The Battle of White Mountain 8 November 1620 Wednesday, Jan 22 2014 

Vauban Tile 500 pixels

Battle of White Mountain 1620 Header

Vauban Tile 500 pixels

The battle of White Mountain 1620 was fought outside Prague in the Kingdom of Bohemia between forces loyal to the Holy Roman Emperor Ferdinand II, and troops of the Catholic League against forces loyal to Frederick V, the King of Bohemia, and Protestant allies, including Hungarians. The battle was a major victory for the Catholics. It was the opening battle in the 30 Years War, a devastating conflict that eventually drew in most of the countries of Europe.  The causes for the start of this war, the Bohemian revolt and the battle that ended it are explored below.

In the sixteenth century, the Habsburg Dynasty ruled much of Europe, and the New World from the Kingdom of Spain, and the Kingdom of Austria, though the office of the Holy Roman Emperor. The Holy Roman Empire in the early seventeenth century was an institution that bound together much of central Europe. It had a Byzantine structure, ruled in name by an Emperor, who was elected by a group of seven electors.

White Mountain 1620 (2)

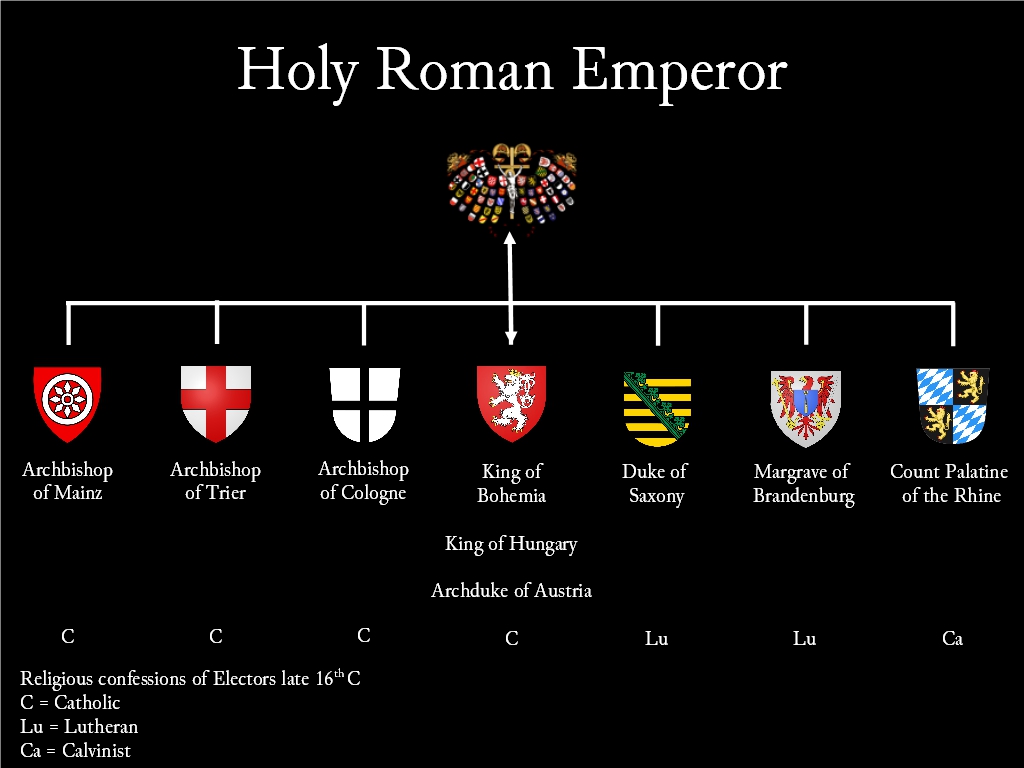
Three of the electors were ecclesiastical, four were secular. In practice, the position was hereditary, with the post going to the chosen Habsburg candidate who was the King of Bohemia, also the King of Hungary and the Archduke of Austria. Given that he was a Catholic, this meant a natural majority of Electors were Catholic.

Beneath this structure were three principle groups; the circle of Electors, the circle of Princes and the circle of free cities within the empire. The empire governed itself in a slow manner, designed to reach accommodation and consensus where it could. One kingdom within this structure, Bohemia claimed a special place, due to it’s geographical position and it’s electoral position. The map below (called Europa Regina) purports to show Bohemia at the heart of European affairs

White Mountain 1620 (0)

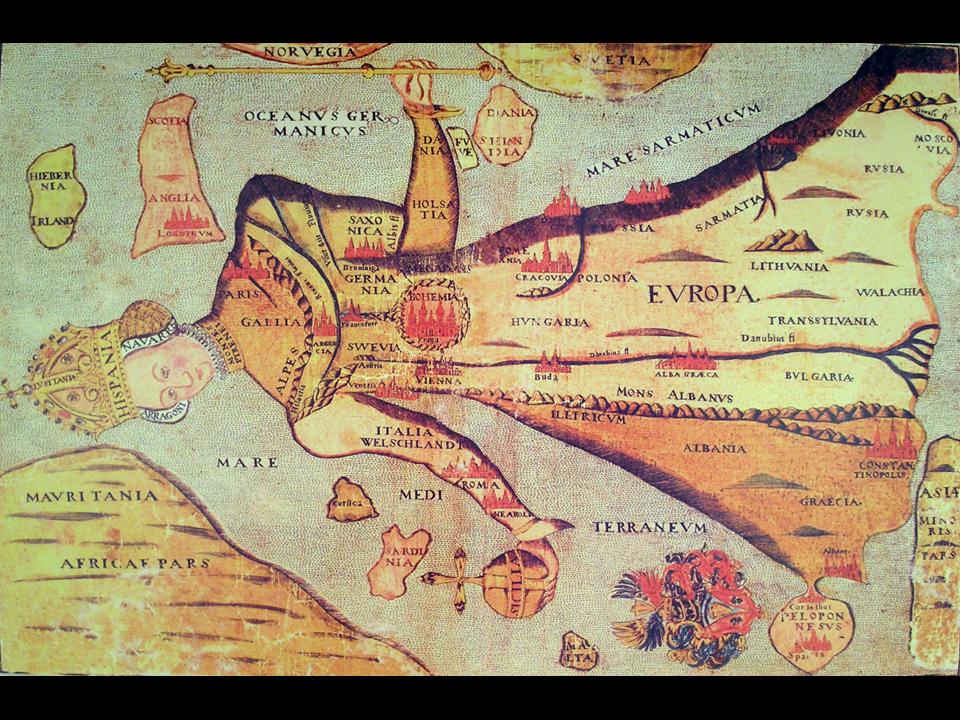
with the head being the kingdom of Spain. Thus the continent, and much of the New World was under the sway of the two great Habsburg powers, related by family. In the age of rule by Dynasty, much depended upon the wisdom of the individual rulers and their councilors.

After the end of the Jagellion dynasty, the crown of Bohemia was made elective by the Estates of the kingdom of Bohemia. In practice the position was seen as hereditary by the chosen Habsburg candidate to become the Holy Roman Emperor from the Austrian branch of the family. Nonetheless, the potential for a dynastic dispute lay within the dilemma of an elected king.

Bohemia under the reign of Holy Roman Emperor Rudolf II (1576-1612)

White Mountain 1620 (1)

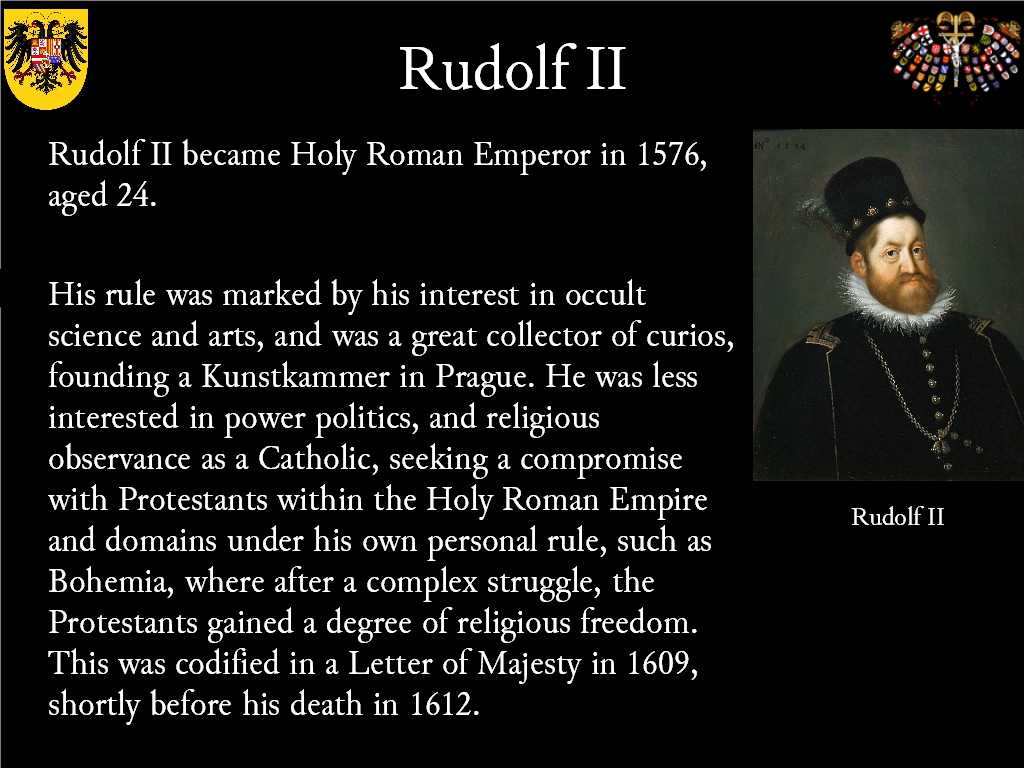
was at the centre of European affairs. The Emperor based his rule in Prague after 1583 and busied himself in establishing his Kunstkammer, a collection of curios.

Bohemiae_Moraviae_et_Silesiae_(Merian)_106                                                   
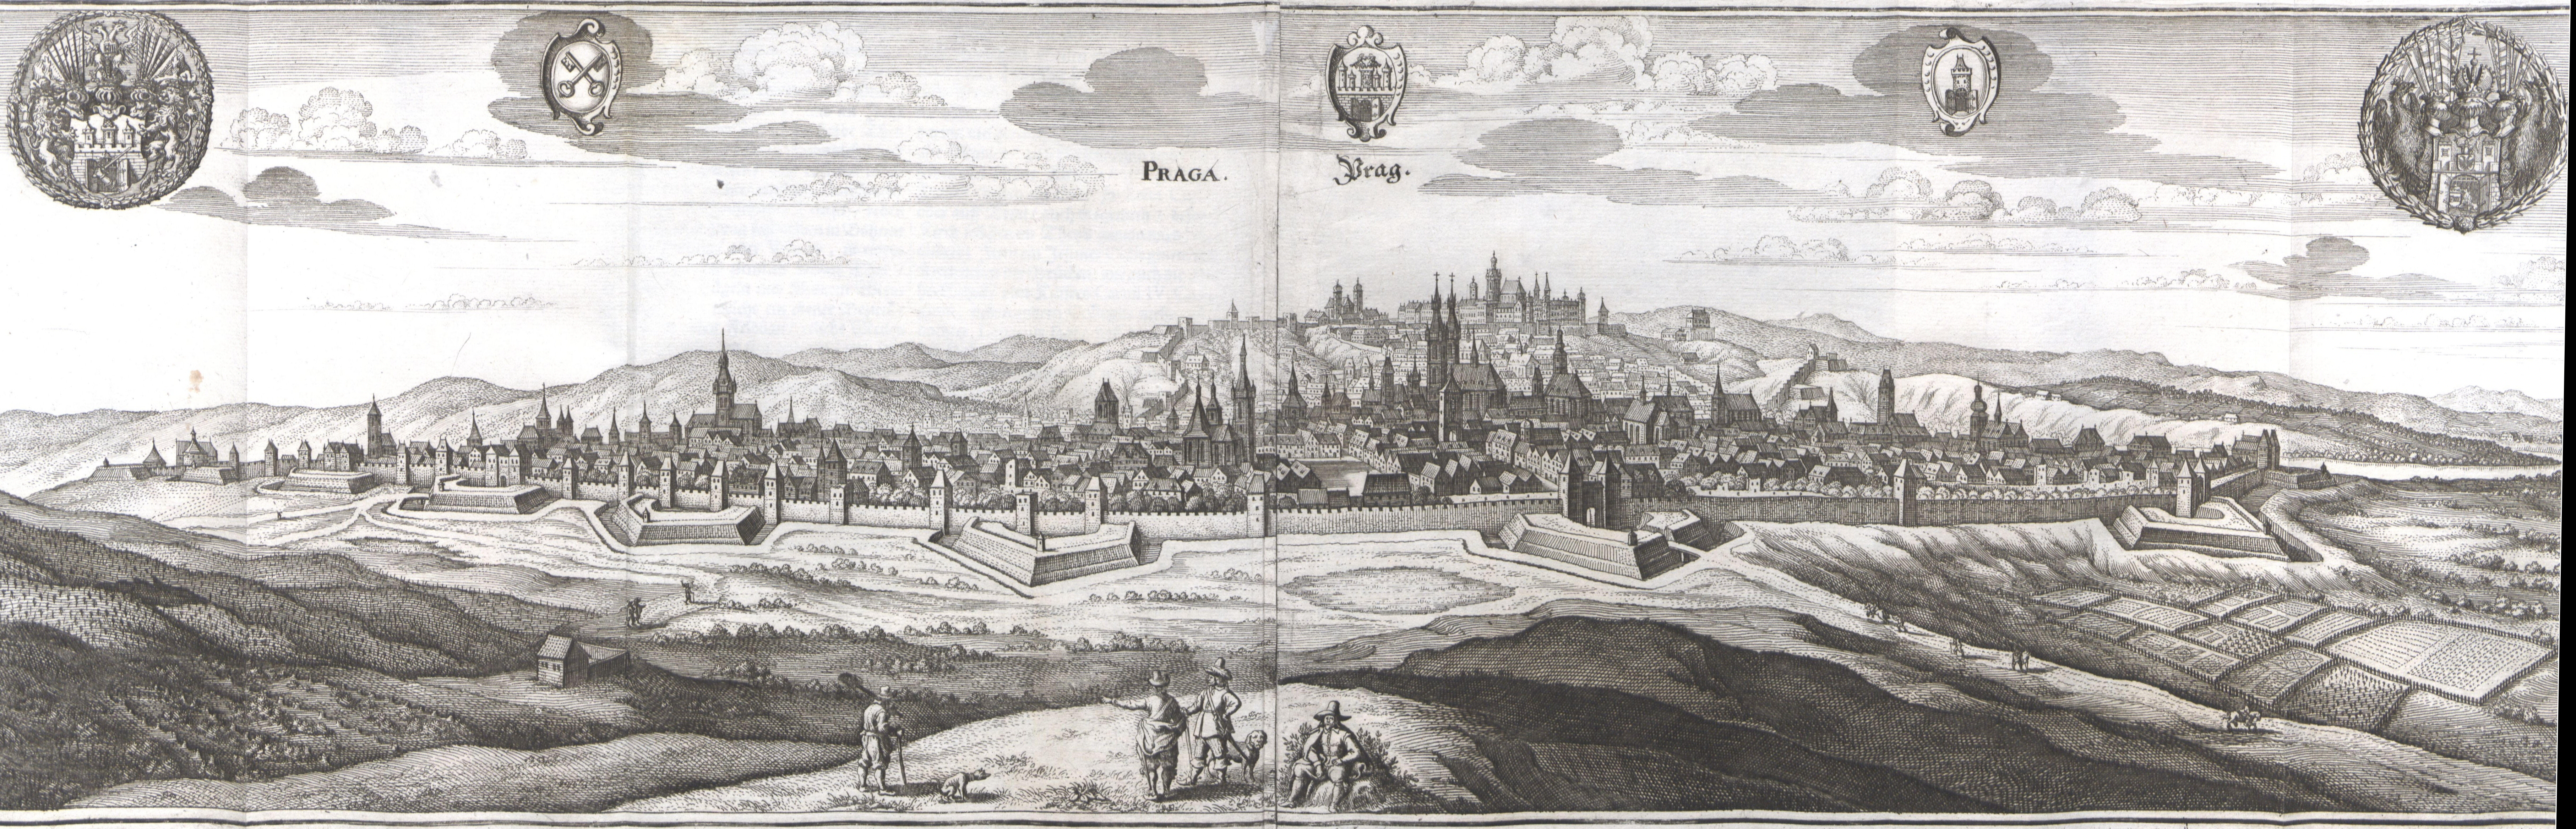
Prague, Topographia Germaniae , Matthäus Merian

By nature scholarly, melancholic, his marriage bought forth no heirs, which promised future instability.

Across the Holy Roman Empire and its patchwork of nationalities, languages and loyalties lay another fundamental choice; religion.

By the reign of Rudolf II, the Protestant reformation and the Catholic counter reformation had come to a weary acceptance of each other. This was firstly confirmed in the Peace of Augsburg 1555, which established certain territories within the holy Roman Empire as being Lutheran, with the majority remaining Catholic, under the principle (Cuius regio, eius religiothat the Prince of a territory chose the religion and all within had to conform, or leave. At the time of this peace treaty, Lutheranism was the only major choice to become a Protestant within the empire.

europe-1618

However Bohemia had a diverse religious settlement stemming from the end of the Hussite revolution in 1436. A separate branch of Catholicism, the Ultraquists were the heirs to this movement, and lived side by side to the Catholics.

White Mountain 1620 (4)

The Fraternity of the Brethren also emerged from the Hussite revolution. They had become reconciled to the Lutheran confession of Ausburg. The Lutherans were the largest section of the Bohemian community. Finally, the Calvinists were the latest Protestant confession to emerge towards the middle and end of the sixteenth century. The Calvinists had an undue representation among the nobility, with only 3% of the population being Calvinist. 15% of the Bohemians were Catholic; the rest one of the Protestant confessions. Thus the kingdom of Bohemia had five churches. It had been originally excluded from the peace of Ausburg, since it was under the personal rule of the Holy Roman Emperor.

Rudolf II and his ruling Habsburg family began a slow process of Catholic renewal, in an attempt to rebuild their faith within the lands they controlled. The most successful of these lay with the cousin of the Emperor, Archduke Ferdinand of Styria.

War with the Ottoman Empire began in 1593, lasting until 1606.

Battle_of_Mezokeresztes_1596                                                   
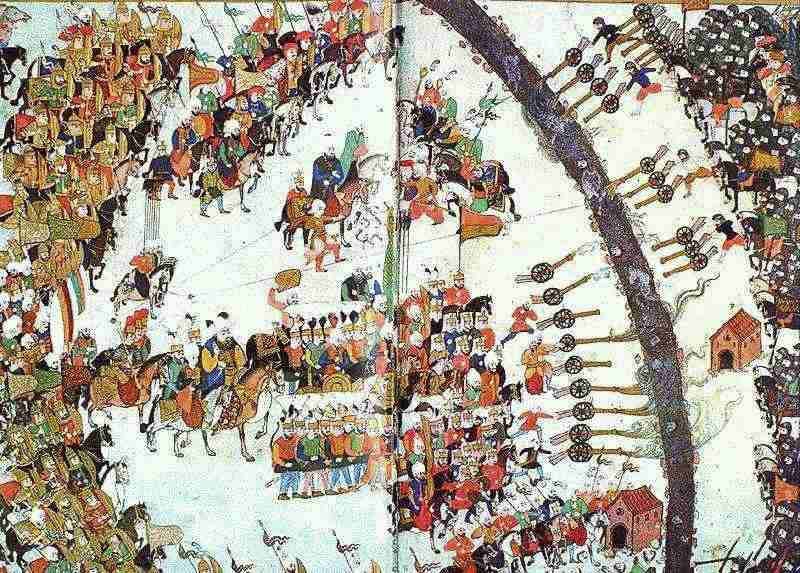
Battle of Mezokeresztes, 1596

During this inconclusive border war which encompassed Hungary Wallachia and Transylvania, a successful revolt by the Calvinist Stephen Bocskai guaranteed religious freedom for Hungary and Transylvania in the peace of Vienna 1606. Thus the Protestants had forestalled Catholic renewal in these lands. In turn, this precipitated a crisis of confidence in the rule of Rudolf II, bringing the question of his succession, and his ability to rule to the forefront.

In 1607, events began to quicken in pace. The Emperor’s younger brother Matthias managed to exploit a Hungarian rebellion and consolidate a power base there, in exchange with concessions to the Hungarian Protestants. He encouraged Bohemia to follow suit, with the aim of restoring stability within the Empire.

In exchange for continued support, the Bohemian protestants extracted concessions from Rudolf II, in the form of a Letter of Majesty, signed in 1609. This granted tolerance for all religions in Bohemia, and acceptance of the various Protestants. Given the majority of the ruling classes in Bohemia were Protestant, the Catholics were now firmly in decline.

In the broader Empire, tensions between the two religious confessions rose, with the formation of a Protestant Evangelical Union, formed in 1608 around the Palatine with other regions, including Württenburg and Brandenburg. In response, the Catholic league was formed in 1609, led by Maximillian I, Duke of Bavaria. At this point, both were defensive, and stood for their own interests. Tensions rose between the two camps over the Jülich-Cleves inheritance, but the quarrel did not escalate into a large war.

In 1612, Rudolf II died, and the Holy Roman Empire passed to his younger brother, Matthias .

White Mountain 1620 (3)

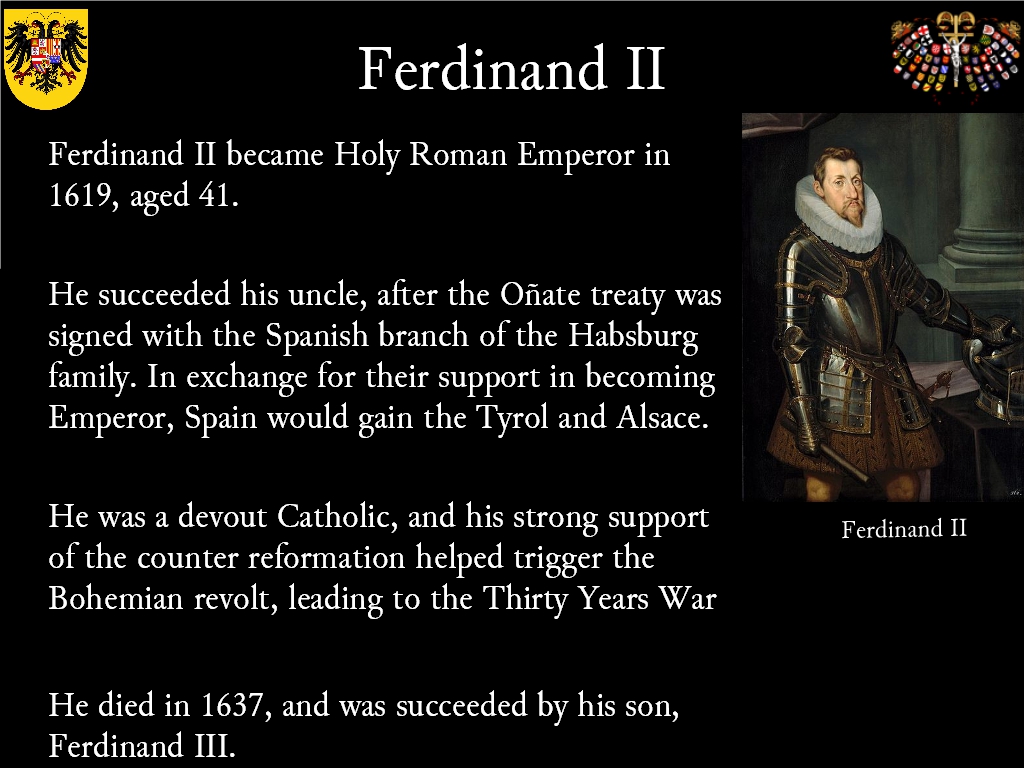
Matthias had no successor, thus the problem of stable inheritance still existed for the Habsburgs. He reconfirmed the privileges won by the Bohemian Protestants in the Letter of Majesty, 1609. In practical terms, the strongest Austrian Habsburg candidate to succeed Matthias was his cousin, Ferdinand, Archduke of Styria. A secret treaty was made between Ferdinand and the Spanish ambassador to the Imperial court, Oñate, leading to a treaty that bore his name. Spain would support Ferdinand’s claim, in exchange for  Alsace and the Tyrol, so allowing the movement of Spanish troops on the ‘Spanish Road’. This allowed rapid movements of troops from the Italian territories under Spanish control to the north, into the Spanish Netherlands (Belgium).

Ferdinand of Styria was raised by Jesuits and was a staunch Catholic. Personally devout, he made no secret of his wish that he would rather rule over a desert than over a land full of heretics, and forcefully began the process of re-Catholicisation in his own lands in the late 1590’s. He managed by force to reconvert this territory, earning the sobriquet Ketzen-hammer (hammer of heretics) in the town of Brenner. He was as much guided by faith as reason in this risky policy, which paid off for him.

Despite the Oñate Treay, the path to the Imperial throne for Ferdinand wasn’t guaranteed, for he needed to become king of Bohemia and become an Elector of the Holy Roman Empire this crown gave him. The electoral nature of the King of Bohemia was disputed, with the Habsburgs assuming this was a mere formality, but the nobles of the Bohemian estates wishing to exert their authority.

An illness befell Matthias in 1617, impelling the necessity for the election. The Grand Chancellor of Bohemia, Lobkowicz, summoned the Bohemian Diet in June 1617. Matthias addressed the Diet, calling for the assembly to back Ferdinand’s accession to the crown of Bohemia. The next day a vote was taken. The magnates confirmed Ferdinand in a public vote, with the exception of one, Count von Thurn. One by one the remaining nobles, and knights followed the majority will and confirmed Ferdinand as the King of Bohemia. He was crowned on 19th June 1617, and despite his inner qualms, confirmed the Letter of Majesty.

Emboldened by the apparent ease with which Ferdinand had succeeded, Lobkowicz began a process of re-Catholicization. Firstly, areas of Prague were no longer allowed to administer themselves, but were forced to accept royal magistrates. Then Count von Thurn was forced to accept a less lucrative position within Bohemia. The Protestants found that their literature was subject to censorship by the royal Chancellery, Taken in all, this appeared to be a direct attack on the rights in the Letter of Majesty, confirmed by Ferdinand. Consequently, discontent grew in the ranks of the Protestant nobles.

At the end of 1617, Matthias left Prague for Vienna to aid the election of Ferdinand to the throne of Hungary. taking Lobkowicz with him. Royal power now resided in a circle of regents, who managed Bohemia in the King’s absence. Further infringements on the privileges granted in the Letter of Majesty forced the Protestant magnates to call an assembly in early May 1618 to discuss their grievances. A letter was forwarded to the King, with a view to hearing his reply at another meeting on 21st May. The reply, drafted by Lobkowicz stated that the Protestant assembly had overstepped their authority, and was forbidden to meet again. This was badly received by the members of the Protestant assembly, who suspected that the letter was not genuine, and had been written by the circle of regents in Prague. The meeting on the 21st received another letter, instructing the assembly to dissolve. After a day’s furious debate by the assembly, a meeting of the electors, including Count von Thun

White Mountain 1620 (5)

decided that open revolt was the best course of action, and the salvation of their faith would be put to public test.

The following day, the 23rd May, saw a group of the Protestant electors marched to the royal castle, the Hradčany, their to confront the royal regents. Lobkowicz, Martinitz, Slavata and their secretary, Fabritius, with a charge of high treason. After heated debate, the accusations settled on Martinitz, Slavata and Fabritius, who were thrown from the window in the defenestration of Prague.

White Mountain 1620 (9)

Despite falling some 20m, all three men survived, after falling onto a pile of dung.

White Mountain 1620 (9)

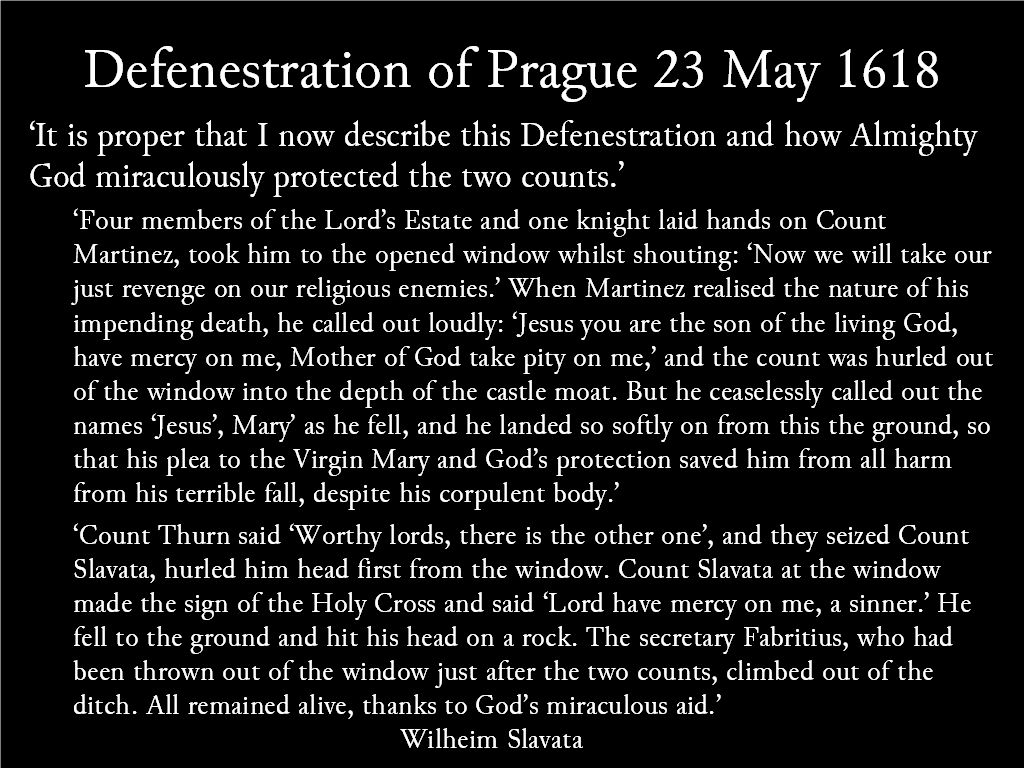
Thus the defenestration of Prague made revolt, and an open breach with the King of Bohemia and the Emperor certain.

White Mountain 1620 - 16

The war began slowly, with neither side militarily prepared for the ensuing conflict.  The Imperialists appealed to the wider empire for help, with Saxony acting to seal its borders with Bohemia, despite being a protestant state. The Evangelical Union was slow to respond to help the Bohemians. Thus despite a religious element to the rebellion, the wider Protestant community were reluctant to join in the fray.

Left to their own resources, small Imperialist (under the command of Bucquoy), and Bohemian (under the command of von Thun) armies began to confront each other in Moravia, between Bohemia and Upper Austria. By September, 1618, the rebel Bohemians had more men in the field, having been reinforced by Count Mansfield and 2,000 Swiss mercenaries, and another 3,000 Silesians. The Imperialists fell back to Budweis, and Krems. The offensive broke down during the winter, with both sides going into quarters.

During March 1619, Emperor Matthias died, and the Bohemian revolt had new implications. No longer were the rebels fighting the King of Bohemia, for Ferdinand was now Emperor elect.

With the die cast, the Bohemians renewed the offensive in April, invading Movaria with 9,000 men, to reach Znaim, the seat of the Moravian Estates. Caught off guard, the Imperialists could do little to stem this attack. Buoyed up by success, von Thun pressed on to try to take Vienna, reaching the outskirts by June 1619. Reinforcements reached Ferdinand, and soon 5,000 men were prepared to defend the city. von Thun’s army was not strong enough to besiege the city, let alone storm it, and he retreated northwards by mid June, lifting the immediate threat to Ferdinand. At the same time the Protestants under Count Mansfield and 3,000 men were caught by 5,000 Imperialist under the command of Bucquoy, and defeated at the battle of Netolitz. Most of the Protestant men were cut down , or captured, with Count Mansfield escaping. The Bohemian advance into lower Austria had failed.

By mid July, the military position for Ferdinand has settle sufficiently for him to call the Imperial Electors together, and he duly became Emperor in August, with a complete majority voting for him, including the Calvinist Palatine.

White Mountain 1620 (7)

Now, as Ferdinand II, he could command loyalty across the Holy Roman Empire.

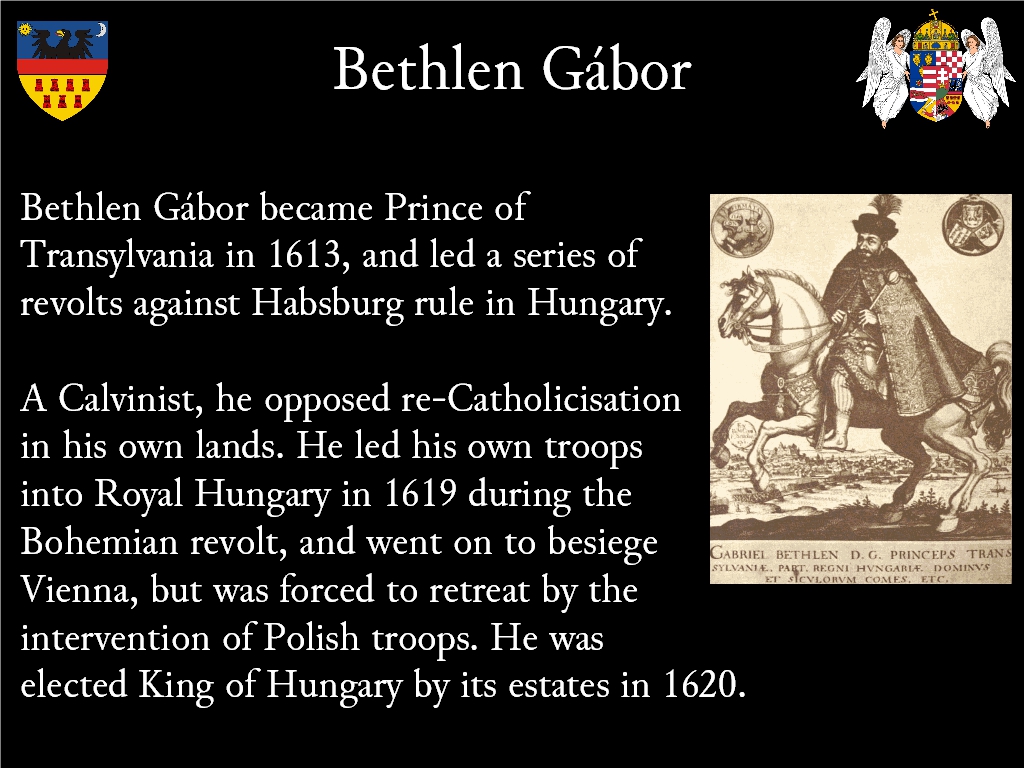
The Bohemians did not seek reconciliation at this point, but sought to distance themselves even more, by reaffirming the Letter of Majesty, and that the Bohemian monarchy was elective, and including the whole of the kingdom (Bohemia, Moravia, Silesia and Lusatia) in the process. The elective crown was then offered to Johann Georg, Duke of Saxony, who rejected it, and then to Bethlen Gabor of Hungary. Bethlen was too involved in unrest in Hungary to accept. Finally after election by the Bohemian Estates in August, the crown was offered to the Calvinist Imperial Elector, Frederick V of the Palatinate.

White Mountain 1620 - 14

Frederick received a letter from the Bohemians announcing his election, married to Princess Elisabeth, daughter of James I of England, he sought advice from his Father in law. The English Ambassador expressed his belief that “the Count Palatine hath a disposition to accept of that crown.”  Frederick V accepted the offer in October, and moved to Prague. In December, his wife gave birth to a son, Prince Rupert.

Ferdinand II had complications of his own. He had inherited a huge debt from Matthias II, which restricted his own military capabilities, having no standing army to count on.

Frederick V, as head of the Evangelical Union, hoped for direct assistance from the princes in the Union. He could also reasonably hope for help from his father in law, King James I. But no help was forthcoming from either quarter, despite pleas from his wife.

White Mountain 1620 - 15

Moreover, even the troops he had in the Palatinate would have to defend this territory in any larger conflict that might ensue. Thus external help, in terms of allies with troops or money, could tip the balance in this conflict.

The Bohemian estates, looking to their own resources could field a small army in March 1620. Their hopes lay with Bethlen Gábor, who continued the struggle against the Habsburgs.

White Mountain 1620 - 13

Polish mercenary (Lisowczycy) intervention on the side of the Imperialists tied down this second rebellion, with only a limited number of Hungarian troops being available to the Bohemians.

Spain offered troops to Ferdinand II once he became Emperor, but the real advance for the Imperialist cause came with the resurrection of the Catholic League in October 1619, under the direction of Maxillian, Duke of Bavaria. In exchange for territorial concessions in the Palatinate after the expulsion of Frederick V, and all expenses incurred to be paid to Bavaria, a Catholic army was raised, under the field command by Count Tilly. Thus another level of dynastic ambition lay in the quarrel, between cousins Maximilian and Frederick.

The final piece of the military jigsaw came with French led diplomacy in July 1620 between the Evangelical Union and the Catholic League. Neither side wished to start a wider war in Germany, guaranteeing the territorial status quo, but allowing either side to engage in Bohemia. Even the Lutheran Elector of Saxony, Johann Georg, failed to support the Bohemian rebels. He preferred instead to police the borders of Saxony and frustrate Bohemian attempts to gain more support for their army. Thus the quarrel, for now, would be settled in Bohemia, with no hint of the wider conflict that was to come.

Five separate armies began the Imperialist counteroffensive. A small army of 5,000 was left to defend Vienna against Bethlen Gábor, whilst a larger force of 21,000 under Bucquoy moved against Prince Anhalt in Lower Austria. Meanwhile three other armies from the Catholic League pressed the Palatinate. The revolt in Lower Austria collapsed, and Prince Anhalt’s army withdrew to Moravia.

Military discipline was likely to be poor from armies that contained significant numbers of mercenaries, and were subject to infrequent pay. The Catholic League’s army in Lower Austria acted with little discipline, ransacking both Protestants and Catholics alike. Likewise irregular Hungarian cavalry behaved so poorly that Ferdinand was reported to say

‘Indeed, the enemy has behaved so terribly everywhere that one can almost not remember whether such tyranny was ever heard of from the Turks.’

Religious hatred was also part of the fierce response from the troops, as the priests in the Catholic League’s army, led by the Pope’s special representative Father Dominic de Jesus-Maria continued their preaching against the heretics.

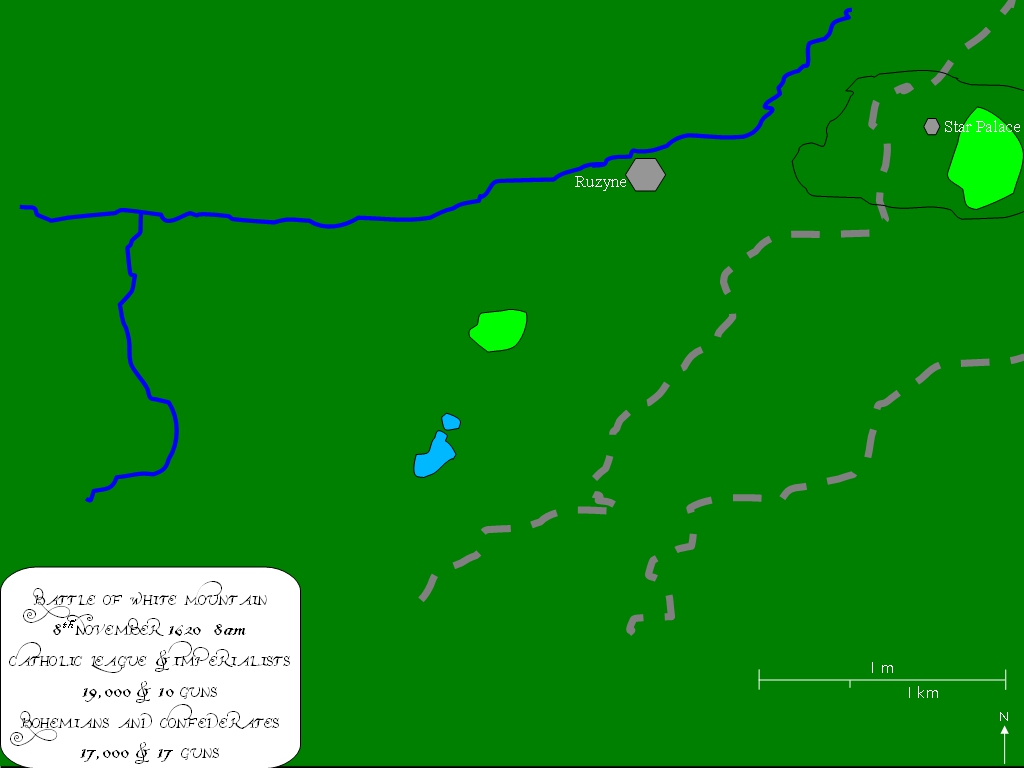
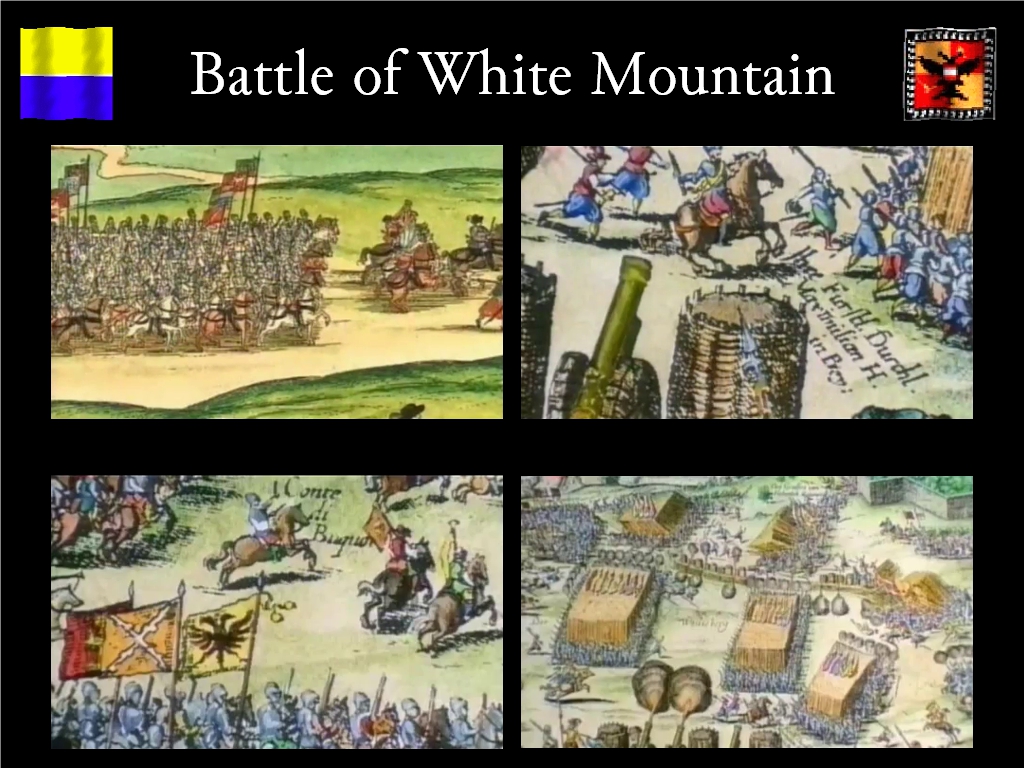
The Imperial – Catholic League army joined near Budweis, and began to move towards Prague by way of Pilsen. The Bohemian force retired back to shadow them. The Imperialists decided to force a battle before the onset of winter, and marched on Prague.

Frederick V joined his army, suffering a mutiny over pay, and lifted morale enough to keep them in the field. They forced marched their army back, overtaking the Imperialists, to reach the White Mountain before Prague on 8th November, 1620.

The narrative of the battle was recorded in a letter from the Bohemian commander, Christian of Anhalt to Frederick V.

As it was your Majesty’s order for me to relate the events of the battle of Prague, it is my duty to obey you promptly and to present briefly what I could observe and recognise.

I remember that on Thursday, 5 November, the enemy had started to break camp before ours, which we noticed at 1 or 2 in the afternoon. Your Majesty gathered the main commanders together and asked me what to do. I gave my advice, to wit is that we should head towards Prague as it was our intention, and no doubt also that of the enemy. Upon this, the elder Count Thun interrupted and said he would bet the enemy had no intention of entering Prague as it was completely impossible, and that instead we should come to the aid of the surrounding villages in order to prevent the enemy from conquering them so forcing Prague to surrender. When evening came, however, we clearly understood what the enemy’s intentions were. Then our deliberations shifted how best to prevent the enemy from advancing. We decided that the aforementioned Count Thun, as guardian of the Crown, would march through the night towards Prague with his son’s infantry regiment, and that your Majesty would follow the next morning with the army. Both these decisions were implemented despite the road being long and arduous and not made practicable. We did so well that we arrived at the place two leagues from Prague half a day before the enemy; it was a village called Anhost. It was Saturday, 7 November and your Majesty arrived around midday.

I gave orders to secure billets for the army, and you decided to make a short trip to Prague. Just after you departed, the enemy started to appear and skirmish and that we heard that all the enemy armies had rejoined each other and were making their swift way straight towards Prague. They were surprised to see we had arrived before them. Upon this, I immediately sent 500 musketeers to keep the passage open, which, if the enemy had known about, would have made our arrival difficult.

So it was that at 8p.m., I started the whole army on the night march, and at 1a.m. we arrived at the so-called White Mountain in front of the city of Prague. I set up camp to rest until daybreak. The Hungarians were alarmed by the din made by some of the Cossacks who had pursued them part of the way. Some of our own infantry regiments also seen perturbed and I wasn’t used to that, so I talked to them but it filled me with dread.

White Mountain 1620 - 41

There was fog at dawn on 8 November. When it was gone, we chose the battlefield between the so-called park of the Star Palace and the slope on the other side, so that we had the advantage of the high ground: the park was on the right hand side and the slope on the left, so that the enemy could only attack us from the front.

White Mountain 1620 (31)

The field having been chosen, the Count Hollach as lieutenant and general chief of staff, ordered the troops to form the order of battle according to the sketch that I enclose .

White Mountain 1620 (29)

The enemy had noticed, (a bit late) that we had started to move; as soon as they heard us they followed us and the vanguard arrived at around 9a.m. I had called Count Thun to ask his advice as he knew this place very well. He confirmed that it was the best place, and called his son’s regiment back from Prague. Meanwhile, Count Hollach had ordered the infantry regiments to guard the park at various points, to wit that of the Count of Weimar, of my son and the company of guards of your Majesty. He ordered the cannon of the Duke of Bavaria to be entrenched, but the spades that I had brought to the camp at my expense had been damaged so much at Rackonitz, that we only had 400 usable ones left. This meant we can to fetch some from Prague, but it took so long that our entrenchment was hindered and remained far from perfect. The Count Thun decided that the two cannon would be taken to the left flank which damaged the enemy greatly but said pieces were positioned too far away. The Hungarians, that is Colonel Cornis and 300 men, were posted on the right flank. The remaining Hungarians stayed at rearguard, because they wanted to be away from the cannon. They were under orders to advance through the gaps when the battle started and to strike the enemy in the flank. I ordered particularly that 1500 Hungarians had to remain on the left flank, as marked on the plan and I dispatched this order three times to the commander.
The Count Hollach had ordered them similarly and the Count Thun took the above named Colonel Cornis to the very place and showed him personally how they were outside the range to cannon and with which advantage they could do a signal service, but nobody came there. The enemy came through a village of the foot of the mountain where the path was bad but wide enough to allow the passage of formed troops on the right flank. But they would have been seen by us, which they wanted to avoid. So, they moved as I described before.

White Mountain 1620 (32)

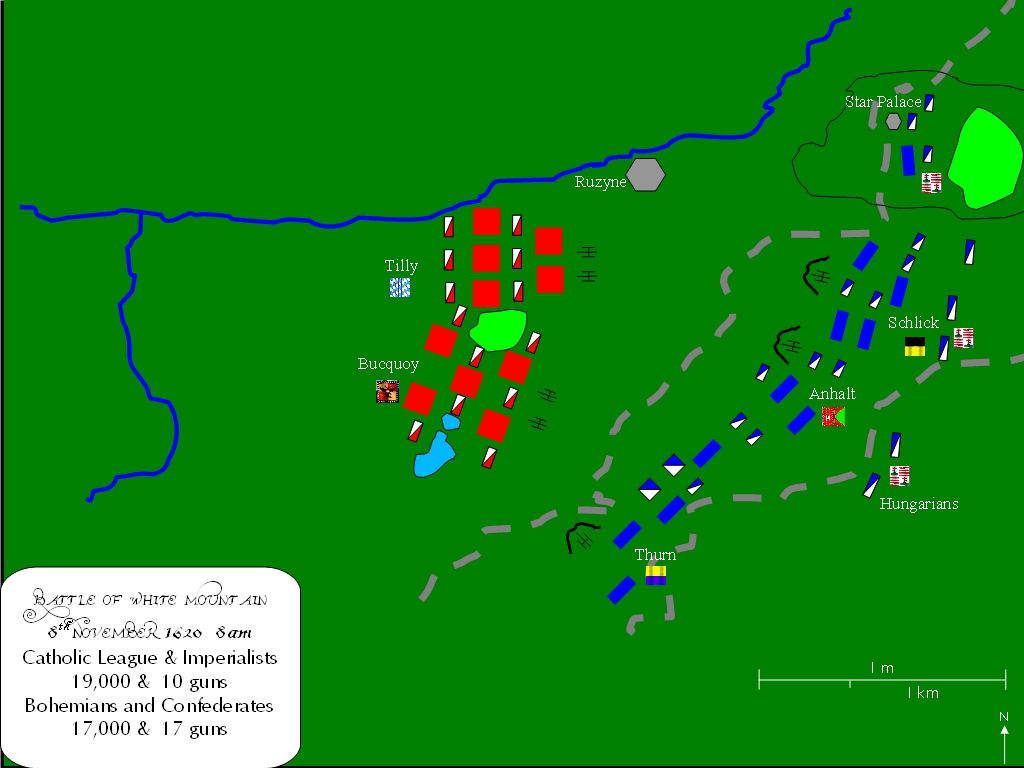
The enemy formed the order of battle at the foot of (and partially behind) the mountain, practically the same forms as us, as they mixed infantry and cavalry regiment left very little space on the front. We could see most ground where our cannon were positioned on the left flank. We damaged them so much that they were obliged to their front back towards their left hand flank.

White Mountain 1620 (33)

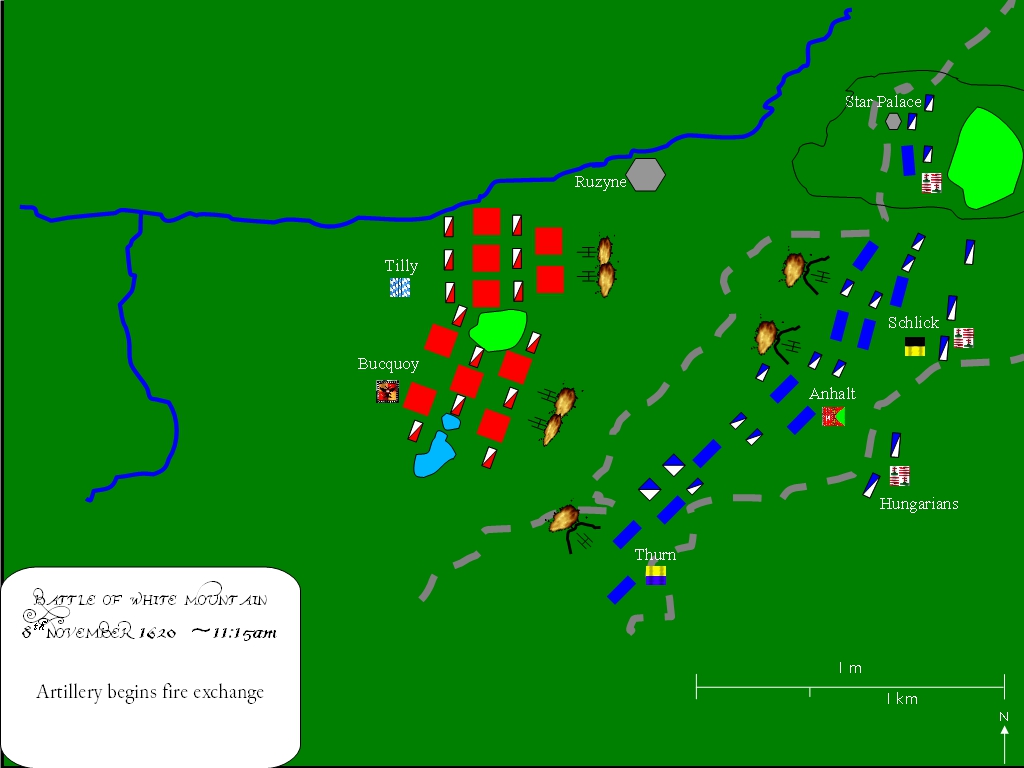
When I saw them moving, I thought they were going to try something more and, finding the Count Hollach of the same opinion, I immediately informed the troops by the two adjutants to the chief of staff and other first officers.

White Mountain 1620 (34)

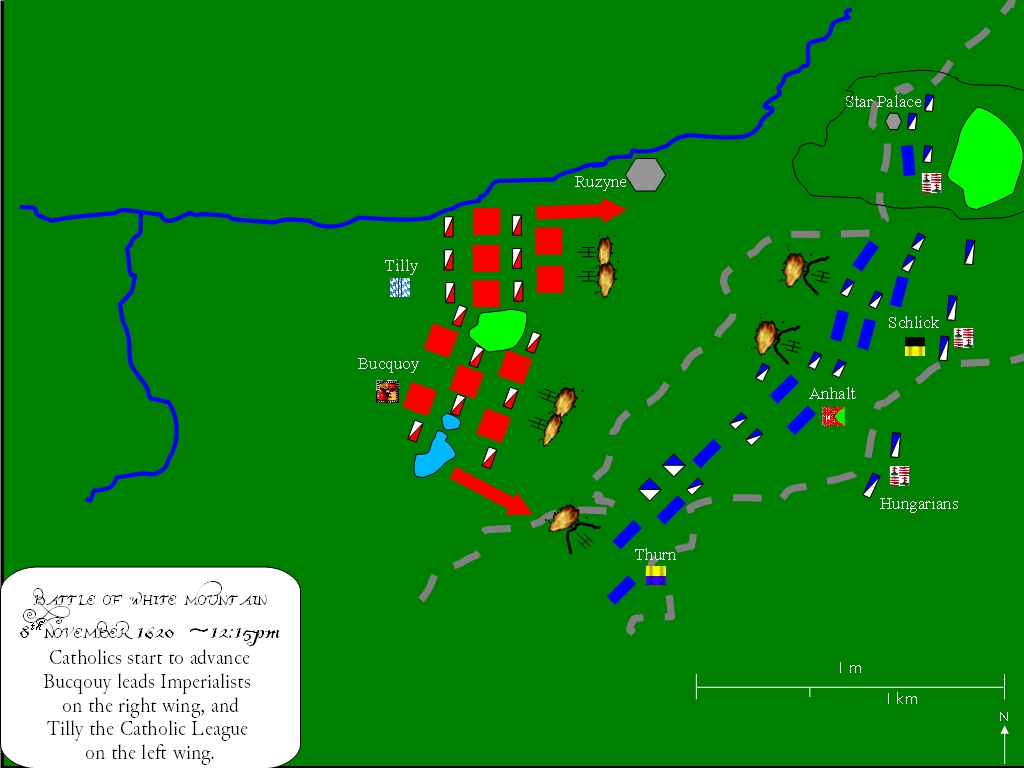
In the end I saw that the enemy’s vanguard was safely climbing the aforementioned mountain. I was near the two cannon on the left flank, and from there I galloped at the head of Count Hollach’s cavalry where my war horses were, and in no time I could see a large troop of cavalry accompanied by two infantry battalions coming straight at us. This gave me hope as the enemy coming so fast had to have lost order and was going to find us standing firm, in good order, our chiefs in agreement and ready to fight them. Our cannon were flanking their army, we had already dislodged theirs and, although they outnumbered us, they couldn’t see this because of the narrowness of the passage. Moreover, I was well aware that the Count Bucquoy, who was experienced and wise captain, would never advise to start a battle under such circumstances. This made me quite sure I was able to hope for certain victory.

White Mountain 1620 - 43

But God, who in his divine wisdom weighs human events, demonstrated his anger at our lack of piety and the offences of which we are all guilty. It must be God who withdrew bravery from our soldier’s hearts, because otherwise it was impossible to believe that such a sudden effeminate terror would sieze so many men as I had seen performing duties so well before. As soon as the enemy arrived at about 300 or 400 paces from Count Thun’s infantry, our soldiers started to shoot without order or sense and, even against expressed orders, shot in the air and immediately started to flee, seemingly in the grip of fear. I then told my cousin Count Solms, your court chamberlain (who was that day honouring me with his presence) that although this didn’t begin auspiciously, I was still hoping for a positive outcome.

White Mountain 1620 (35)

At the same moment, and being only just armed, I saw before me my cavalry, which had been levied by Lieutenant Colonel Streiff, with some caracolling and others galloping away. So, I ran towards them and stopped them with my sword to make them returned to the charge. The captains obeyed me, but most of them didn’t really persevere.

Count Hollach arranged his troops so that the ones on the left flank should charge and he told them what to do. The troops of counts Solms and Bubna were engaged with the enemy but with little strength or resistance, so that I could see everything of the vanguard on my left, including the three companies of the estates of Bohemia and the one coming after. Everyone was fleeing, some with the infantry which was running the fastest. My son charged with his cavalry, fought and pushed the enemy back to where they had their cannon.

White Mountain 1620 (36)

There, he was wounded twice, as was his brave lieutenant-colonel. My son was then taken prisoner. Count Styrum with Mansfield’s troops charged on the enemy’s musketeers on the side of the park and afterwards he attacked the cavalry. He did his duty with bravery and gained a good reputation. Colonel Stubenvoll also led two or three good charges.

White Mountain 1620 - 45

I led the Austrian cavalry charge and they did well. Lieutenant-Colonel Baron Hofkirchen stayed put. But the latter also performed the bad caracole. It was then that I also ordered the major of the Silesians to attack as well, which did well with the aid of his troops, but the resistance was too great. The enemy, however, was stopped and pushed back, so that some of their troops galloped away to regroup.

White Mountain 1620 (37)

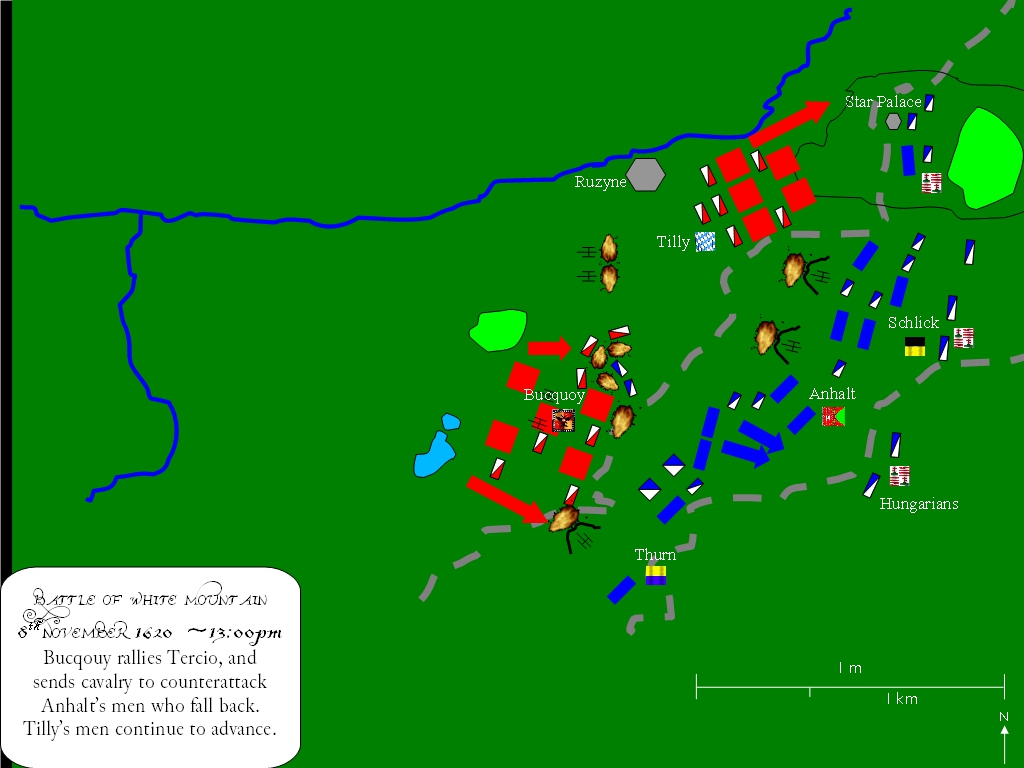
Two enemy infantry battalions fired a great salvo which killed the horse of my chamberlain. One of my gentlemen, Keydel, was also wounded at my side. Those two battalions decided to withdraw too. Our artillery did well and greatly damaged the enemy, which left them perplexed. The regiment of Moravia commanded by Colonel Schlick, as well as the five infantry companies of Lieutenant-Colonel Pechmann showed bravery and remained until the last. As I could see no cavalry coming to our help, and as I had only 16 horsemen near me, and as the enemy was returning with many troops (both cavalry in infantry) I didn’t dare to remain, but withdraw towards the main road that goes towards Prague. I went slowly, hoping that I would find some of our troops waiting, but this was in vain.

White Mountain 1620 (38)

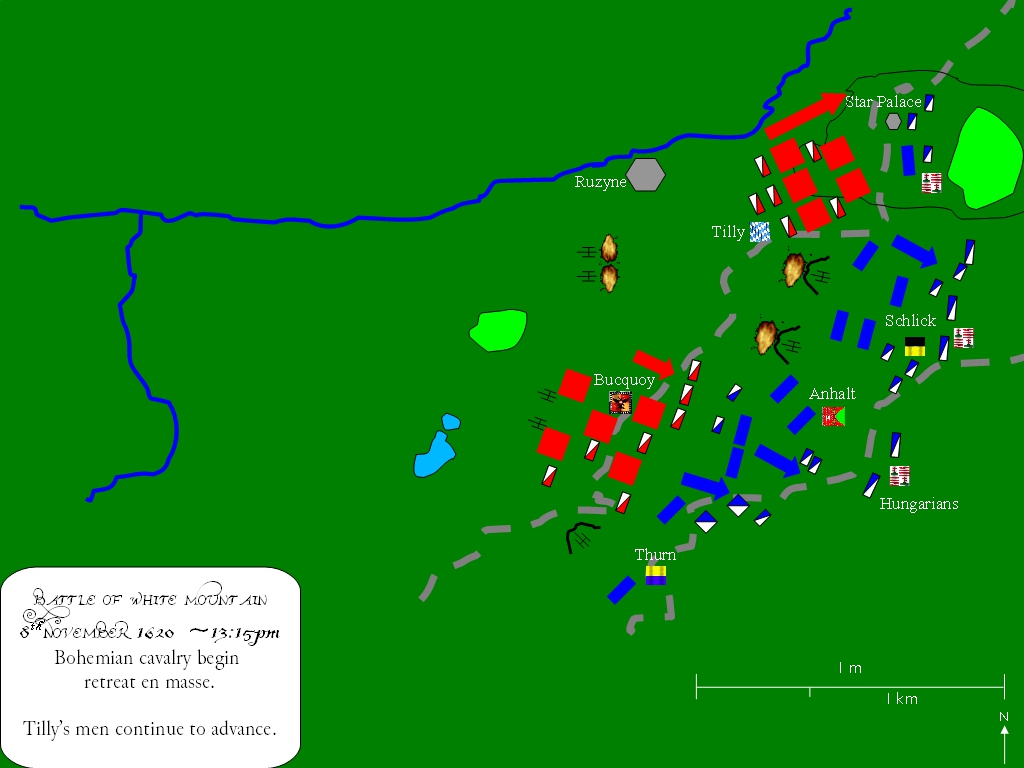
When the elder Duke of Weimar went to stop the Hungarians, he found Colonel Cornis accompanied by the very few of his Carey is asked to stand firm he answered ‘the Germans are fleeing’; the Duke and answered ‘they are Germans in the evening, but by morning there will be the same as the Hungarians’; but Cornis although he had turned a little did not want to understand the Latin phrase. Then, the aforesaid Duke came upon another officer who was fleeing and shouted to him that if he didn’t turn back he would shoot him through the head. When he turned, the Duke realised it was one of the colonels who didn’t stop his flight continued fleeing the enemy.

White Mountain 1620 (39)

So, I can confirm that when I withdrew, of all our Hungarians, only a hundred were left of the ten thousand, such was the diligence they showed. It was now impossible to stop the troops.

White Mountain 1620 (40)

I reached the New Gate where I found Your Majesty together with the routing infantry who had fled before and had already climbed the ramparts. I could only recover six of them who agreed to defend the city walls. The fear was overwhelming in all ran through the Little Side (i.e. the western part of Prague) towards the Old and New Town. Some of them were swimming, especially the Hungarians, some of whom were drowned.

Some of our worst mistakes was that most of our cavalry would not engage properly. The proper way, which I often explained to them, was to reject the bad habit of caracolling when facing the enemy. Those who listened my advice, although defeated, covered themselves in glory, the others in blame. I want to stress this point strongly here, so that this custom of charging without properly engaging is avoided like the plague.

White Mountain 1620 - 46

Your Majesty will understand from this account the real reasons for our defeat, and will also understand the defeat was caused not by the enemy’s valour, but by their good fortune and the divine help they received. Surely, God wanted to punish us for our sins, mostly because of the awful treatment and bad pay bestowed upon our soldiers; seeing that the estates of Bohemia wanted their ruin and disbandment, those soldiers were reduced extreme despair and bad behaviour, such that no chief or officer could order them to fight anymore. For me to start of proper explanation of those of those matters, the aforesaid imperfections (and why I wanted to separate from the aforesaid estates and provinces), I would need reams of paper to do them justice. Your Majesty knew about this, even if you couldn’t remedy the matter in any way possible to you. However, for this generation of people, all was in vain as the unhappy outcome proved.

Since the Hungarians were useless that day, and 1,800 killed in the game parks, though no more than 500 cavalry and around 8000 infantry along with six large guns at the battle. If only our men held their grounds, we would have been strong enough with God’s help, thanks to thanks to the advantages we had.

Christian of Anhalt, Letter to Frederick V, after the Battle of White Mountain.

White Mountain 1620 - 40

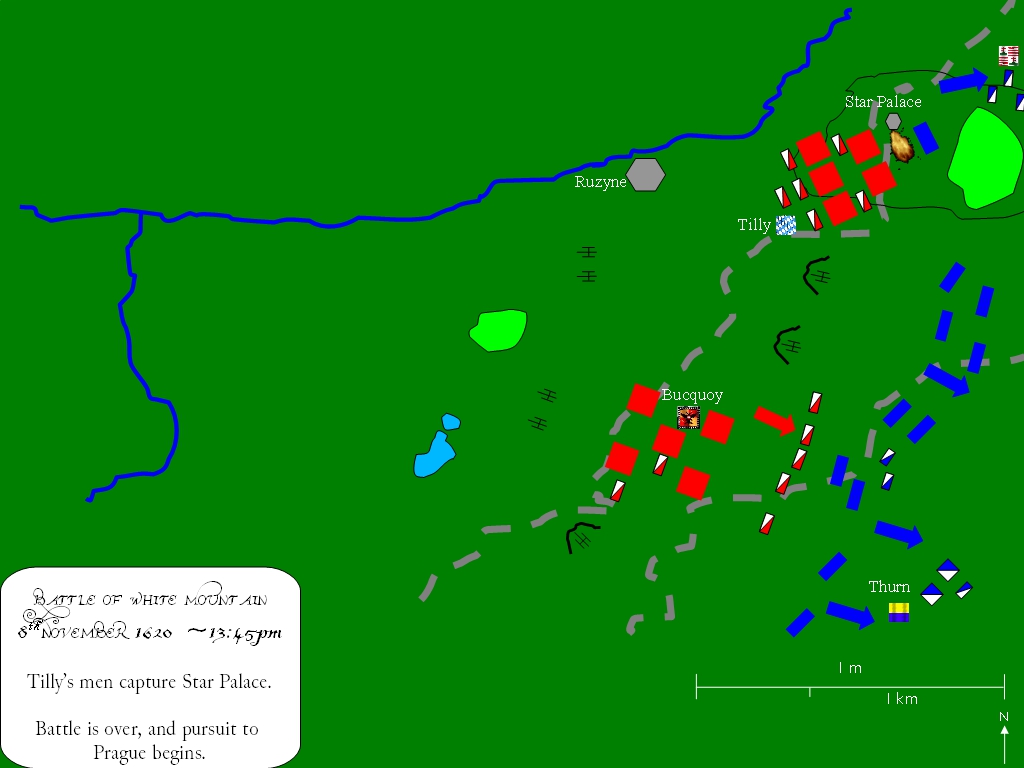
The collapse of the Bohemian army led swiftly to the collapse of the rebellion

The Bohemian rebels suffered the full weight of Ferdinand II wrath.

White Mountain 1620 - 44

White Mountain 1620 - 47

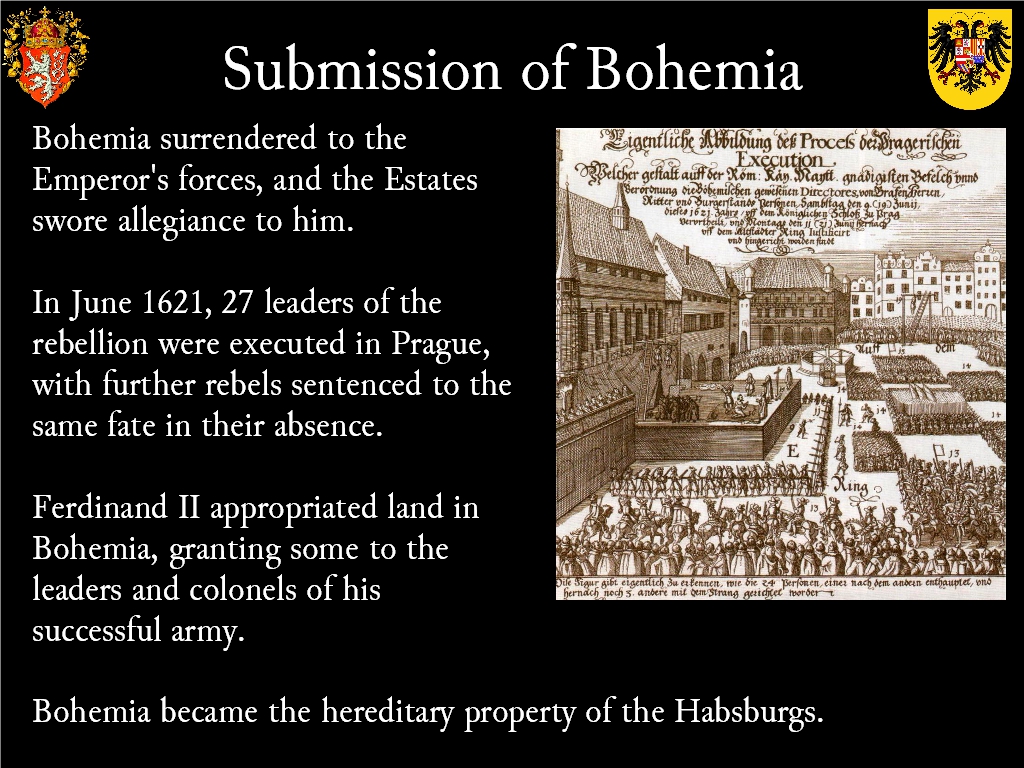
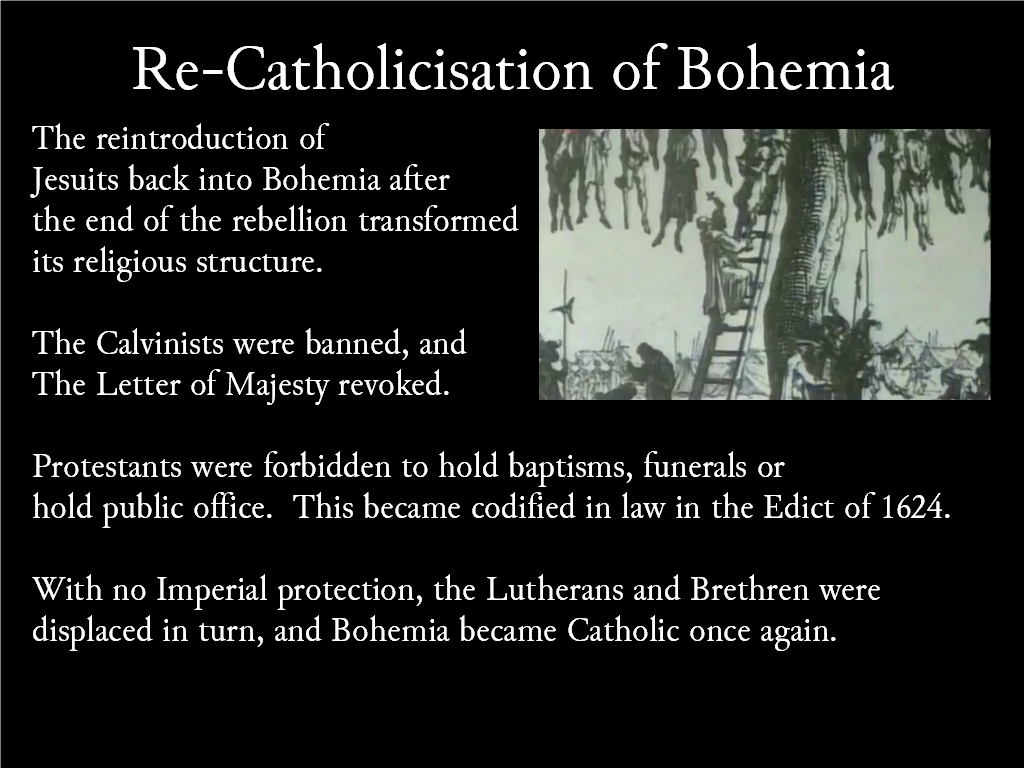
The end of the reign of Frederick V, swiftly led to his banishment within the Holy Roman Empire, and the confiscation of the Palatinate, with the electoral title conferred on Maximillian I, Duke of Bavaria. This act alone ensured the broadening of the conflict into what became the Thirty Year Wars, as re-Catholicisation loomed over Protestant Germany.

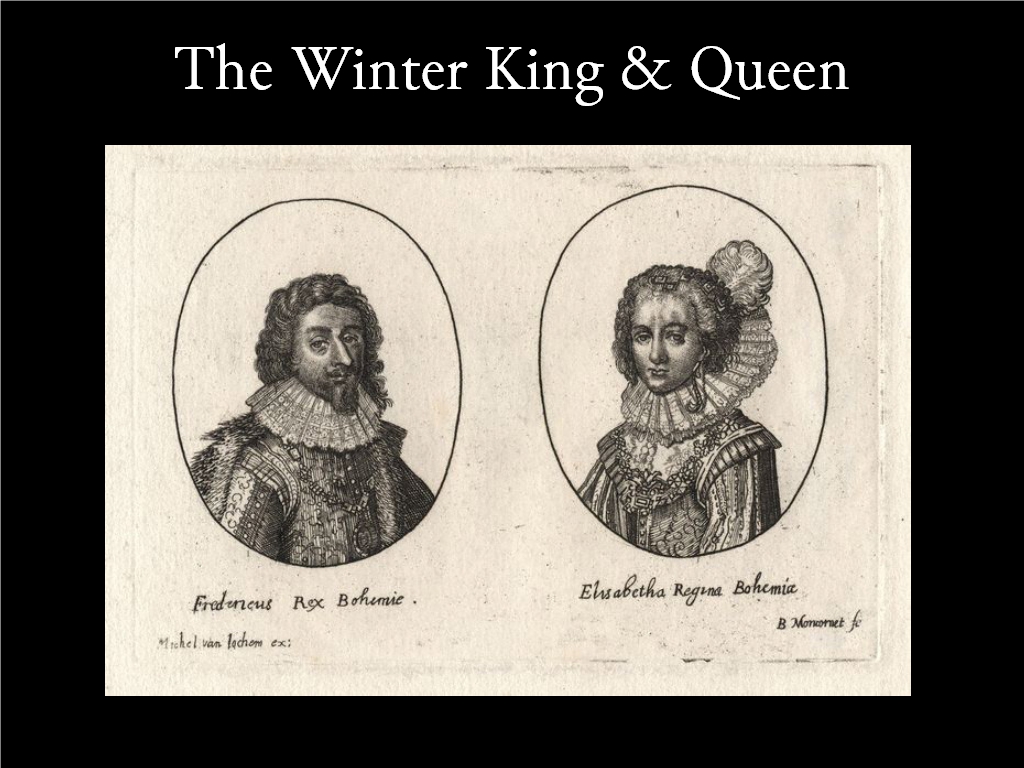
Frederick V was soon to be mocked as the Winter King, due to the brevity of his rule.

White Mountain 1620 - 30

A popular song at the time in Germany lamented his fate.

“Oh! Poor winter king, what have you done?
How could you steal the emperor’s crown
By pursuing your rebellion?
Now you do well to flee
Your electoral lands and Bohemia.
You will pay for your mistake with grief
And suffer mockery and shame.
Oh! Pious Emperor Ferdinand, grant him pardon!
Do not hold his folly against him.
He’s a very young man,
Who did not realise beforehand
How much a crown weighs.
Now it is weighing very heavy on his head.
If he had known, he would not have done what he did.”

Yet history would confer on their line great blessings, for their heirs included George I, King of England, who founded the Hanoverian dynasty.

Spacer


White Mountain 1620 - 50

White Mountain 1620 - 51

White Mountain 1620 - 52

Spacer

Albus


The Battle of Lützen 16 November 1632 Monday, May 9 2011 

Vauban Tile 500 pixels

Vauban Tile 500 pixels

The Battle of Lützen 1632 was a major battle in the Thirty Years War. It was fought between the Army of Sweden and their Protestant allies in Germany, led by King Gustavus Adolphus against the Imperialist Army led by Wallenstein. The battle saw the defeat of Wallenstein’s men at great cost to the Swedes and the death of their King, Gustavus Adolphus. Origins of The Thirty Years War are complex. The reformation and counter reformation left the Holy Roman Empire and Northern Europe split between Protestants and Catholics, defined by the Peace of Augsburg, 1555. Underlying religious and political tensions sparked the outbreak of the Thirty Years War, which played out the various factional interests. The trigger for this vast conflict, was the death of King Matthias, Holy Roman Emperor and King of Bohemia without an heir. The succession passed to Ferdinand II of Austria, but was contested by the Bohemian nobility, who threw representatives of Ferdinand out of a window in 1618 in the defenestration of Prague.

Such an insult could only lead to conflict. Underlying these causes was the Triptych of Turbulence; the interplay between Religion, Power and Dynasty.

Each would have its own contribution to the strife, which had distinct phases. The Bohemian Phase (1618 – 1621) marked the onset of the war, and its initial containment.

With the defeat of Frederick I, the Protestant cause in Bohemia was crushed at the Battle of the White Mountain. The victorious Imperialist and Catholic League army pursued Frederick into his homeland of the Palatinate. The Palatinate Phase (1621 – 1624) marked the spread of the war within the Holy Roman Empire.

Ferdinand II had deposed a threat from within the Holy Roman Empire and rewarded his chosen allies, and Catholic influence had grown at expense of the Protestants. The Danish Phase (1625 – 1629) began the start of foreign involvement in the war. Alarm had spread within the northern Protestant kingdoms at the growing success of the Holy Roman Emperor, Ferdinand II.

Christian IV entered the war, partly to secure his own holdings within the Holy Roman Empire, and partly to reduce the power of the Catholics. Early success eventually gave way to failure, when his army was crushed by Count von Tilly at the battle of Battle of Lutter in 1626. He eventually signed the Peace of Lübeck in 1629, leaving the path clear for Swedish entry into the war. By this time, Wallenstein, the Imperialist Generalissimo held sway over a vast territory in the name of Ferdinand II. Such power was obtained at a terrible price, as “Der Krieg ernährt den Krieg / “War feeds itself” became a guiding principle for his army of mercenaries.

The Swedish Phase (1630 – 1634) began a new era of foreign involvement in the war. Wallenstein attempted to build a fleet with Spanish help to master the Baltic seas. This raised a threat to Denmark and Sweden, who overcame their traditional enmity to face the Imperial threat. The final casus belli was the Edict of Restitution. Catholics had urged the Holy Roman Emperor to take advantage of their relative strength during the war by restoring lands to the position of the Peace of Augsburg in 1555, in practice returning vast tracts of lands claimed by Protestants back to Catholicism. The Edict enshrined this principal, thus ensuring a Protestant reaction, led by John George of Saxony. The Diet of Regensburg , 1630, failed to reach agreement between the Imperial Electors and the Emperor, but led to the dismissal of Wallenstein. The path was now clear for Gustavus Adolphus to take his small, but highly trained army into the war.

The Protestant city of Magdeburg declared for Gustavus Adolphus after being declared re-Catholicized as a result of the Edict of Restitution. The city was surrounded in 1631 by Tilly and von Pappenheim. The Swedes made slow progress through Germany to relieve the city, allowing time for a siege by the encircling Catholic armies of Wallensten and Tilly.

News of the Swedish advance spurred Tilly on, and the Imperialist troops bombarded the city before storming it on 20 May 1631. The city fell and endured a terrible two day sack.

The news of the sack of Magdeburg sent shockwaves through Europe, stiffening religious emnity in the conflict. It also spurred on Gustavus Adolphus and his men.

The Battle of Breitenfeld 1631 was the first test of strength between the Imperialists and their mercenary army and the army of the Swedes and their German Protestant allies. Each side had differences in troop deployment (Order of Battle) and battlefield tactics in the three types of troops employed; cavalry, infantry and artillery. Habsburg Spain and Austria used an order of battle with cavalry on flanks, infantry in the centre in one or two lines formed in Tercios. Artillery was typically grouped across the infantry line, or on high ground. The Swedes and their allies had an order of battle with some cavalry on each flank, interspersed by musketeers. The infantry was placed in the centre in two lines, with a cavalry reserve between the two lines. Heavy artillery was grouped in the centre, with lighter artillery pieces attached to the infantry regiments for close support.

In terms of tactics, again clear distinctions can be made between the two armies. The Habsburg Spanish and Austrian armies had infantry formed into Tercios (Squares of Pikemen 10 ranks deep, with blocks of musketeers in corners). This was an unwieldy formation, but difficult to stop once moving forward. The cavalry engaged by the caracole; with the front line firing pistols, then wheeling behind the next rank and reloading. This was difficult to achieve on the battlefield as a fight descended into a sword fight, or mêlée. With artillery, heavy guns only were employed, with larger barrels than Swedish guns, however at a slower rate of fire. The Swedish army had infantry formed into regimental lines six deep, with pikemen in the centre, flanked by a greater number of muskeeters. They used lighter guns and cartridges, with ball and powder which ensured a greater rate of fire than the Imperialists. Their cavalry engaged directly with the sword in close combat, without bothering to fire pistols first, thus giving them a “shock” effect in combat. Artillery also saw developments with lighter ‘Regimental’ guns introduced, placed with the infantry. Their heavier guns were employed in large concentrated bateries, with emphasis placed on rate of fire. The Battle of Breitenfeld 1631 was a resounding victory for Gustavus Adolphus and his men.

The victory was celebrated across Protestant Europe.

Swedish troops now swept into the heartlands of the Holy Roman Empire, occupying the Palatinate.

The death of Count von Tilly at the Battle of Rain, 1632, led to the recall of Wallenstein to head the Catholic army under the Imperial banner.

Wallenstein detached Pappenheim’s force, and the Swedes closed in on the remainder of the Imperialists at Lützen on 15th November, 1632. Battle of Lützen 16th November 1632 Wallenstein, badly outnumbered by the Swedes and their Protestant allies, issued an urgent recall to Pappenheim’s force.

Pappenheim received the letter at midnight and began to move towards the battlefield with a cavalry by 2 am, with infantry and artillery to follow. A heavy fog covered the battlefield on the morning of 16th November.

The fog slowed the march to the battlefield and the Swedish troops deployment. The Swedish followed the same type of deployment as at Breitenfeld; mixed cavarly and musketeers on each flank, with infantry in the centre in double lines. Gustavus Adolphus commanded the Swedish and Finnish cavalry on the right wing, Brahe and Kynphausen the infantry in the centre and Bernhardt  the cavalry on the left wing. The badly outnumbered Imperialists also followed the same type deployment as at Breitenfeld; with cavalry on the wings (led by Wallenstein and Holk on the right, Piccolomini on the left) and deployed in echelons. Their infantry (led by Colloredo) was placed in the centre, but this time formed into lines, not tercios.

With the battle about to begin, Gustavus Adolphus ordered the singing of two hymns, a custom preceeding an attack by the Protestants.

The troops then sang Gustavus Adolphus‘s battle hymn, ‘Verzage nicht du Hauflein klein’ (O little flock, fear not the foe), Altenburg’s hymn written after the battle of Breitenfeld, 1631 as they began the advance. Soon extra Swedish cavalry were placed on their right flank, to ‘fan out the feathers’.

Wallenstein ordered Lützen to be burnt and the smoke asoon added to the confusion from the fog. Gustavus Adolphus led the Swedish right wing and soon scattered the Croat light horsemen opposing them, who were no match for the veteran cavalry interspersed with musketeers facing them.

At midday, Pappenheim and his Imperialist cavalry arrived on the battlefield. Wallenstein ordered him to counterattack on the Imperialist left flank, where the Swedes were still pressing hard. He led his men directly into the Swedish cavalry, who gave a volley. Pappenheim was severely wounded and the Imperialist counterattack stalled. He later died of his wounds.

In the rolling fog, Gustavus Adolphus led a small troop of cavalry forwards, but he was killed.

In the centre, the Swedish yellow and blue infantry brigades pressed forward. The Imperialists met them with stiff resolve and flank attacked them with cavalry, which decimated their attack.

The battle raged on all fronts.

The Imperialist right flank began to fall back after the death of Pappenheim, but their centre held.

Prince Bernhardt  renewed the attack on the left flank, with a view to capturing the area surrounding Lützen and the windmills atop the hill.

The attack failed, due to a counterattack from the Imperialists.

After being repulsed on the left and centre, and having suffered the loss of their King, the Swedes began slowly retiring back in confusion. The King’s Chaplain, Fabricus, sensing the urgency of the position began rallying men on the right flank by singing Lutheran hymns.

‘Retreat! The time for that is past. It is vengeance now!’ Bernhardt to Kynphausen.

From 3:00 until 3:30 both sides reorganised, preparing themselves for the final onslaught. The Swedes prepared to attack again.

The Swedes advanced once more onto the Imperialists line. By now, both sides had suffered many losses. ‘A fatal earnestness was seen and heard on both sides’ as quarter was either asked, nor given as the battle settled to push of pike in the centre.

Nearly all the Imperial commanders were wounded during this final stage of the battle as eventually the Swedes managed to push through and take the guns by the windmill as night fell.

The Imperialists retreated during the night and the battle had been won by the Swedes at great cost.

Wallenstein withdrew his army to Leipzig, then back into winter quarters in Bohemia. The Swedes had successfully driven the Imperialists out of Saxony at the loss of their King and many of their best troops. Protestant Europe mourned the loss of the Lion of the North.

The Imperialists failed to exploit this setback. Wallenstein failed to renew the initiative against the Swedes in 1633 and after intrigue was killed on the order of Ferdinand II in February 1634.

The Swedish army and the Imperialists, reinforced by Spanish troops met again on the field of Nördlingen 1634, with the Swedes being crushed. The war now entered a new phase; between Bourbon France and Hapsburg Spain. The war ended in 1648, with the Peace of Westphalia in an agreement little different to that proposed by Gustavus Adolphus in 1631. The full slide pack is available as a pdf file here. (7 Mb file!).

Spacer

Spacer

Albus

The Battle of Lützen 16 November 1632 Redux Sunday, May 8 2011 

Vauban Tile 500 pixels

Vauban Tile 500 pixels

A wargame of the Battle of Lützen is described below.

The schematic of the battlefield above has been scaled down to fit our beloved bit of 5′ by 4′ for the wargame recreation. The scale used is board 1mm = battlefield 2 m; each move represents 5 minutes, and each figure represents 100-120 men using 25mm figures. Thus our 5′ by 4′ board rescales to 3 by 2.4 km on the battlefield. The number of troops need to be reduced accordingly to keep the troop density equivalent. The Imperialists had about 17,000 men at the start of the battle with 24 guns, and the Swedes/Germans about 19,000 with 60 guns. Reducing this by a factor of 1/2, the following order of battle is given.

In this battle, we use the principle of Sauve qui peut to define the level of losses (in terms of base units of 1 figure) sustained by each side before mass panic sets in. The levels are shown below for each army.

For both sides, once the threshold of losses exceed the following percentages, a dice roll is made to ascertain if mass panic has set in.

For the Imperialist army, the loss of up to 12 base units can be withstood before testing for morale. As soon as the relief force under Pappenheim arrives, the morale levels are lifted to 14 base units at the 15% threshold, to reflect the higher level of troops on the field. In the case of the Swedes and German allies,  19 base units can be lost before the 15% threshold is reached, reflecting their advantage in numbers. One additional complicating factor for the wargame is the effect of the weather. The Battle of Lützen was fought in fog which varied throughout the day. To simulate the capricious nature of fog, a dice is rolled to determine the visibilty.

Each position shows the visibility on the battlefield, so at position 1, the visibility falls to 100m (50mm) etc, whereas at 5-6 the visibility is unlimited, subject to line of sight. The generals refighting the battle use suspension of disbelief, so that if enemy troops are bearing down unseen upon your own because of the snow visibility, you cannot react until they would emerge… as happened during the original battle. After 15 minutes (3 moves) a dice is rolled and the new visibilty is established. Given the fog rose in the morning, but fell in the evening, a modifier to the dice roll is given for the time of day. Between 10:45 and 11:00 am, +1 is added to the roll. Between 11:00 and 13:00 + 2 is added to the roll, 13:00 and 14:00 no modifier is added, 14:00 and 15:00 -1 is added to the roll, and finally after 15:00 until nightfall -2 is added to the dice roll. This alters the probablilty of being in clear weather or thick fog, depending on the time of day.

Similarly, the arrival of Pappenheim and his men is given to chance. It’s known that he appeared shortly after 12:00, so to account for this at 12:05 a dice roll of 6 will allow Pappenheim’s men to appear on the board. At 12:10 a dice roll of 5,6 is needed, 12:15 4-6 is needed and this dice modification of shortening odds continues at 5 minutes intervals until at 12:30 the troops definitely arrive on the board. Rules used in the games can be found in this link.

A final point:- the little puffs of white cotten wool on the battlefield pictures below signify firing and the clouds of white smoke it made, the ‘fog of war’ that black powder produced.

Move 1 (10:45)

The Swedish army, led by their King Gustavus Adolphus finish singing “Ein feste Burg ist unser Gott” and begin to sing “Verzage nicht du Hauflein klein“, King Gustavus‘s own battle hymn.

Be not dismayed, thou little flock,
Although the foe’s fierce battle shock,
Loud on all sides assail thee.
Though o’er thy fall they laugh secure,
Their triumph cannot long endure,
Let not thy courage fail thee.

He signals the advance, and the cannons ring out, sending their shot through the mist at the enemy.

Wallenstein the Imperial commander sees the Swedes through the fog, a straggling line of sinners. He has recalled Pappenheim and his men to the field. If his troops can hold on until they arrive, then surely the Lord of Hosts will give the day to his men and not to these Northmen.

A man that is an heretick after the first and second admonition reject;
Knowing that he that is such is subverted, and sinneth, being condemned of himself.

Above the fray, Auster the God of fog breathes his mists over the plains of Lützen. He cares little for these mortals arguments. The visibility at 400m is enough for these men to see their emnity reflected.

Move 2 (10:50)

The Swedes march on in the centre, led by General Major Brahe. On the left, Gustavus Adolphus starts to wheel the cavalry around to outflank the Imperialists facing his men. The Swedes are singing the last verse of their hymn.

Our hope is sure in Jesus’ might;
Against themselves the godless fight,
Themselves, not us, distressing;
Shame and contempt their lot shall be;
God is with us, with Him are we; To us belongs His blessing.

The Imperialists before them, Catholics, count the beads on their rosaries as they retice their Pater Nosters and Ave Marias. There is still time to find redemption before the bullets start flying.

Move 3 (10:55)

Gustavus’s men continue to wheel, Brahe’s men continue to close on the enemy. There is no singing now, only the steady beat of drums. The novice soldiers on each side look on in disbelief at what is unfolding before their eyes, as the moment of truth beckons. The veterans of the Imperialists spit into the ground and check their weapons one last time.

Move 4 (11:00)

First contact between the troops, as a fight breaks out between the Swedish cavalry, interspersed with musketeers against the less well trained Croats. The Imperialist artillery fire on the Swedes, unnerving them.

Move 5 (11:05)

The Swedish cavalry under artillery fire break in confusion. To their right, Gustavus Adolphus and his men fight the Croats. The first line of infantry have now almost closed to fire contact. What was once cloaked in mist is now plainly visible.

Move 6 (11:10)

Gustavus Adolphus falls wounded to a lucky pistol shot from a Croat in the mêlée.

Sweden and all Protestant will grieve in due course for the lost Lion of the North. Catholic Europe will sing Te Deums for their deliverance.

Salvum fac populum tuum,
Domine, et benedic hereditati tuae.

The Swedish cavalry press on their attack, seeking vengence. The Swedish and Imperialist infantry send each other into a disorganised state as push of pike takes over from the musket exchange.

Move 7 (11:15)

The first line of Imperialist infantry wavers and breaks at the end under the Swedish assault, creating a dangerous gap in the line. As if to underline the danger, the Imperialist General Colloredo falls to a musket ball as the troops he stood before crumple under the assault.

The Croats responsible for the fall of the Swedish King break in confusion. All goes badly for the Imperialsts, except on the extreme left, where their cavalry hold the Swedes on the line of the River Flossgraben.

Auster, the God of fog, sucks his breath in and the mists disappear over the plains of Lützen. The folly of men is for all to see.

Move 8 (11:20)

Remember Magdeburg! Magdeburg Quarter! ” roar the Swedes as the Imperialst front line crumples even further into retreat, throwing the troops they flee past into chaos.

Providence has spoken again, the battle  is all but won by the Swedes, or is it? News of the fall of their King reaches the Swedish blue regiment. A flicker of doubt creeps into their hearts.

Wallenstein has no time for doubt. He must lead a cavalry counterattack to stem the haemorrhage of troops in his centre or lose all.  “Vorwärts”! he shouts, and the men of his right wing obey.

Move 9 (11:25)

The counter charge in the centre scatters the Swedish Blue Regiment, as their defensive hedgehog breaks under the pistol shots and sabres of the Imperialist cavalry.

On the extreme left, by the River Flossgraben,  the Swedish cavalry also scatters before the Imperialists, as the truth of the loss of their King sinks in, and unnerves their fighting resolve.

Move 10 (11:30)

The scattering of the Swedish cavalry continues, and their retreat puts fresh heart into the Croats, who stop retreating. The Swedish infantry are pressed back by the Imperialist cavalry, with more troopers rushing to try their luck on the last standing Swedish infantry regiment in their front line.

Wallenstein’s gamble has paid off so far. He rides to rally the infantry in the centre, who begin to come to order again.

On the far right, Duke Bernhard receives news of the  fall of Gustavus Adolphus in silence.  He is, by seniority, the new leader of the army. The battlefield is quiet at his end, with no chance of an attack by the Imperialists. He shall take his cavalry with him to reinforce the army, and lead it to avenge the death of his King.

Fortuna Belli has favoured first one side, and then the other. Where her eventual indulgence will fall is not yet clear. Only time, and more fighting will tell.

Move 11 (11:35)

Duke Bernhard begins wheeling his cavalry around behind the second line of Swedes in the centre.

The front line of Swedish infantry suffers a furious cavarly charge and much of the infantry is thrown into confusion in the mêlée.

Behind this battle line, Wallenstein continues to rally the Imperialist infantry in the centre.

Move 12 (11:40)

Mars rides with the Imperialist cavalry as the Swedish infantry breaks before the onslaught. The riders hew down those who stand, those who run. Providence was with the Swedes just a short while ago?

The Imperialist infantry threaten to sweep forward and complete the partial victory won by the cavalry.

Wallenstein knows that if Pappenheim and his men come to the field soon, he can win against the odds, and the gratitude of the Emperor will be great indeed.  His mercenary heart knows such praise may beckon pay and further privilege.

On the left, the Imperialist cavalry pulls back behind the River Flossgraben under the command of Holk. Much of the Swedish cavalry first attack continues to rout.

Move 13 (11:45)

In the centre, one small clump of Swedish infantry valliantly battles on against a caracole attack by the Imperialist cavalry. Another clump breaks under the cavalry assault.

To the right, a mass of  Imperialist cavalry ride on to face the Swedish infantry second line. They are made of sterner stuff than their compatriots, and they stands their ground, in a defensive ‘hedgehog’, bristling with lowered pikes.

To the rear of this action, Holk leads the Swedish cavalry of their left wing towards the centre.

Move 14 (11:50)

The cavalry vs infantry battle in the centre rages on, with the Imperialsts getting the worst, as a troop of Swedish cavalry scatter the cavalry on the right. The Swedish infantry hold firm, a shore against the waves of horses.

Wallenstein has succeeded in rallying the Imperialst infantry behind the front line.

Move 15 (11:55)

The Imperialist cavalry retire in confusion, and the Swedes have held for now. The cavalry charge gave the Imperialsts breathing space, enough time for Pappenheim and his men to close the distance to the field.

The victorious regiment of Swedish cavalry sweep through the gap between the Imperialist infantry in the centre and on the right as they pursue the fleeing cavalry.

Move 16 (12:00)

The cluster of Swedes that fought off the Imperialst infantry pit their arms against a regiment of Imperialists who swiftly become disorganised in the push of pike. The Imperialst cavalry by their side retire through a gap between the infantry.

The small regiment of Swedish cavalry continue to pursue the Imperialists, but notice they are now separated way ahead of their comrades, and also a regiment of cavalry, led by Wallenstein is riding towards them. Instinct tells them they should return back to their own lines.

The Swedish cavalry of the left wing has now reached the centre of the battlefield.

Move 17 (12:05)

The Swedes win the push of pike and sends the imperialist infantry back in disarray.

The small regiment of Swedish cavalry on the right hand side of the battle plunge into the flank of an imperialist regiment of infantry, who break in disarray and begin running towards their cannon on a hill for safety.

Wallenstein leads his cavalry group towards the successful Swedes. If he can catch them, he will be extracted his revenge.

Move 18 (12:10)

The Swedish cavalry on the right-hand side of the battle continue to harass the Imperialist infantry regiment which flees in terror. But help is at hand, Imperialist cavalry ride towards them in the certitude they will overwhelm their enemy. Meanwhile Wallenstein continues his advance to their rear in the hope of encircling them.

In the centre, ebb and flow is order of the day. The reformed Swedish line joined the victorious group of infantry which has just seen off the Imperialists. However to their rear, a small group of cavalrymen break the extreme of the Swedish second line.

Far to the rear, the Protestant cavalry has nearly completed its transfer from one side of the battlefield to the other.

Wallenstein‘s wish has been granted. Pappenheim has arrived on the battlefield with his reserve of Imperialist cavalry.

Move 19 (12:15)

Pappenheim‘s cavalry waits for their leader to survey the battlefield and pick their spot for deployment.

In the centre the Imperialist infantry strengthens its line, ready for renewed struggle with the Swedes.

On the right, the isolated Swedish squadron pursues the broken Imperialist infantry, but slowly, surely the Imperialist cavalry are riding to surround it.

Move 20 (12:20)

Pappenheims men ride to the left flank as it is clear that is where the Swedes are massing for a counter attack.

Close to the artillery near the Flossgraben, the Swedish blue regiment has successfully repulsed the squadron of Imperialist cavalry attacking them, which in turn routs away disorganised.

On the right flank, the successful Swedish squadron is quickly scattered by the surrounding Imperialist cavalry. The survivors from this melee make their way towards a gap in the line of infantry advancing towards the Imperialists.

Move 21 (12:25)

Redeployments govern the battlefield as troops reorganise into new battle lines.

The Imperialists now have an arc of troops from one side of the battlefield to the other, infantry in the centre, cavalry on both flanks. This is the norm and Minerva, the Goddess of strategy approves.

The Swedes have denuded their right flank of cavalry and drawn everything towards the left where squadrons still ride to complete their redeployment. This is a bold strategy, born of desperation at the death of their king. Its success will surely live on the whims of Fortuna Belli once the action has started.

The infantry lines in the centre make their way towards each other, drums beating and flags flying. Both sides have tested each other’s mettle this morning, and more will be tested this afternoon.

Move 22 (12:30)


The Swedish blue regiment marches forwards to engage the imperialist artillery on the extreme of their left flank.  They immediately come under attack from a squadron of Imperialist cavalry and artillery fire which tests their resolve. The Swedes nerves hold, as their defensive hedgehog fights off the cavalry.

Auster the God of fog breathes his mists once more over the plains of Lützen.

On the Swedish left flank, the second line of cavalry sweeps round as all are still in motion. The Imperialists cannot see this movement but can hear something sizeable is happening.

Neither the Swedish or Imperialist infantry in the centre push further forward, each waiting for the other to make the move.

Move 23 (12:35)

Auster’s mists still cover the battlefield, masking the redeployment of the second line of Swedish cavalry.

The Swedish blue regiment successfully fights off the Imperialist cavalry squadron which retires disorganised. They have served their nation and their faith well today.

Move 24 (12:40)

With an impetuousity born of success, and perhaps guided by Mars, the Swedish blue regiment marches forwards directly towards the Imperialist artillery tormenting them.  Their good order breaks down in the process and the men become disorganised. An Imperialist infantry regiment advances to add flanking fire onto the Swedes. How long can they last?

Move 25 (12:45)

The arid bliss self belief provokes addled the Swedish blue regiment. Their charge has ended in failure and they break before the triple torment of infantry, cavalry and artillery fire.

The mist lifts and Pappenheim can see that the Swedish cavalry are forming one long line. This threatens to outflank his men. They must punch through their centre when the attack comes.

On the other flank, the remaining Swedish cavalry begin riding toward the centre.

Move 26 (12:50)

The Swedish blue regiment regain their nerve as they draw level with the main battle line.

The Swedish cavalry have now formed their long battle line.

Move 27 (12:55)

Artillery exchange fire, but elsewher a terrible calm descends on the battlefield. No side will test the others resolve.

Move 28 (13:00)

The Swedish cavalry begin to advance. Pappenheims men, veterans all, will them closer so battle can begin.

Move 29 (13:05)

The Swedes begin shortening their cavalry line by forming a traditional double line. Pappenheim sees this leaves a gap between them and their infantry centre. If he can scatter the cavalry facing him, he could roll up the exposed flank of the Swedish infantry. If…

Move 30 (13:10)

The Swedes continue their redeployments. The Imperialists wait.

Move 31 (13:15)

Auster’s mists roll over the battlefield once more, masking the redeployment of the Swedish cavalry.

Move 32 (13:20)

The Swedes on the right wing have finished their movement.

Move 33 (13:25)

Framåt! Gud vara med oss!

In the mists  Pappenheim and his men hear the Swedish cavalry advance, and glimpse them emerge through the fog.

Move 34 (13:30)

Auster’s breath increases and the fog plunges the visibility to 100m.  Only at the left flank of the Swedish advance can the two protagonists see each other, as both sides ready for the deadly embrace.

Move 35 (13:35)

In thick fog the first honours go to the Swedes, with their interspersed cavalry and infantry scattering the end of Imperialist cavalry. The fog masks the gap opened between Pappenheim and his men and the artillery at the end of the Imperialist infantry line.

Move 36 (13:40)

The Swedish cavalry wave continues on through the mists, Pappenheim  supporting his men.

Move 37 (13:45)

The mists lift a little and battle is joined along the length of the Imperialists right flank. The Swedes have crossed the Flossgraben, threatening the flank of the Imperialist infantry. A cavalry squadron rides forward to intercept.

Move 38 (13:50)

Fortuna Belli smiles on the Swedes, as they progress against the Imperialist cavalry which shatters under the assault. Wallenstein cannot tell which way the battle is going on his flank but senses with trepidation that the sound of battle is moving towards him, indicating his men aren’t holding their ground.

Move 39 (13:55)

The situation on the left flank of the Imperialists line worsens as a Swedish squadron captures the Imperialist artillery. This threatens their entire infantry line with flanking fire. The regiment at the end of the line falls back, fearful of their position. With Pappenheim busy rallying his men, a cavalry counter charge must fall to Wallenstein who senses the danger his army is in. He moves to the nearest cavalry and urges them to follow him.

Move 40 (14:00)

The battle rages between the Swedish cavalry and the Imperialists on their left flank, with the Imperialists holding their own. Wallenstein and the cavalry ride towards the captured artillery battery, now in Swedish hands, who fire on the approaching men.

Move 41 (14:05)

The Swedes are driven back to the Flossgraben river, and a fierce cavalry mêlée breaks out around the captured artillery unit. The battle is in the balance again.

Move 42 (14:10)

Wallenstein and his men overwhelm the Swedish cavalry defending the captured artillery unit whose fate once again hangs in the balance. If the Imperialists can resecure this vital components to their line, the battle may swing back to them yet.

Regardless of this event,  the long line of Swedish and Protestant infantry begins the approach towards the Imperialists to settle the matter once and for all by the push of pike.

Move 43 (14:15)

The artillery piece becomes a central target in the struggle, as the Swedes counter-attack, preventing the imperialists from remanning the guns and using them.

The advance of the Swedish and Protestant infantry is slow down on the extreme right by a headlong charge of Imperialist cavalry, forcing the end regiments into a defensive hedgehog. The Swedish infantry falters, becoming disorganised.

Move 44 (14:20)

The Swedish cavalry once again forces off the imperialists trying to recapture the artillery. The guns belong to the Swedes again, who will shortly begin pummelling the Imperialists when the opportunity presents itself.

On the left flank of the Imperialists a major cavalry battle has broken out as the Swedes try their luck one more time. Both sides in the chaos and confusion of the fighting and the fog become disorganised. The Swedes still have a line of reserves to fall back on, but should the Imperialists lose the whole position of their army is exposed. Sensing this, the Imperialist infantry begins slowly withdrawing seeking to delay the moment of truth with their opposite number.

Things go better for the Imperialists on their right flank, as one of the cavalry squadrons breaks through Swedish Green regiment, putting the men to the sword as they drive on.

Move 45 (14:25)

The judgment of Fortuna Belli comes down on the Swedish side. Their cavalry have scattered Pappenheim and his men, exposing the entire army’s flank. The disorganised remnants of the Imperialist cavalry ride towards the edge of the battlefield, seeking safety in the fog through speed and distance from their tormentors.

The Imperialist infantry begins retreat in earnest, sensing that the battle can no longer be won. The Swedish infantry, with a hole punched through its left flank seems none too keen to advance, as thetheir Green regiments suffers grievously at the hands of the victorious Imperialist squadron pursuing them. Help may be on its way as a small Swedish cavalry squadron rides to intercept them.

Move 46 (14:30)

A majority of the Imperialist cavalry has fled the battlefield. Their infantry pulls back steadfastly seeking the same safety. Even the artillery on the hill above the town of Lützen makes its own way off the battlefield.

The Imperialist cavalry squadron pursuing the Swedish Green regiment is scattered by the countercharge of the Swedish cavalry. They ride headlong for the gap that means safety for them, leaving the survivors of the Swedish Green regiment to run headlong away from the conflict until they regain their nerves.

Move 47 (14:35)

The Swedes advance again en masse, as they seek to close down on the remaining Imperialist units. Equally these men seek their safety but retreat in good order.

Move 48 (14:40)

On go the Swedes, back go the Imperialists. A mass of Swedish cavalry is gathering for the final assault, for they can close the distance long before their infantry can cause any further harm.

Move 49 (14:45)

“Let God arise, let his enemies be scattered:
let them also that hate him flee before him.
As smoke is driven away, so drive them away:
as wax melteth before the fire,
so let the wicked perish at the presence of God.”

With the words of the 68th Psalm, beloved of the Calvinists in their ears, the Swedish cavalry close in upon one poor unfortunate Imperialist infantry regiment. Surrounded, it will be made to pay for the sins of the rest of their army, as quarter will neither be given or asked.

The rest of the Imperialist army shall escape to fight another day, in another place.

Victoria  awards the day to the Swedes and the German Protestants. Despite the loss of their dead king, they have clinched the battle, and although this victory is melancholic due to the passing of their monarch, they have succeeded in avenging his loss and securing Protestant Germany.

Northern Europe will mourn the fallen Lion King. Farewell faithful servant; the star that burns twice as bright lasts half as long.

From afar,  Mars and Pax know this battle’s outcome can only seek to prolong the war, as the death of Gustavus Adolphus gives the Imperialists enough hope to continue the struggle.

Wallenstein  and his defeated men retire into the fog and the approaching gloom.  Wallenstein  does not know yet of the fall of Gustavus Adolphus, but will seek to make this the principal outcome of the battle to the Emperor when he is summoned to explain his army’s defeat.

A little more resource your Majesty, more money and men, and I can overwhelm these Northmen yet for your honour and the greater glory of the Church.

The Emperor will see through these words, but accept the premise.

The entire battle sequence is available as an animated gif, best viewed in Windows picture viewer.

The Generals fighting this battle were

Gustavus Adolphus 

 Wallenstein