![]()

![]()
")
")
")
")
")
")
")
")
")
")
")
")
")
")
")
")
")
")
")
")
")
")
")
![]()
The slides above are available as a powerpoint slide show here.
1703 The Battle of Höchstädt and War Spanish Succession Battles Annasaule, Battle of Hochstadt, Bourbon, Count von Styrum, Elector of Bavaria, Ferdinand Maria, Habsburg, Innsbruck, Louis XIV, Marshal Marsin, Marshal Villars, Maximilian II Emmanuel, Prince Leopold of Anhalt-Dessau, Treaty of Fontainebleau 1631, Tyrol, Versailles, War of the Spanish Succession, Wittelsbach 7:40 am
1703 The Battle of Höchstädt and War Spanish Succession Battles and Wargames Battle of Hochstadt, Count von Styrum, Elector Maximilian II, Fortuna Belli, Marquis d'Usson, Mars, Marshal Villars, Minerva, Prince von Anhalt-Dessau, Somnus and Mors, Victoria 12:30 pm
![]()
 A wargame of the Battle of Höchstädt is described below.
![]()

The schematic of the battlefield above has been scaled down to fit our beloved bit of 5′ by 4′ for the wargame recreation. The scale used is board 1mm = battlefield 2 m; each move represents 5 minutes, and each figure represents 50-60 men using 15mm figures. Thus our 5′ by 4′ board rescales to 3 by 2.4 km on the battlefield. The number of troops need to be reduced accordingly to keep the troop density equivalent. The Austrians and Prussians had about 16,000 men at the start of the battle, and the French about 24,000 by the end of 20th September 1703. Reducing this by a factor of 15/24, the following order of battle is given.

In this battle, we use the principle of Sauve qui peut to define the level of losses (in terms of base units of 2 figures) sustained by each side before mass panic sets in. The levels are shown below for each army.

For both sides, once the threshold of losses exceed the following percentages, a dice roll is made to ascertain if mass panic has set in.

For the Imperialst army and their Prussian allies, the loss of up to 15 base units can be withstood before testing for morale. In the case of the Franco-Bavarian army, given the initial deployment of just d’Usson’s troops, a lower level of losses can be sustained, so d’Usson’s troops can lose 6 base units before the 15% threshold is reached. As soon as the main army under Villars and Maximillian II arrives, the morale levels are lifted to 23 base units at the 15% threshold, to reflect the higher level of troops on the field.
A final point:- the little puffs of white cotten wool on the battlefield signify firing and the clouds of white smoke it made, the ‘fog of war’ that black powder produced.
The rules used for the re-enactment are found here.
![]()

Move 1 (11:30)
")
Marquis d’Usson stares at the serried ranks of Austrians and their Doppeladler Fahne before him. He recalls a conversation he once had with le Roy Soleil.
Given the host before him, this theory of stoical forbearance will be tested to the limit, unless the main army under Maréchal Villars and Elector Maximillian II appears soon. Count von Styrum is unaware of the approach of the main French and Bavarian army. All he sees is the small force before him, which must surely yield to his superior numbers. ‘Feuer’. The Austrian cannons begin firing, and the French guns respond. The duel has begun.
Move 3 (11:45)
")
Marquis d’Usson has ordered le régiment Hainaut into the village of Oberglauheim to protect his left flank. The imperialsts are content for now to rain cannon balls onto the French artillery, thereby disrupting them, so they cannot return fire.
Move 4 (11:50)
")
Count von Styrum sends the first three lines of his troops foward. It will take time to cross the ground before engaging with the enemy. The French stand and look on at this advance; en muraille blanc, a wall of white coated men armed with muskets, drapeau d’ordonnance flying.
To the rear of the Imperialists, Fürst von Anhalt-Dessau orders his troops into column. They will march round and in due course outflank the French if they hold their ground.
Move 5 (11:55)
")
Le régiment Hainaut makes its way into the village of Oberglauheim, and Marquis d’Usson relaxes a little. He sees that the Imperialists are keeping their cavalry close to their infantry, and the cavarly on their right flank is making its way past the village of Sonderheim, squadron by squadron.
Move 6 (12:00)
")
The French cavalry on the left have seen the Austrian cavalry compressed against Sonderheim, and they attack, discharging their pistols before engaging with sword. The first Austrian squadron is disorganised by this sally. Meanwhile the French cavalry attack forces the nearby Austrian infantry into square. On the Austrian right flank, their cavalry begins to advance ahead of their infantry, who steadily advance on.
The head of the Berliner blau caterpiller, formed from the Prussians and their columns of infantry and cavalry begin passing the village of Unterglauheim.
Move 7 (12:05)
")
The cavalry battle by the village of Sonderheim ebbs towards the French, then back towards the Austrians, as more of the latter arrive to join the fray; “Vorwärts!“. Austrian infantry flee from the French cannonade, as the advance on the French centre temporarily halts. Marquis d’Usson orders le régiment Anjou into column and stirs the cavalry on the right into action, as he prepares his men for a complicated minuet in front of the advancing enemy.
Move 8 (12:10)
")
Marquis d’Usson orders the French cavalry on the left to wheel round to face the Imperialist Cuirassiers, swinging behind the village of Oberglauheim, which is itself under pressure from Austrian troops, who falter under the defensive fire from le régiment Hainaut. Meanwhile, le régiment Anjou wheel their column towards the gap left by their cavalry.
The rout of the Austrian infantry stops, but hey haven’t yet reformed, so cannot return to the advance, despite the admonishments from Count von Styrum.
The French left looks more shaken as part of their cavalry shatter under the weight of Austrian horsemen, who now outnumber the remaining enemy by 2:1.
Move 9 (12:15)
")
The battle is poised to tip either way, according to the whims of Fortuna Belli who smiles on neither side yet. On the French right flank, le régiment Hainaut hold onto Oberglauheim, sending das Regiment Holstein – Ploen reeling back from volley upon volley of musket fire. The Austrians disrupt their Swabian comrades in das Regiment Baden Baden. However all does not proceed to French liking, as le régiment Artois breaks under Imperialist fire. On the French right flank, the French cavalry retreat slowly as the Austrians advance. The French cavalry retirement allows the Austrian infantry to reform out of square, to begin the advance again.
Move 10 (12:20)
")
The Austrian cavalry sweep around behind Oberglauheim, and the French cavalry on their left wheel around to face them.
The gap in the line left by the routing le régiment d’Artois is quickly filled by le régiment Royal and le régiment d’Anjou. The Swabian Imperialists facing them suffer the worst of the fire exchange.
Two other Austrian battalions still retreat through their advancing comrades, sowing disorder and panic amongst them.
Move 11 (12:25)
")
Near Oberglauheim the Austrian and French cavalry face off in a mêlée, with the first round going to the French. They send their tormentors back in a rout; the second line of Austrian cavalry looking wearily on.
The Swabian Imperialist infantry retreat from the steady musket fire offered by the French line, which holds firm.
The head of the Berliner blau caterpiller, formed from the Prussians and their columns of infantry and cavalry begin passing the village of Weilheim.
Move 12 (12:30)
")
The battle has been fought for one hour, and Marquis d’Usson still sees no sign of the main French and Bavarian army. He rides to rally le régiment Artois before they cross the river Schwanenbach. In this battle, every man will count.
The French infantry line, a wall of men clad in white, stands firm having repulsed the first wave of the Imperialists.
Near Oberglauheim, the Austrian and French cavalry face off in the next mêlée, with the honours going to the Austrians, who seek revenge for their earlier loss.
Move 13 (12:35)
")
The French lose the cavalry duel, and L’Marquis d’Usson rides to them to urge them to rally.
By Oberglauheim, das Regiment Baden Durlach aus Schwaben tries to storm the village, but the French will not yield. Instead the Swabians melt before the French fire.
Move 14 (12:40)
")
L’Marquis d’Usson fails to rally the fleeing French cavalry, who cry ‘Sauve qui peut‘ as they plunge across the river Schwanenbach. A quick glace over the Marquis’s shoulder suggests he is needed urgently elsewhere.
On the French right flank, Austrian cavalry ride in upon the French cavalry and a new mêlée begins. The Imperialist infantry make contact with the French and start a fire fight. The sound of musketry rolls out across the battlefield, punctuated by cries of En Jou! Feu!.
Move 15 (12:45)
")
On the French left, the Austrian cavalry begin to advance as the Berliner blau caterpiller draws ever nearer to the village of Oberglauheim.
On the French right, the cavalry mêlée continues. A French battery limbers up, ready to withdraw to relative safety and form a new line of resistance. Meanwhile, another Austrian battalion retreats from the fire fight with the French.
Move 16 (12:50)
")
The cavalry mêlée on the French right continues, with both sets of men slashing at each other, swords drawn; disorder rules as Mars revels in the fight.
The presence of Austrian cavalry so near forces the french battalion at the end of their right into square. Another Imperialist infantry battalion withers before French fire. To the rear of the Austrians, a battery limbers up and begins to make its way to the nearby hill.
So far, the French have performed well, but they risk a cavalry attack from the rear as the Austrian sweep round in pursuit of the barely reformed le régiment Artois. This mortal threat should concentrate the minds of the men struggling to get into order.
Move 17 (12:55)
")
The sight of a line of Austrian cavalry before le régiment Artois does the trick, and they snap into square; a secure post to the rear of the French. The second line of Austrian infantry is now in retreat, having been broken by the French wall of white, who cling to their ground, though disorganised.
Fortuna Belli has not completely abandoned the Imperialists. On the right, the French cavalry yield first to the Austrians, who are too tired to pursue. Despite the casualties the Imperialists have taken, they may soon envelop the French. Marquis d’Usson scans the horizon for signs of the main French army. They are nowhere to be seen.
Move 18 (13:00)
")
The battle is finely balanced. The French infanty by Oberglauheim advance, scattering the Swabians before them, even as Count von Styrum exhorts his men on.
Behind them, a ragged line of French infantry struggle to reorder themselves. Scenting the weakness, the Austrian cavalry to their rear ride forwards. One group attack le régiment Artois in square who hold firm, sending riders and their horses to the ground with their musketry; more work for Somnus and Mors this evening. Another group of Austrian cavalry make straight for the ragged line.
Marquis d’Usson rallies the French cavalry on the right, who dutifully follow their leader back to the fray.
By Höchstädt, the other group of fleeing French cavalry no longer cry ‘Sauve qui peut‘, as distance from the battle calms them. They come to rest, and their senses.
Move 19 (13:05)
")
Le régiment d’Artois continues to hold in square at the back of the French position and they fight off the Austrian cavalry who scatter towards the gap between the villages. Their Prussian comrades ride forward to fill the void they have left. Before Oberglauheim, the second Austrian cavalry group threaten the rear of the French infantry line, who form into square from the threat. At the extreme left of the French line, the square formed by le régiment d’Anjou starts to buckle from a fire fight with the Austrian infantry third line.
Le régiment Hainaut in Oberglauheim stare as the Prussian battalions, which have marched steadtfastly around the battlefield, as they prepare to storm their village.
The Austrian artillery battery on the hill by Sonderheim unlimbers and makes ready to fire.
On the French right, the cavalry mêlée resumes, with no-one blessed by Victoria so far.
Move 20 (13:10)
")
Fortuna Belli can curse and bless an army in equal measures. The French position on the left buckles; the Prussians eject le régiment Hainaut from Oberglauheim at the same time as the Austrian Cuirassiers slam into le régiment d’Anjou ; Mars delights in the fight. The Austrian third line of infantry closes in for the kill, and surely the French cannot hold for much longer.
However on the horizon, the advance guard of the main Franco-Bavarian army arrives to the rear of the Imperialists. Oblivious to this development, Count von Styrum hears a strange cheer go up from the French ranks; not at all the sound he expected from an army about to be defeated.
Move 21 (13:15)
")
Chaos reigns as the French cling onto their ragged line, despite being turned on their left flank by the advancing Prussians and attacked by Imperialists in front, being led on by Count von Styrum.
The relocated French battery fires on the Austrian Cuirassiers attacking le régiment d’Anjou and disorganises them. They retire to safer ground and try to reform. Meanwhile le régiment d’Anjou continues running oblivious to the retreat of the attacking cavalry.
On the French right, again their cavalry yield to the attacking Austrians, who pose ready to sweep down on the mass of infantry in squares about to flee. But still the French keep up a strange cheer, as their beleaguered battalions in square see French infantry behind the relieving cavalry marching towards them.
The Austrian regiments that fled from the first attack reached as far as the river Nebel but did not cross. They stare open mouthed at the column of French cavalry and infantry bearing down upon them. The colonel of das regiment Holstein – Ploen sends a messenger to Count von Styrum alerting him to the new danger.
Move 22 (13:20)
")
Like a compass needle responding to a nearby stronger magnet, the Austrian battery on the hill swings around by 180° and starts firing at the French cavalry advancing to the rear of the Imperialist army. This movement is also seen by Count von Styrum, who receives the message from the regiment Holstein – Ploen with incredulity and denial. “Es kann nicht sein, müssen Sie irren“.
A Swabian regiment, routing from the battlefront reaches the river Nebel and sees the new danger. The men start running along the edge of the river towards Oberglauheim, and away from the French.
On the French right, the infantry in squares hold on, buoyed by the sight of even more comrades marching towards them. And still more march towards the battle.
On the plain before Höchstädt, the recently routed French cavalry emerge from the town to face a line of Prussian cavalry.
Move 23 (13:25)
")
Finally Count von Styrum dares to turn around and sees for himself the advancing French cavalry to his rear, who now draw close to Unterglauheim. He instinctively rides towards his unintented rear line, formed from the rallied Austrian infantry along the river Nebel.
At the rear of the French line, the Prussian and French cavalry start another mêlée, with weight on numbers telling for the Prussians.
Move 24 (13:30)
")
A mass of French infantry retreat from the battle towards Höchstädt. On the French right, their cavalry yield once more to the Austrians. However, a combination of two regiments firing sends back a Swabian battalion in retreat.
The Prussian cavalry win their mêlée against the battle weary French, who ride away in a rout. However an unbelievable message has arrived from the Prussian commander, Prince Anhalt-Dessau, ordering their recall.
Meanwhile, the relieving French cavalry sweep past Unterglauheim.
Marquis d’Usson exhorts his men on. They have done wonders in clinging on, if only they could hold on a little longer. Perhaps the day can still end in Gloire for them, if Fortuna Belli smiles on them.
Move 25 (13:35)
")
The Prussian cavalry now turn about face, and try to forget the size of the prize to their right. They have the French army at their mercy, and yet their commander wants them to return. Warum?
The Imperialist infantry before the French have not swept forwards, having received a messenger from Count von Styrum, urging caution, given the French army appearing before their rear.
The Prussian commander, Fürst von Anhalt-Dessau, can also see the danger. The Austro-Prussians have just a little more time left to crush d’Usson’s French, before turning to face the new threat. He seeks an urgent meeting with Count von Styrum to discuss their options.
Move 26 (13:40)
")
As the Prussian cavalry obey, they see the French relieving cavalry riding towards the Prussian infantry, and begin to see the sense in the orders they are following.
The French cavalry see before them the fleeing Swabian infantry, who now abandon their weapons and run for lives.
The Austrian cuirassiers have passed between the gap of the Prussian infantry, and the imperialist infantry and attempt to ride around the latter to catch the French cavalry in the flank. The distance however is long, and they sense the French cavalry will reach the fleeing infantry before they can make contact.
The fleeing infantry under Marquis d’Usson’s command have come back to order, and march behind his line in columns.
Count von Styrum receives the request to meet from Fürst von Anhalt-Dessau. Sensing no immediate danger to his rear, he prepares to ride off in search of his comrade
Move 27 (13:45)
")
The pursuing French cavalry reach the Swabian infantry and begin the dreadful task with sabres drawn. The Austrian cuirassiers pass around the flank of a line of Imperialist infantry, and see this carnage. Revenge spurs them on.
The Austrian infantry before Marquis d’Usson tries one last time to break his line; thick smoke and the sound of musketry ripples up and down. One battalion of Austrians turns and flees, leaving a gap in the line.
Fürst von Anhalt-Dessau has ordered his Prussians to form a new line of battle, with which to sweep the flank of the French. The first Prussian column turns into line.
Move 28 (13:50)
")
The French cavalry still do their terrible work on the defenceless Swabian infantry; only Mars can bear to look on the scene. The Prussian and Austrian cavalry dig their spurs in to drive their horses faster, so they can catch the French.
The Austrian infantry attack breaks on the wall of the French, and most of them retire or retreat.
Count von Styrum now knows he cannot quickly win this battle; he must turn his force to face the ever-growing threat from the French main army, whose columns appear to stretch over the horizon, and place a rear guard to fend off d’Usson’s men.
To the rear of the Imperialists, Maréchal Villars breasts the hill with his fresh infantry, and is delighted to see that d’Usson’s men still making a fight of it. Versailles shall hear of this.
Move 29 (13:55)
")
The proximity of the pursuing Prussian and Austrian cavalry force the French to break off their attack on the Swabian infantry.
The Austrian cavalry on the French right pour through the gap in theline left by the retreating infantry battalion, as they see the chance to attack the fleeing men.
Maréchal Villars swings the French infantry column to his right before Unterglauheim.
In the midst of the disorganised imperialist infantry, Count von Styrum and Fürst von Anhalt-Dessau meet to decide on the next phase of the battle.
Move 30 (14:00)
")
The French cavalry calmly form into line, as the Prussians and Austrians try to reach them. The remainder of the terrified Swabian infantry make for Oberglauheim.
On the French right flank, Marquis d’Usson sees his retreating battalion come to some order and form square to fight off the Austrian cavalry attacking them. White smoke envelops the square and for now he cannot tell if they have survived the onslaught.
With a heavy heart, Count von Styrum orders his infantry to break off the attack on d’Usson’s men and turn around to fight the ever growing French threat. Fürst von Anhalt-Dessau will lead his Prussians on, and clear d’Usson from the field, having time to swing around behind von Styrum’s men, to form a masse de decision for later in the day.
Move 31 (14:05)
")
The French cavalry ride back towards their own infantry deploying under the command of Maréchal Villars. Their pursuers will not reach them.
On the French right flank, le régiment Tourraine fights off the Austrian cavalry who retire in disorder. Marquis d’Usson appaulds his men and their resolve. Having seen off the Imperialists, now he must turn his men and face the Prussians.
Count von Styrum tries to calm two battalions of men fleeing from contact with d’Usson’s men. Every man will be needed in the next fight.
Move 32 (14:10)
")
Minerva watches with satisfaction and Mars with frustration as mayhem gives way to manoeuvre. The dispositions chosen by the generals now will determine the battles fate.
The Imperialists draw back to form a line of battle along the river Nebel. Before them, the growing Franco-Bavarian army also deploy into line of battle.
The successful French cavalry raid rides back to join thier newly arrived camarades who have just breasted the hill before Oberglauheim.
Fürst von Anhalt-Dessau welcomes back his cavalry after their fruitless chase of the French. They will be a trump card to play when attacking d’Usson’s men.
Marquis d’Usson begins issuing the orders to swing his men, forming a right angle into a new line to face the men in Berliner blau.
Move 33 (14:15)
")
The manoeuvres continue uninterrupted, apart from artillery fire raining cannon balls down on the marching men.
Fürst von Anhalt-Dessau watches his infantry march in columns, shortly to form a new line. Minerva whispers in his ear and he sees the empty space by the left flank of d’Usson’s line, now forming a curve. His men on the right flank have no-one to fight.
d’Usson knows this too; he must extend his left, or risk being flanked. His men are in front of the river Schwanenbach; they would be better behind it to face the Prussian wave when it comes.
Move 34 (14:20)
")
Marquis d’Usson rides as fast as he can to his right flank, ordering a rapid redeployment of men to his left flank. But a commander knows that no matter how urgent the need, it still takes time.
Before d’Usson’s men, Fürst von Anhalt-Dessau urges his infantry on in their redeployment to a line of battle. The race is on between the French and the Prussians in reforming before the next round of combat.
Move 35 (14:25)
")
All is movement. The Prussians near finishing their redeployment, d’Ussons’s French have only started theirs.
Maréchal Villars watches his first line of infantry intently. Should he attack immediately, or wait until the next column of men marching steadily along the road towards the battlefield deploy and form a second line?
Count von Styrum urges the Imperialists towards the river Nebel to form a second line of defence. All he can do is endure the next French attack and hope the Prussians can finish off the French to his rear.
Move 36 (14:30)
")
The Prussians finish their deployment, as do Maréchal Villars first line of French infantry.
The Imperialists strive to close the gap between their first and second line, as they see the second column of French infantry breast the hill before them. “So many?” says Count von Styrum, but only to himself.
Move 37 (14:35)
")
The Prussians and French begin a deadly Sarabande; the Prussians advance and the French retire behind the river Schwanenbach, ready to receive the next advance. Behind their line, the two French battalions march as fast as they can to cover the gap emerging on the left flank.
Maréchal Villars waits for the second line of French infantry to begin to form, and Count von Styrum is grateful there is no immediate attack. His second line will be in place before the French come on.
Move 38 (14:40)
")
The Prussians advance, the French retire, traiding space for time. Fürst von Anhalt-Dessau tires of the Sarabande; time to up the tempo to a Gavotte. He orders his cavalry to head for the wings of his line and wait for any weakness in the French.
Move 39 (14:45)
")
And so the deadly Gavotte begins, as a line of fire breaks out across the Prussians.
“Machet Euch fertig! Schlaget an! Feuer!”
And the French, who reply
“Présentez armes! En joue! Feu!”
The French initially fare worse. The Prussian cavalry trot forwards looking intently for a French retreat they can pounce on, hawk on mouse.
Move 40 (14:50)
")
Fortuna Belli frowns on the Prussians, as the battalion on their right retreat. The Prussian cavalry by them move forward.
Behind the French firing line, le régiment Royal Roussilon and its companion near the end of their forced march in column. But they see les Prusses wheel towards them, en muraille.
Far away from this action, les Bavarois arrive and march in column. Maximilian II, Elector of Bavaria, rides up to Maréchal Villars on the hill to discuss how best to deploy his men.
Move 41 (14:55)
")
The Prussian infantry begin to advance in the firefight. The Prussian cavalry charge the French left wing, with the end battalion in a disrupted square, which withstands the first assault. Along the firing line, d’Usson’s men still mostly hold, en muraille blanc, although increasingly ragged.
On the hill, Maréchal Villars sees d’Usson’s men still stand. His troops have almost deployed in the second line, so he suggests that Maximilian II leads les Bavarois in a flanking march towards Oberglauheim.
Move 42 (15:00)
")
d’Usson’s men begin to retire from the Prussian advance, as the Marquis tries to rally le régiment Artois. The Prussian cavalry become disorganised as they try to break the French square, who holds on.
“Avant!” The bugles call out, the drums beat and the first line of Maréchal Villars infantry march towards les autres chiens.
Move 43 (15:05)
")
Firing erupts as the French and Austrians exchange fire, with the French getting the worst. Fortuna Belli frowns on le régiment La Reine, their blood turns to ice and they run.
The French cavalry takes the onset of firing as their cue, and begin to sweep around past the village of Weilheim.
Marquis d’Usson stays with his men as they continue to fall back, leaving two battalions in square dangerously exposed to Prussian ire. They hold firm, and send the Prussian cavalry back in disarray. Fürst von Anhalt-Dessau steadies the battalions by him.
Move 44 (15:10)
")
Count von Styrum has cause for celebration, as only le régiment Le Rois remains from the French first line. The rest have retired into Unterglauheim and the mill.
Maréchal Villars masks his displeasure with the performance of his infantry, hoping that le régiment Champagne at the far right of the line will do well. He and Maximilian II urge les Bavarois on. The sooner the flanking move takes place, the better.
Marquis d’Usson watches the squares of le régiments Hainaut et Orleans send the Prussians back, with a little help from the French battery nearby.
Move 45 (15:15)
")
The Austrian battalion at the left of the line looks on at the cavalry mêlée, and decides to form square. “Formiert das Karree! Das ist ein Behfehl”. The men obey as quickly as they can.
Despite holding their own in the first attack from the French, Count von Styrum and his men grow increasingly restless. They can see the French cavalry ride around and attack their own before the village of Oberglauheim. If the Austrians do not hold, their flank will be exposed, as surely as the unfolding infantry attack from die Bayern will bring. And to their rear, a strange roar goes up. Die Französisch have beaten die Preußen!! “Mein Gott, wir sind umgeben”.
Move 46 (15:20)
")
Fortuna Belli frowns on the Austrian cavalry and the French cavalry muraille sweeps all before them. That’s enough for Count von Styrum’s men, they have endured enough, and the first line falls swiftly into disarray brought on by panic.
This echoes onwards to the Prussians, and they too sense the dangers and fall back to the village of Lutzingen.
Maréchal Villars sees this, but how to exploit it? His troops in Weilheim spring out and force the Austrians back. Time for the second line to advance.
Move 47 (15:25)
")
The French sweep on and the Austrians fall back. That’s enough for the Austrian artillery on the hill, who limber up and begin to make their way across the plain.
Mars calls to the French cavalry on the right, and their commander leads them forwards by le régiment Champagne. A cavalry officers dream; an army falling back in disarry. “Ziehen Säbel”!
Marquis d’Usson forms his men into another line who have been fighting for four hours continuously. Such a long day.
Move 48 (15:30)
")
A full mêlée rages by he village of Oberglauheim as the Austrians and Prussians try to stem the advance of the French cavalry.
Count von Styrums men fall steadily back and it looks as if the battle is lost; Mars rides with the French cavalry on the right as they bear down on them, sabres drawn. The Austrians have reformed into columns for quicker movement.
Fürst von Anhalt-Dessau rallies the battalions by him as they reform into a shaken line, ready to hold the gap between Oberglauheim and Lutzingen.
d’Usson’s men advance again. They could cut off the Austrian retreat.
Move 49 (15:35)
")
The Austrian cavalry send the French cavalry back on the left flank in disarray. If the austrians can repeat this on the right flank, they may yet escape the battlefield in good order.
Move 50 (15:40)
")
What though the field be lost?
All is not lost; the unconquerable Will,
And study of revenge, immortal hate,
And courage never to submit or yield.
Count von Styrum sees his cavalry on the right rout after a brief mêlée with the victorious French. He must save as many men as he can before d’Usson’s men close in. The Prussians try to come to order, but they too have wilted before Fortuna Belli‘s implacable gaze.
“Jeder für sich und Gott mit alle”!
The battle is lost for the Imperialists.
Move 51 (15:45)
")
The French cavalry chase the fleeing Austrian infantry into the rough marshland by the Danube, who throw their equipment away, to help them run even quicker. These men are happy enough to still be alive – what need have they of standards and muskets? The Austrian cavalry flees behind the ragged mass of their infantry, as all desperately try to make the gap left open by the Prussians and the Imperialist cavalry by Oberglauheim.
d’Usson’s men advance. The gap the Imperialists have open to them to retreat is reducing minute by minute. Count von Styrum knows this and rides headlong towards escape, abandoning the troops behind him.
Move 52 (15:50)
")
The French cavalry ride into the fleeing Austrian infantry, leaving more work for Somnus and Mors in their wake, as men, cannons and standards fall to their sabres. To their right, the French infantry under Maréchal Villars march forward, scattering an Austrian artillery train. All the Imperialist guns are now in French hands.
d’Usson’s men halt their advance to form square as fleeing Austrian cavalry ride by, but the gap for retreat is still closing.
Move 53 (15:55)
")
As more Austrians fall to French sabres, the Bavarian troops have steadily been marching round and will soon be able to attack Oberglauheim, the lynchpin in the gate still open for the Imperialists and Prussians to escape through.
Maximilian II urges the French cavalry on, which line the northern edge of the battlefield, as they face off against the Prussian and Austrian cavalry. Despite being allies, he cannot get the men to advance. Prussian infantry march as fast as they can to form the rearguard on the retreat to Nordlingen.
Still the net closes, bringing in more Austrian soldiers, who throw their hands up in surrender.
Move 54 (16:00)
")
The net closes in further, and more Imperialists fall into it. They simply beg for mercy and no longer fight.
Move 55 (16:05)
")
The Bavarians reach Oberglauheim, and the Austrians quit without a fight to join the retreating throng. d’Usson’s men open fire on the remainder still running through the gap, as the French cavalry in pursuit at the rear round up the Imperialist stragglers. The net has closed.
Move 56 (16:10)
")
Today has been a disaster or a triumph, depending on the point of view of the combatants. Fortuna Belli takes no sides.
Victoria awards the day and the triumph to the French and Bavarians, as she surveys their terrible handiwork. Over 60% of the Austro-Prussian army have become casualties, all their artillery train, and a swathe of their standards are now in French hands.
“d’Usson and his men accomplished miracles today, your Majesty, as did the rest of your army”, Maréchal Villars shall tell Le Roi Soleil in tonight’s dispatch.
Le Roi Soleil shall light a candle in Sainte-Chapelle once he gets the news, and order the singing of Te Deums. Perhaps he shall call Maréchal Villars “Le Tapissier de Notre-Dame. Il est surnommé le tapissier de Notre-Dame en raison du grand nombre de drapeaux ennemis, qu’il prend sur les champs de bataille et que l’on suspend dans le cœur de la cathédrale.”

![]()
The entire battle sequence is available as an animated gif, best viewed in Windows picture viewer.

The Generals fighting this battle were


1709 The Battle of Malplaquet and War Spanish Succession Battles Battle of Malplaquet, Blackadder, Duke of Marlborough, Fortuna Belli, Malbrough s'en va-t-en guerre, Marshal Boufflers, Marshal Villars, Prince Eugene, War of the Spanish Succession 3:00 pm
![]()

![]()
The battle of Malplaquet was the bloodiest encounter in the 18th century, and was the climax of the campaign of 1709 during the war of the Spanish Succession.
Hopes for peace were high at the start of the year, after the successful campaign by the Allied forces, led by the Duke of Malborough and Prince Eugene in 1708. France was close to breaking point.
")
Peace negotiations were established, but the Allies demanded too much in requiring Louis XIV to remove his grandson from the throne of Spain (the initial cause of the war), in favour of the Holy Roman Emperor, Charles VI.
The French would not comply with this demand, ensuring that the war would be fought to a bitter conclusion, much to Marlborough and the Allies regret.
")
Louis XIV appointed Marshal Villars to lead the battered French Army and defend the borders of France. He quickly improved them in terms of morale and matériel.
")
The campaign of 1709 opened with a flanking move to the east, and the besiegement of Tournai.
")
Eventually Tournai fell to the allies.
This led the way clear for the Allies to continue their eastwards flanking move, hoping to bypass the defensive lines built by the French. In early Septemeber, the Allies moved on Mons. Villars recognised a battle was close at hand. He received a letter from Louis XIV:-
‘should Mons follow on the same fate of Tournai, our case is undone; you are by every means in your power to relieve the garrison; the cost is not to be considered, the salvation of France is at stake.’
Marshal Boufflers joined the French army, ‘with his cuirass and weapons’, to serve under Marshal Villars.
On the eve of the battle, the Allies stood their force in two bodies on the plain of Mons before the woods, hoping to tempt Marshal Villars and his army through the Aulnois gap onto the plain of Mons beyond. Instead Villars moved his army into the Aulnois gap and began constructing redans in the woods on each flank, which were considered by the conventions of the day to secure them. In the gap itself further redans were built, creating a strong defensive position.
")
Villars and Boufflers had some 80,000 men and 80 cannon.
Marlborough and Eugene had some 110,000 men and 120 cannon, and thus had an overall advantage of ~4:3 in men.
The Allied plan of attack for September 11th followed the basic pattern of the battle of Blenheim.
")
")
The Greeks believed in “Ethos Anthropos Daimon”; a man’s character is his fate. The brilliant victories by the Duke of Marlborough at the Battles of Blenheim and Ramilles had used central attacks. Villars would make his centre as defensible as possible with redans, stretching into the woods either side of the Aulnois gap, and let Marlborough’s men bleed to death in the expected assaults.
")
")
The French counterplan relied heavily on the assumption that the wooded flanks were secure from Allied incursions, as normally assumed during this period. However, fog lifted slowly from the battlefield on the morning of September 11th, allowing the Allies to deploy large number of troop in the wood of Taisnières unnoticed.
For the main attack on the French left wing, three lines of troops were used; about 80 battalions of Imperialists in all, under Prince Eugene.
For the secondary attack on the French right wing, two lines of troops were used; about 30 battalions of Dutch, under the Prince of Orange.
For the final central attack, only one line of troops were used; about 19 battalions of mostly British, together with the major part of the artillery and the cavalry reserve of about 200 squadrons of cavalry (some 30,000 horsemen) under the Duke of Marlborough.
")
The Imperialist and Prussian troops began their assault on the wood of Taisnières, but were stopped by unexpectedly fierce resistance from the French infantry.
")
")
The account of La Colonie, the Bavarian army ‘Old Campaigner’ describes the advance of the Prussians under fire towards the wood of Taisnières.
“As soon as this dense column appeared in the avenue, fourteen guns were promptly brought up in front of our brigade almost in line with the regiment of Garde Franchise. The fire of this battery was terrific, and hardly a shot missed its mark. I could not help noticing the officer in command, who although he seemed elderly was nevertheless so active that in giving his orders there was no cessation of action anywhere, the cannon shot continued to pour forth without a break, plunged into the enemy’s infantry and carried off whole ranks at a time, but a gap was no sooner created than it was immediately filled again, and they even continued their advance upon us without giving us any idea of the actual point determined on for their attack. At last the column, leaving the great battery on its left, changed its direction a quarter right and threw itself precipitately into the wood on our left, making an assault upon that portion which had been breached.”
The day was turning bloody indeed, and it was clear that the French would fight to hold every position.
")
The Prince of Orange led 30 Dutch battalions in an assault of the French redans before the wood of Lanières.
Again, the French mounted a stiff resistance, firing at close range, and opening up enfilading grapeshot fire with cannon, concealed in low ground. Terrible casualties were inflicted. The Dutch reached the line of redans, only to be met with further musketry from the French infantry, forcing the Dutch to retire in good order.
")
")
Both assaults on the prepared positions had failed. The Allies regrouped and tried again.
The Prince of Orange led the survivors in a new assault on the French. The Dutch troops followed, with the officers falling alongside their men, including Generals Spaar & Week.
Once again, French enfilading grapeshot and musketry did their terrible work, before the Dutch reached the redans, only to be thrown back by a spirited counterattack. The Dutch retired in disorder, and might have been chased from the field but for cavalry assistance.
")
Schulenburg led the survivors of the Imperialist first attack to a new assault of the French in the wood of Taisnières, this time breaking through the north face.
Lottum’s Prussians fared little better in their second assault, being brought to a halt, ‘torn and exhausted’. An English brigade under Argyll went in support of this assault.
Inside the wood of Taisnières, over seven thousand men were killed and wounded. The Allied infantry pursued the remaining four or five thousand French survivors. Little quarter was given on either side.
‘They hewed in pieces all they found before them, … even the dead when their fury found no more living to devour.’
")
By 10:30 Marlborough was aware that the first Dutch assault failed and rode over to see the troops, when he was intercepted by Goslinga, the Dutch deputy in the field.
Goslinga told the tale of the double repulse and together both men, joined by Prince Eugene, rode over to see the Prince of Orange ready to lead his shattered remnants in a third assault; this the Duke forbade.
‘Our left was the Dutch troops only, who beheaved themselves extremely well, but could not force the enemy retrenchment, so that their effort has suffered more than any other nation’
Marlborough, after the battle.
By 11:30, Villars sensed his left flank was slowly crumbling under the weight of numbers of troops employed by the Allies.
He did the only thing possible by withdrawing troops from his centre, exactly as Marlborough had intended, taking the Irish, French and Bavarians from the redans and sending them into the Wood of Taisnières as reinforcements.
‘By the time the Irish Brigade had got well into the wood it was considered to be hardly sufficient as a reinforcement by itself, and an order came for us to follow it, although there was no one else left to fill our place which would be left open to the enemy. They would not fail to seize it, as they could then attack the Maison du Roi with a great chance of success by simply lining the outside of our entrenchments, a manoeuvre quite possible for them to carry out. When the first order was brought to the brigade-major, who reported it to me, I refused to obey it, and pointed out the absolute necessity that existed for our maintaining the position we were holding ; but a lieutenant-general then arrived on the scene, and ordered us a second time to march off, so sharply that all our remonstrances were useless. We abandoned our post and marched into the wood to join in the fusilade with the others.’ Jean de la Colonie
Despite his defensive traps, Villars was being forced by relentless pressure to comply with Marlborough and Eugene’s plan.
")
Command in the front line on the battlefield in the age of muskets meant taking your chances in combat, along with everyone else. Prince Eugene was wounded, but not seriously.
")
Men from one nation fought on each side during this battle. Two Swiss (Bernese) regiments had a bayonet fight, one in the French and one in the Dutch service respectively. In the wood of Taisnières, the Royal Irish met and fought the French Royal Irish Regiment, the ‘Wild Geese’. This account survives, and illustrates the tactical advance used by the British and Dutch infantry in platoon firing, rather than firing by ranks, as used by the French.
‘…When the army advanced to attack the enemy, we also advanced into that part of the wood, which was in our front. We continued marching slowly on, til we came to an open in the wood. It was a small plain, on the opposite side of which we perceived a battalion of the enemy drawn up, a skirt of the wood being in the rear of them. Upon this Colonel Keane, who was then head of the Regiment, having drawn us up, and formed our platoons, advanced gently towards them, with the six platoons of out first firing made ready. When we had advanced within a hundred paces of them, they gave us the fire of one of their ranks; whereupon we halted, and returned them the fire of our six platoons at once; and immediately made ready the six platoons of our second fire, and advanced upon them again. They then gave us the fire of another rank, and we returned them a second fire, which made them shrink; however, they gave us the fire of a third rank after a scattering manner, and then retired into the wood in great disorder: on the which we send our third fire after them, and saw them no more. We advanced cautiously up to the ground which they had quitted, and found several of them killed and wounded; among them Lieutenant O’Sullivan, who told us the battalion we had engaged was the Royal Regiment of Ireland. Here, therefore, there was a fair trial of skill between the two Royal Regiments of Ireland, one in the British, the other in the French service; for we met upon equal terms, and there was none else to interpose. We had but four men killed and six wounded: and found near forty of them on the spot killed and wounded.’ Captain Parker
By midday, the French had been driven from the wood of Taisnières, and began reorganising between the villages of La Folie and Chaussée du Bois for a counterattack.
")
General Schulenburg prompted Marlborough to notice the empty French centre and to occupy it.
")
The path to victory for the Allies lay open if they could seize their opportunity quickly.
")
The Allied centre advanced to attack the empty French centre.
")
‘It was the most deliberate, solemn, and well-ordered battle I ever saw – a noble and fine disposition, and as nobly executed. Every man was at his post; and I never saw troops engage with more cheerfulness, boldness and resolution. In all the soldiers faces appeared a brisk and lively gaiety which presaged victory. The Lord of Hosts went forth at our head as Captain of our host, and the army followed with a daring cheerful boldness, for we never doubted but we would beat them. Providence ordered it so, that our regiment was no farther engaged than by being cannonaded, which was, indeed, the most severe that ever our regiment suffered, and by which we had considerable loss. But the soldiers endured it without shrinking, very patiently, and with great courage. For my own part I was nobly and richly supplied, as I have always been on these occasions, with liberal supplies of grace and strength, as the exigencies of the day called for. I never has a more pleasant day in my life. I was kept in perfect peace; my mind stayed, trusting in God.’ Major Blackadder
")
")
The Dutch squadrons of Auvergne passed through the gaps in the redans, followed by the British cavalry under General Wood, and the rest of the Prussian, Hannoverian and Imperialist cavalry, some 30,000 horsemen in total, to begin the biggest cavalry battle in the eighteenth century.
")
Exchange of fire was a trial of endurance and nerve, and well as chance, as Corporal Bishop’s account makes clear.
‘They returned our volley with great success. I may say it, for my right and left hand men were shot dead, and in falling had almost thrown me down, for I could scare prevent my falling among the dead men. Then I said to the second rank: ‘Come my boys, make good the front.’ With that they drew up. Then I said: ‘Never fear, we shall have better luck the next throw.’ But I just saved my word, for my right hand man was shot through the head, and the man that followed me was shot through the groin, and I escaped all, though nothing but the Providence of God could protect me. Then our rear man was called up to be a front; but he poor man was struck with a panic, fearing that he should share the same fate as the others did. He endeavoured to half cover himself behind me, but I put out my hand behind me and pulled him up, and told him, that I could no ways screen him, for he was sensible a man behind him was shot. By strong persuasion I prevailed upon him, so that he was not in the least bit daunted, but stood it out as bold as a lion. We received a great many volleys after that, and one time I remember it wounded my Captain and took my left hand man, and almost swept off those on my right, so that it left the man that was intimidated, and myself alone. Then I said, ‘Come Partner, there is nothing like having good courage.’ So we filled up our ranks in a regular form and when we had so done, we fired upon them briskly and with great success.’
Even great commanders succumb to the whims of Fortuna Belli, and Villars fell wounded at this critical juncture.
")
Overall command of the French army transferred to Marshal Boufflers. His ‘cuirass and weapons’ were needed, after all.
")
On the left flank, the French gained a notable success, scattering Allied cavalry in the act of deployment.
")
The cavalry battle in the centre ebbed to and fro, as the Allies tried to establish a bridgehead.
")
The Allies were driven back against the redans, only for the French to be dispersed by British infantry fire.
")
Boufflers led six charges to countain the Allied advance, led by Marlborough and Eugene in person, but were slowly pressed back by weight of numbers. The French retired onto the plain behind the redans, where the cavalry struggle continued.
Meanwhile, the Dutch eventually forced the French from their prepared positions on their right flank.
")
The battle now ended. The French now left the field in good order, both wings retiring, covered by the cavalry in the centre. The Allies were too exhausted to pursue.
By the terms of 18thC warfare, the Allies had won the battle, since they possessed the field, but had lost considerably more men in combat. In this sense, the battle was a technical victory for the Allies, rather than the earlier crushing defeats that Marlborough inflicted on the French.
")
Reflections on the aftermath of the battle make sombre reading…
‘The day was very bloody, and disputed for more than six hours with more obstinacy and uncertainty of result than I know how to describe. The Princes and generals who saw yesterday the left of the battlefield were horror-struck to see our men stretched before the entrenchment and within it in their ranks as they had fought.’
van Goslinga
‘In many places they lye as thick as you ever saw a flock of sheep, and where our cousin Tuillibardine was, it was prodigious. I think I never saw the like.’
‘He only wonders how anyone comes off where bullets fly so thick… None alive ever saw such a battle, God give us a good peace… I hope to God it may be the last battle I may see.’
Orkney
‘I am so tired that I have but strength enough to tell you that we have had this day a very bloody battle, the first part of the day we beat their foot, and afterwards their horse. God Almighty be praised, it is now in our powers to have what peace we please, and I may be pretty well assured of never being in another battle.’
Marlborough to Sarah, his Wife, Personal letter on the night of the battle.
‘It is melancholy to see so many brave men killed, with whom I have lived these last eight years, when we thought ourselves sure of a peace.’
Marlborough to Godolphin, October 3rd 1709
Despite his crippling wound Marshal Villars recovered, and wrote to Louis XIV, describing the pyrrhic victory he believed the Allies had won.
")
For certain, he had prevented an invasion of France in 1709, and kept her hopes alive for better terms in any future peace treaty.
Widespread shock at the level of casualties from the battle was felt across European society.
‘Ye joy here doe not appear proportional to the success; for ye cries of widows, orphans and tender virgins, deprived of their husbands, fathers and Gallants prevail so much amongst this phlegmatic nation that I believe the beaten French will carry off disgrace with better countenance than ye Dutch triumphant express their Glory; but to say the truth the Dutch troops suffered extremely… Walpole, the Hague, 17th September 1709
Malplaquet was the last major battle that the Duke of Malborough fought during the war of the Spanish Succession, although he continued in the field for another two years, gaining further victories and territory from the French.
The battlefield is commemorated today by monuments, both in France
")
and on the column of victory at Blenheim Palace, England.
")
The battle also lives on in France in a folk song, Malbrough s’en va-t-en guerre. This suggests that The Duke of Marlborough died during the day’s action, and the news is eventually passed to his wife, Sarah Churchill, Mistress of the Robes to Queen Anne. It became popular in France as a children’s song, and still survives, a faint echo of that bloody day in 1709.
The full slide pack is available as a pdf file here, (7 Mb file!), or as a powerpoint slideshow (pps) Malplaquet 1709 (12 Mb file!) .
")
")
1709 The Battle of Malplaquet and War Spanish Succession Battles and Wargames Battle of Malplaquet, Duke of Marlborough, Fortuna Belli, Mars, Marshal Boufflers, Marshal Villars, Minerva, Prince Eugene, Victoria, War of the Spanish Succession 9:00 am
![]()

![]()
The battle of Malplaquet was the last of the major battles that the Duke of Marlborough fought in the war of the Spanish succession. Located near Mons on the French border, the battle resulted in a Pyrrhic victory for the Allied forces over the Franco Bavarian army, led by Marshal Villars.
For the 300th anniverary of the battle, a wargame simulation is described below.
The schematic of the battlefield is shown below, scaled down to fit our beloved bit of 5′ by 4′ for the wargame recreation. The scale used is board 1mm = battlefield 2 m; each move represents 5 minutes, and each figure represents 60 men using 15mm figures. Thus the 5′ by 4′ board rescales to 3 by 2.4 km on the battlefield.

This is roughly a shrinkage by 5:1 of the real battlefield, so the number of troops need to be reduced accordingly to keep the troop density equivalent. The Allies had about 110,000 men, and the Franco-Bavarians about 80,000 on 11th September 1709. Reducing this by a factor of approximately 5, the following order of battle is given.

Assuming 600 men per battalion and 120 men per squadron, the Allies have a total of 22,000 men (26 battalions, 48 squadrons and 30 cannons). The Franco-Bavarians have a total of 17,000 men (21 battalions, 33 squadrons and 20 cannons).
Clearly outnumbered, the French have created a series of redans and entrenchments that span the centre of the battlefield, easily seen in the photographs below.
The rules used for the re-enactment are found here.
![]()

Move 1 9:00 (time of the start of the battle on 11th September 1709 )

Maréchal Villars has heard the muse of warfare, Minerva, whisper in his ear “Ethos Anthropos Daimon”; a man’s character is his fate. The brilliant victories by the Duke of Marlborough at the Battles of Blenheim and Ramilles had used central attacks. Villars has made his centre as strong as possible with redans, stretching into the woods either side of the Aulnois gap, and will let Marlborough’s men bleed to death in the expected assaults on these prepared positions.
Marlborough and Eugene are sure the French will not contest à outrance this battlefield, but will yield to their will: flanking attacks, causing a weakening of the centre, followed by a coup de grâce attack through the centre.
Fortuna Belli can only smile on one of these protagonists.
A massed cannonade from the grand battery in the Allied centre signals the start of the battle proper, and Eugene leads the Imperialist infantry forwards through the wood of Taisnières. Lottum leads the Prussians forward against the flank of the wood.
Move 3 9:15

The Allied assault move forward slowly through the wood of Taisnières. Villars cannot see the mass of troops in the thick wood, but a messenger from Albergotti, the General in command of his extreme left, tells him that he can hear drumbeats across a broad front in the woods. Ever cautious, mon Maréchal readies his reserve about Chaussée du Bois to enter the fray. He crosses his centre, and calls on le regiment du Bourbon to march to Chaussée du Bois to fill the gap. Meanwhile, the French cannonade make bitter battleplay upon Lottum‘s advancing Prussians, who suffer as the sky rains cannonballs on them.
Move 6 9:30

The Allied assault through the wood of Taisnières meets its first stiff resistance from the French infantry, sheltering behind redans. The Imperialst Austrian first line withers under fire and is disrupted. The Prussians attempt to wheel around on the plane of Aulnois before the wood of Taisnières, and in so doing expose their flank to the French artillery. This is a target no gunner can miss, and whole ranks are carried off. The first line breaks in retreat, the second is disrupted. Lottum urges them on under fire. Meanwhile, Maréchal Villars has called for more reserves to help with the hammer blow he expects at the top of wood of Taisnières. He sends a messenger to summon the Spanish troops from his right wing, under the command of General D’Artagnan.
The Prince of Orange studies his pocket watch. Half an hour has passed since the battle has started. Time to lead his troops against the silent, waiting redans before him; the French watching intently. “Vooruit!”. His men obey.
Move 7 9:35

The brave Dutch infantry is soon immersed in a storm of fire, as the French artillery, concealed by the redans sheltering the Swiss troops opens fire. The right wing of the Dutch infantry is thrown back, the centre is badly disrupted, even before they have a chance to engage with the French.
A messenger sent by Maréchal Villars has been cooly received by General D’Artagnan. He can hear Maréchal Boufflers troops beginning to repulse the Dutch advance. He sends the messenger back, empty handed; “Je suis nécessaire ici!“. What will le Maréchal say at this impudence?
Fortuna Belli smiles on the French. On the left flank, the Prussians break under flanking fire and exchange of musketry. The Austrians similarly have broken at the top of the woods. Only the extreme right of the Allied line marches through the wood of Taisnières uncontested.
Move 8 9:40

The plight of the Prussians has moved Marlborough to attempt to rally them, together with General Lottum; “Bleiben und kämpfen!”. Eugene has the same task with the Austrians, fleeing from the fire at the top of the wood of Taisnières. Are these really the same French they’ve fought and beaten so many times before?
The Dutch recoil under fire, with only one unit reaching the redans in sufficient order to fight with the Swiss, who make ready:- “Hier chömme d’Holländischer. Füür!”
Move 9 9:45

“Les autres chiens! En Jou! Feu! Chargez!…” For 15 minutes the wall of white coated soldiers of France have fought off the Austrians. They still hold, but are steadily being ouflanked by the brigade under General Withers on the extreme left of the wood of Taisnières…
Aware that the army risks being outflanked, Maréchal Villars moves to the centre to gather reserves. But from where? Did Minerva whisper to Marlborough too? Here he receives the news from General D’Artagnan and his refusal to come to his aid. Mon Maréchal sends the quaking aide back, with a stern rebuke. He will not accept another refusal of a direct command; “France will fall without his troops”.
Marlborough is busy steadying shattered Prussian nerves. But he is aware that the Dutch are suffering terribly on his left flank. The Swiss troops have done their terrible handiwork and the Dutch are in retreat across the battlefront. The Prince of Orange rallies who he can in preparation for a second assault.
Right now, Fortuna Belli clearly favours the French.
Move 10 9:50

The Austrian and British flanking move has just emerged from the wood of Taisnières, stirring the French battalion holding Chaussée du Bois to start to swing towards the threat; “En avant”. In the wood itself, the French still hold back the Austrians, despite now beginning to get disorganised themselves. This tangle of woodland has become Campus Martius, a field of Mars, and the carnage is terrible as Fortuna Belli frowns on the Austrians. Mars, breaker of armies, nods and approves at this strife.
The Prussians are still reorganising whilst under artillery fire.
In the centre, Maréchal Villars has called for every second battalion from his centre, to be sent to his left flank. If he can inflict enough casualties on the Allied advance in the wood of Taisnières, there is a chance he can stem this tide and then divert the troops back to the centre. “Cuimhnidh ar Luimneach” cry the Irish as they march towards the sounds of the fusilade on the left flank.
On the right flank, the Dutch are beginning to regroup before their next attack “Stabiel jongens, stabiel“.
Move 11 9:55

Maréchal Villars has returned to the left flank to take personal command. He sends troops into Chaussée du Bois, even as the Austrians capture the village of La Folie. On the firing line, the French are begining to be driven back from the redans at the top of the woods.
The Prusssians are still slowly coming to order as Marlborough and General Lottum call out “Reiß dich zusammen!!” But the French artillery keeps on firing and playing havoc.
The Prince of Orange steadies the Dutch in his second line, as the first line begins another assault on the French right.
Behind the threatened French front, General D’Artagnan receives mon Maréchal’s admonishment. He must obey this time, and forms his troops into column of march, informing Maréchal Boufflers of his orders.
Move 12 10:00

Fortuna Belli at last smiles on the Allies. The French infantry at the top of the wood of Taisnières are beginning to fall back from the redans in some disorder. General Albergotti has bought time for the reserves to flood to this corner of the battlefield, but is it enough time?
On the extreme left, the British disrupt their French attackers with steady platoon firing. The French respond with a general advance of Bavarian cavalry, which makes ready to threaten any Allied advance out of the wood.
The Prussians begin to regain some order, which is just as well as Marlborough receives a report from the Prince of Orange telling him of their repulse, and demands for more troops.
On the French right, the Swiss infantry and the French artillery break apart another Dutch attack . Only those troops sheltered by the wood of Lanières have made it to the French redans. These are contested with musketry. A pall of battle smoke hangs in the wood, obscuring the view.
Move 13 10:05

On the extreme left, the British infantry have routed their French attackers, who run for the village of Chaussée du Bois. The French cling on to the top of the wood of Taisnières. Meanwhile, French cavalry sweep round, ready to attack the Austrians and British, who will have to form square to defend themselves.
The Prussians bring another unit to order, with cajoles and curses.
On the extreme right, one last Dutch battalion tries its luck against the formidable French redans. Prussian cavalry sweep around to their rear, to stabilise the situation.
Move 14 10:10

The French cavalry charge the fully formed English square. “Steady, lads:- fire!” The irresistable force and the immovable object fight it out, with honours even so far. To counter this cavalry threat, the reserve Austrian cavalry makes its way through the wood. But between them and a flanking charge are 6 squadrons of Bavarian cuirassiers. In the wood of Taisnières, the French have been pushed back halfway, abandoning the redans in a general attempt to reorganise. Maréchal Villars is busy forming a second line from the Irish troops that have just arrived.
The Prussians on the plane cannot see this movement. Neither can any of the Allied commanders see General D’Artagnan march his Spanish Netherlands troops to the left flank.
Marlborough rides over to meet the Prince of Orange and assess the situation. The second Dutch assault has failed; with troops retiring or routing back to their starting position.
The French right flank is secure. “Bien. Quelle affaire!” mutters Maréchal Boufflers, and Fortuna Belli smiles in agreement.
Move 15 10:15

Marlborough listens to the Prince of Orange and rapidly concludes that little is to be gained, but much would be lost by another unsupported self sacrificial attack. A battalion of Hannovarian troops marches through the wood of Tiry to support the shattered survivors; the Dutch are forbidden to advance until the general assault takes place.
General Lottum finally has all the Prussian troops back in order, and they wait for the order to advance.
On the left flank, the solid English square beats back the French cavalry, who retreat back in disarray. The Austrian cavalry emerge from the wood, to be confronted by their Imperial pretenders, the Bavarian cuirassiers. By the side of the English, a single Allied battery is ready to emerge from the wood, ready to pound all before it.
Meanwhile, the French infantry continue to hold some form of firing line in the wood of Taisnières; some firm, some retreat in good order. Behind them, Maréchal Villars has formed a double line of infantry, ready to brave the next Allied storm.
In the French centre, their artillery are disrupted by Allied fire. The slow march of the Spanish Netherlands continues. “Vite, plus vite, mes braves” urges General D’Artagnan.
Move 17 10:25

The Bavarian cuirassiers take the Austrian squadrons in the flank and rout them into the wood. The Britsh infantry return to line formation, and the Allied cannon has unlimbered and begun to attack the French infantry before it. Maréchal Villars calls for the cannon from the redans nearest to the wood of Taisnières to join him ‘Ici, tout de suite’ to answer this impertinence in kind. Thus ordered, the artilery piece limbers up and heads towards the village of Chaussée du Bois. The Prussians and British in the centre of the battlefield notice this movement.
Move 18 10:30

Unaware of the success of the Bavarian cuirassiers, the British infantry begin to advance with covering artillery fire. The Bavarians notice this move and will react shortly. Eugene urges his Austrians on to drive the french out of the last quadrant of the wood of Taisnières. The firing line arcs around, the battle ebbs and flows in the tangled trees.
Elsewhere, the French undergo slow movement towards the left flank. Marlborough and the Prince of Orange have stabilised the Dutch infantry, and the Hannovarians have moved up in support of them.
After 1 1/2 hours of battle, the victory points and the honours belong to the French and the favours of Fortuna Belli have not changed.
Move 19 10:35

Sheltered from direct artillery fire by the village of La Folie, the Bavarian cuirassiers threaten the British infantry, who form square as their only defence. The firing line still stands in the wood of Taisnières, neither the Imperialists or the French will yield this Campus Martius. The French counter attack is beginning to congregate around the village of Chaussée du Bois.
Move 21 10:45

Stalemate – The Bavarian cavalry await the French artillery to arrive and pound the British square into something more malleable for the sword. The British hope that their supporting cannons will suppress this deadly threat. In the woods, the French slowly give way before superior numbers. Eugene must soon see Marlborough and know his will.
Move 23 10:55

The French release control of the wood of Taisnières to the Austrians, and withdraw, attempting to reorganise a new firing line for a possible counterattack. The Bavarian cuirassiers still have the British pinned down in square, but their nemesis, a French artillery battery has just arrived. Meanwhile, in the Allied centre, Eugene meets Marlborough. Despite the carnage on both the left and right flanks, their minds are still made up to attack. Through a gap in the redans they spy General D’Artagnan move his column of infantry towards the French left, they see the gap where a French artillery battery once stood, now replaced by disorganised French infantry. Soon, soon, the trial of strength will begin; a full assault. “Half past eleven, then?”.
Move 24 11:00

Eugene asks Marlborough for the Dutch cavalry immediately behind the British infantry line. He consents.
Apart from artillery duels, all else is quiet across the battlefield. On the French left, reorganisation ready for a counterattack builds up around the village of Chaussée du Bois.
Move 26 11:10

Eugene leads the Dutch cavalry on the road through the edge of the wood of Taisnières. Marlborough sweeps around the Prussians and the rest of the cavalry reserve, “General advance, half past eleven, Gentlemen”. They all nod in agreement. A messenger goes to the Prince of Orange telling him the same. He can’t wait to remove memory of the recent rebuff with his beloved Dutch troops. “Wraak!”, he mutters. The eyes of Mars blaze, like the doors of an open furnace.
Move 27 11:15

The Dutch cavalry sweep past the redans at the top of the wood of Taisnières. They stare at the dead and the wounded, both Imperialist and French. At this speed, it’s hard to tell them apart. All they know for certain is that Prince Eugene leads them towards the sound of cannon fire and the growing sound of the fusliade, as the Imperialists begin to contest the village of Chaussée du Bois.
General D’Artagnan has finally arrived with his reinforcements after 80 minutes marching. They are ready to rest, but are more likely to begin the fight.
Move 29 11:25

Prince Eugene and the Dutch cavalry have passed through the wood, and await the cannonade signal from the artillery by the Prussians, signalling the general advance. The Bavarian cuirassiers still have the British pinned down in square as the artillery duel between the Allies and French continue, with honours even on the left, and the French disorganised by the Irish troops in the centre. The first attempt by the Austrians at breaking into the village of Chaussée du Bois has failed, due to the stubborn resistance from the French firing line.
Move 30 11:30

Marlborough and Eugene hopes that the muse of warfare, Minerva, whispered in their ears too, and that the French have drained their centre to defend their flanks. Time to begin l’attaque à outrance. The Allied mass cannonade in the centre of the battlefield signals the general advance, and the infantry, both British and Prussian, spring to life and march forwards, drums beating, flags waving in the breeze. Behind them, the mass of the Allied cavalry begins to advance at the trot, Marlborough at their head. He calmly reflects that this is the moment commanders-in-chief strive for, the pinnacle of life in the service of his Queen.
“Il a commencé. Une attaque!” says the commander of the Gardes Françaises, who dashes off a rider to find his Maréchal and let him know the news. But the sound of a mass cannonade travels across the whole battlefield, and although Maréchal Villars cannot see it yet, he knows what that sound means. Despite favouring the French so far, will Fortuna Belli continue to do so? The next hour may seal the fate of the war.
Move 31 11:35

The Dutch cavalry emerge from the wood of Taisnières, and the First squadrons of Bavarian cuirassiers instinctly close down on them. The French infantry before the village of Chaussée du Bois form square in response to the cavalry threat.
The Allied infantry in the centre continue their advance, drums beating, passing through their cannons which begin limbering up, ready to move behind the marching lines.
Move 32 11:40

The Dutch cavalry have been disorganised by the Bavarian cuirassiers, who sense the momentum is with them. The Austrian infantry, emerging from the woods have come under fire from the French Artillery, and are disrupted.
In the central redans, the Irish and Bavarian infantry watch the Allied march towards them continue, the sound of their drums getting louder all the time. The French artillery battery by the Irish redans, desperately tries to reorganise and fire off enough shots to stem the tide rolling towards it.
Move 33 11:45

The Dutch cavalry break and flee into the woods. As they draw breath, the Allied battery nearby tears into the Bavarian cuirassiers with flanking grapeshot, and they in turn flee. The second waves of each cavalry advance to fill the gap and hold sway over the French left flank.
Maréchal Villars has moved position behind the Bavarian infantry in the centre and sees the spectacle before him. “Bravo, bravo!”. But what to do?
“Anseo Tagann na Sasanach agus nAlban!”. The French battery beside the Irish redan regains its composure and starts firing into the advancing British. Men fall, but the battalions absorb the cannon fire, as they have all day. Colonel Blackadder of the Cameronian Highlanders recites his prayers as the cannon balls rush close by:-
Thou, O Lord, art just and powerful: O defend our cause against the face of the enemy. O God, thou art a strong tower of defence to all that flee unto thee: O save us from the violence of the enemy…
As the line of the Highlanders sweeps past him, the Prince of Orange gives the signal and the Dutch begin to advance on the redans on the French right. Maréchal Boufflers cannot believe that they would try to storm him again, across the field where so many of their comrades have already fallen.
Move 34 11:50

The Dutch cavalry win the duel; the Bavarian cuirassiers flee. This forces the French infantry into squares, pinning them down. The Austrian infantry push hard against the French firing line by the village of Chaussée du Bois.
The advance of the Cameronian Highlanders towards the French battery in their centre finds Colonel Blackadder reciting the 91st Psalm:-
He that dwelleth in the secret place of the most High shall abide under the shadow of the Almighty. His truth shall be thy shield and buckler. Thou shalt not be afraid for the arrow that flieth by day. A thousand shall fall at thy side, and ten thousand at thy right hand; but it shall not come once near thee.
as the grapeshot sings through the air. But the will of the Throne of Grace, or the whim of Fortuna Belli, prevails and the Highlanders march on, closer to their destiny with the Wild Geese, the Royal Regiment of Ireland in the service of France.
The Bavarian infantry see their fellow Germans, the Prussians of Brandenburg close down towards them, as the noise of their drums grow.
On the French right flank, the Hannoverians and Dutch negotiate the ranks of dead and wounded before trying to storm the retrenchments held by the Swiss in the service of France.
Move 35 11:55

Fierce discord storms, Mars thunders and exclaims,
Furies call as the field’s engulfed in flames.
A universe of fire rings the battlefield across all fronts at once. On the extreme left of the French line, with the blessing of Fortuna Belli, the Dutch cavalry sieze their moment and against all the odds decimate both the nearest French square and the cannon. The remaining French squares look on in horror at the fate of their comrades “mon Dieu, ces pauvres gens!”. Mars, bringer of strife approves.
The fringe of the wood of Taisnières, the village of Chaussée du Bois; both are hotly contested, with the French clinging on.
In the battle for the central redans, the Bavarians and Prussians exchange fire. Meanwhile, Colonel Blackadder‘s penitential prayers are rewarded as the Scots close down, storming the cannon, and disrupting the Irish infantry, who cannot withstand their fury.
The Hannovarian and Dutch infantry fare better this time against the Swiss infantry in French service, disrupting all as they close with bayonet. On the extreme right of the French line, the Dutch are thrown back again by enfilading cannon fire. However, through the shadows of smoke, the gunners make out advancing Prussian cavalry. “Attention, la cavalerie! Vite, Feu!”. Can they stop them in time?
Move 36 12:00

The fighting intensifies. The Dutch cavalry continue to attack the fleeing French infantry, but are counter-attacked in turn by the French cavalry regiment in reserve behind Chaussée du Bois. Some of the Bavarian cuirassiers have rallied and reluctantly advance again. The French fall back from the woods, and strive to hold onto the village.
The Bavarian redan holds firm against the Prussians who suffer dreadfully, being exposed to their fire in the open.
The Irish flee their redan, and the Scots turn the cannons that tormented them back on their former masters. Colonel Blackadder‘s offers the 44th Psalm in praise for their deliverance.
“Thou art my King, O God: command deliverances for Jacob. Through thee will we push down our enemies: through thy name will we tread them under that rise up against us. For I will not trust in my bow, neither shall my sword save me. But thou hast saved us from our enemies, and hast put them to shame that hated us.”
Marlborough at the head of the British cavalry sees the gap in the French defenses that the Scots have made, and increases the pace of the advance to a canter, the others following their Duke.
Sensing what will soon befall his defensive positions, Maréchal Villars has ridden over to join with the Maison du Roi, the finest cavalry in France, ready to counterattack any breach from the Allied sea of men.
The Hannovarian and Dutch still struggle to capture the retrenchments manned by the Swiss, who cling on. “Vooruit!” urges the Prince of Orange. One Dutch battalion cannot hear his call, but act as though they have, shattering the resolve of the French infantry by Maréchal Boufflers, who calls on them to stand and fight.
Move 37 12:05

The universe of battle is all encompassing. On the left flank, the French cavalry manage to break their Dutch opponents, who flee for the woods. Deep in the woods, their comrades who routed earlier have come to rest and try to reorganise. The Bavarian cuirassiers try their luck on an Austrian square before the village of La Folie, which weathers the onslaught so far.
Once again, a column of infantry tries to storm the village of Chaussée du Bois. The French battalion holding the village is isolated; their colleagues have been put to flight by the Austrian infantry.
The Bavarian redan still holds out against the Prussians who fail to make any impression on them.
Marlborough signals the Scots Dragoons to advance through the gap left by their infantry. The chance to express their gratitude at this opportunity is tempered by their eagerness to advance “Out of the way, Sawny swadlers”, they cry as they come on.
The Swiss retreat from their retrenchement, and the Prince of Orange cannot believe his change of luck, given their earlier losses. If only he could more clearly see the smile of Fortuna Belli; her grace now extends to the Dutch infantry on the extreme right of the French army. Having routed their French opponents, they vault the retrenchment and make ready for any counter-attack.
Move 38 12:10

On the left flank, the battle is dominated by Allied squares vs Franco-Bavarian cavalry. Neither side will yield to the other, so the Bavarian and French attacks swirl around their opponents, looking for any weakness to exploit. The hedge of bayonets dissuade the horses to come any closer, as steadily musket fire takes its toll on the cavalry. Deep in the wood of Taisnières, the remnants of the Dutch cavalry make their way back to the front to chance their luck again, whilst Prince Eugene tries to pursuade another group to stand and fight.
In the centre, the Scots Dragoons pass through the gap in the redans and are immediately attacked by French cavalry. “Ces terribles chevaux gris! Comme ils travaillent!” But the Greys hold their own; their motto ‘Nemo me impune lacessit‘ being particularly apt. Soon even more Allied cavalry will flood through the gap.
The Prince of Orange urges his men on, and they vault the retrenchment, and storm the French battery nearby. The French battalion nearest this action counter-charges in an attempt to recapture the guns. The other battery limbers up to move away. The Prussians by the wood of Lanières sees this commotion, and scents an opportunity no cavalry commander could resist.
Maréchal Boufflers, leads a counter-attack against the Dutch troops who breached the retrenchments in the wood of Lanières. Fortuna Belli gives her favour to the French, and the Dutch are repulsed.
Move 39 12:15

The Bavarian cuirassiers break from the steady fire of the Austrian square and flee. Their French cavalry comrades are still chancing their luck on the British square, which still stands firm.
The French infantry in Chaussée du Bois holds out and repulses another Austrian attack. “Assez! Quand vont-ils apprendre?”. The Austrian infantry fails to make more headway against the French holding onto the flank of the village, and retreats back to the edge of the wood of Taisnières.
The Bavarian infantry behind their redan begin to crack, becoming disorganised after 20 minutes of constant fighting. The Irish infantry, who routed sometime earlier from the Scots, have almost made it to the shelter of the village of Malplaquet. Between them and the redans they once held, a fierce cavalry battle rages; Scots Greys and Hannovarian confreres against the French. The mêlée engulfs all; it’s difficult to see who has an advantage.
On the right flank, the Dutch and Hannoverian infantry consolidate their position, leaving the Garde Francaise sandwiched between them and the cavalry action. They sense it is time to withdraw.
Not such luxury for the Maison du Roi, Maréchal Villars wheels them round to face the Prussian cavalry bearing down on them.
Marlborough joins with the Prince of Orange to see how the battle looks from this vantage. He sends messengers to some of the Allied cavalry to swing round to their left and pass round the gap. Despite the prodigious casualties lining the retrenchments before him, he senses the battle is now his if the Allied troops keep pushing on.
Move 40 12:20

The Allied squares have seen off both the Bavarian and French cavalry. The French infantry on the left flank step into the breach and begin attacking the British before they have formed out of square. At stake is control of an artillery battery lost by the French earlier, but held by no-one in the recent débâcle. The Austrian infantry sent to storm the village of Chaussée du Bois listen to no reason or admonishments, they run and run in a blind panic past their commander, Prince Eugene.
The Bavarian infantry in the redan finally break and retreat. Infantry now line the reverse slope of these central redans; what was once French is now firmly in Allied hands. The Hannoverian cavalry are the first to break in the cavalry mêlée, but more reserves pour through the gap.
The Garde Francaise march back, hoping they can get to relative safety and hold onto their regimental colours and honour in this most dangerous position.
Maréchal Villars is now in the thick of a cavalry mêlée with the Maison du Roi, pitched against the Prussians. Fortuna Belli gives no favour, so neither yields. All the time, more Allied cavalry heads towards this point, so the odds are slowly swinging against the French, despite their acknowledged process in arms and their Maréchal.
Maréchal Boufflers has seen off the last Dutch attack, but sees the stream of Allied horsemen heading his way. He has a decision to make; a fighting withdrawal, or a heroic last stand.
Move 41 12:25

Things go well for the French on their left flank. The British infantry break under fire from the French and pass through their Imperialst comrades, spreading disorder as they go. The remnants of the Bavarian cuirassier regiments rally, and try to reorganise.
In the center, the cavalry mêlée ebbs and flows, this time to France’s favour. The Greys are pushed back and their colleagues are threatened in the flank. With no further reinforcements, things might look dire for the remaining troopers, but more Allied cavalry prepare to pour through the gap. The French who attempt to outflank the Allied horsemen come under enfilading fire from the British infantry sheltering behind the redans.
The Garde Francaise continue to march back, unmolested.
The Prussians continue to attack Maréchal Villars and the Maison du Roi in their cavalry mêlée. Allied support appears, which begins to attack the Maison du Roi in the flank. Only le Maréchal and their discipline keeps them from collapsing.
Maréchal Boufflers has decided to withdraw; ”The better part of valour is discretion; in the which better part I have saved my life.” The battle cannot be won, and much more could be lost for France if he fails to extract the right wing from underneath the Allied cavalry. The wood of Lanières offers perfect shelter, and so he orders his infantry to begin to retreat.
Move 42 12:30

Prince Eugene leads the remnants of the Dutch cavalry forward, Batavians against the Bavarian cuirassiers. Both sets of troops are tired, mentally and physically. “Are these my arms, so tired they go on, and on, alone?“. Just one more push can settle the account, either way.
The French infantry push into the disorganised Imperialsts, and recapture their cannon, as Fortuna Belli smiles on them. But in the cavalry mêlée in the centre, she frowns on the French. How capricious!
A French cavalry regiment flees from artillery fire; the next wave of British horsemen take their gap. The British infantry still pour enfilading fire onto the French horsemen, who in turn struggle to overwhelm the outnumbered Allied horsemen. And yet more Allies continue to make their way towards the gap in the redans.
Maréchal Villars and the Maison du Roi cannot hold out for much longer, as even more Allied cavalry threaten to surround them. The restless cavalry have forced the Garde Francaise into square, forcing their retreat to come to a halt. They await an attack, or a more favourable time to move again.
Move 43 12:35

On the left flank, Eugene and the Dutch battle the Bavarians. The clash rages, with the advantage going to the Bavarians. The French infantry still drive into the Austrians, who are pushed back. Elsewhere, on the left flank, an imperceptible breeze stirs through the French infantry that whispers “Retraite en bon ordre”, before the cry becomes “Sauve qui peut”. Battalions begin to withdraw, colours flying and drums beating.
In the centre, the Allied tide is just being held by the French on the left side. On the right side, Maréchal Villars and the Maison du Roi are forced to retreat after 15 minutes of fighting. The door to Allied cavalry advance has been flung open. Maréchal Boufflers showed prescience in starting his retreat.
Move 44 12:40

Fortuna Belli smiles on the French on their left flank. Eugene and the Dutch cavalry are driven back, which leaves the French free to stage an ordered withdrawal. The Garde Francaise retreat in square, shadowed by the rallied Maison du Roi.
Move 45 12:45

The battle is largely confined to movement. The French left, centre and right retreat in an orderly manner; the Allies cautiously advance into the space left behind. Marlborough senses the job is done, the battle is won. But at what cost?
Move 48 13:00

Victoria awards the day to Marlborough and Prince Eugene, as possession of the battlefield is the hallmark of victory. But they have a sea of wounded men to care for, so pursuit is out of the question; the extent of these casualties will only become apparent later in the day as they tour the battlefield together.
The French have inflicted far more casualities than they have suffered, and so some of the honours go to them. The French left wing has left the field broadly intact; the same is true for the French right wing under Maréchal Boufflers. Only in the centre have the French been comprehensively beaten.
Given these facts, in consolation for the resolve the French have shown, Victoria will whisper the postscript to the letter that Maréchal Villars will send to le Roi Soleil.
‘The officers and men of Your Majesty’s troops have done marvels, although your army is in retreat, it will become clear that it has lost less men than the enemy… If God gives us the grace to lose another similar battle, Your Majesty can count on his enemies being destroyed.’

The entire battle sequence is available as an animated gif, best viewed in Windows picture viewer

Rules used for fighting this and other Marlburian battles can be found here.
Thanks to Dixon’s Miniatures for the figures, and to warflag.com for the flags
Finis
1704 The Battle of Vélez-Málaga and Naval Battles and War Spanish Succession Battles and Wargames Admiral Sir George Rooke, Amiral de France de Toulouse, Aquilo, Auster, Favonius, Fortuna Belli, Naval Battles, Venti, Victoria, Vulturnus, Wargames 10:11 pm


The Battle of Vélez-Málaga was the largest naval battle in the War of the Spanish Succession.

It took place on 24 August 1704 south of Málaga, Spain, in an action between an Anglo-Dutch fleet,


which intercepted a Franco-Spanish fleet.


Both fleets had about 50 ships; mostly third rate ships of the line, with a few extra fire-ships and galleys employed, due to the mild weather. The battle itself was bloody, with about 5,000 casualties overall, but no ships were sunk on either side. Both combatants adhered to fighting by line of battle, which offered benefits from mutual support of fire by neighbouring ships, at the restriction of freedom of movement for the fleet. An engraving of the battle gives an impression of the action.

The Franco-Spanish fleet failed to defeat their rivals, and could not retake Gibraltar from the British. Thus, a tactical stalemate turned into an Grand Alliance strategic victory, with long ranging consequences.
Maurepas, a naval minister of Louis XV, once dismissed naval warfare thus: “I don’t think much of these naval combats. C’est piff poff on one side and the other, and leaves the sea as salty as before”. But it’s a deadly piff poff when you’re in the thick of it, as we shall shortly see.
This simulation uses 12 ships per side (i.e. approximately 1/4 ship in original battle), with an Anglo-Dutch fleet intercepting a Franco-Spanish fleet, using simple wargame rules. The names of the ships and the squadrons used for both fleets are found in the velez-malaga-damage-sheets. The weather gauge lies firmly with the Grand Alliance, with the wind blowing from the west, courtesy of the Venti Favonius, at a moderate strength, supporting the approach of the Anglo-Dutch Fleet. During the battle, the wind direction can alter via successive die rolls as explained in the rules. The Franco-Spanish fleet are initially unable to sail directly into wind to head off the Anglo-Dutch, and so wait for their arrival.


The Franco-Spanish fleet have to double round the Anglo-Dutch Fleet, cross their ‘T’ and inflict more damage than they receive, provided the winds change direction. The Anglo-Dutch fleet have to prevent this fleet manoeuver, and in turn inflict more damage than they receive. This will stop an attempted relief of Gibraltar, which lies to the west, by the Franco-Spanish fleet. The English vanguard, under the command of Vice Admiral Sir John Leake in HMS Prince George closes down on the French line, waiting to come into range for combat to commence. Les Vaisseuls de la Marine Royal are ready.
![]()


The French vanguard, led by Vice Amiral de Villette Mursay in the ship Fier, steers slightly to port, bringing his ship in extreme range of the British vanguard.

Alas, the broadside causes no significant damage!
Damage so far:- Anglo-Dutch = 0 Franco-Spanish = 0
The weather now becomes fresher; still blown by Favonius, the west wind.

Fortuna Belli now frowns on Fier. The broadside from HMS Prince George takes out two of her port gun decks, and with a double six being thrown, Vice Amiral de Villette Mursay sees his ship catch fire. HMS Norfolk‘s broadside, destroys the remaining gun deck on the port side. Fier cannot retaliate, and must send all hands to put the fire out, otherwise it will shortly explode.

Fier fails to throw a 5,6, and so the fire continues to grow towards the ship’s magazine. Vice Amiral de Villette Mursay has no option but to steer his ship hard to starboard, away from the main fleet, in case the Fates dictate his ship explodes, and spreads further havoc in a chain reaction. Sérieux is now the flag of the French vanguard, under the command of Captain Chamelin. Its first broadside exacts some revenge against HMS Prince George, which loses a starboard gun deck. The Foudroyant‘s first broadside fails to make any damage on HMS Norfolk.

Damage so far:- Anglo-Dutch = 1 Franco-Spanish = 3
The weather gauge remains the same for the next move.

Broadsides from HMS Prince George fail to result in any damage to Sérieux, but shots to the sails from HMS Norfolk and HMS Barfleur bring down the mainsail and mizzen masts of Foudroyant.

Alas, the unhappy blue squadron, vanguard of the French fleet! Fier fails to throw a 6 to put the raging fires out, Fortuna Belli whispers to Morta it is time, and so the flames reach the ship’s magazine and she explodes. Admiral de Villette Mursay and his crew are lost, and all of France will grieve when they hear the news. The loss of rigging from Foudroyant, encourages her to steer to starboard towards the doomed Fier, and out of the line of battle to help save survivors. Before she turns, her broadside damages HMS Norfolk, and the Sage inflicts even more damage on HMS Barfleur. Revenge begins for the French after the loss of their brave Amiral and his crew.

Damage so far:- Anglo-Dutch = 3 Franco-Spanish = 14
The Venti Favonius runs out of breath, and his companion, Afer Ventus, takes over as the wind swings to the south west, still at the same moderate strength.

The English vanguard pass Sérieux, and further shots to her sails bring down her fore-mast. The main mast to Sage is also brought down by shots from HMS Swiftsure. The English red squadon comprising the centre of the fleet is now fully deployed.

Sérieux now replies in kind against HMS Norfolk, which loses another starboard gundeck. Sage and Tonnant, the flagship of Amiral de France de Toulouse, also fire and damages HMS Royal Sovereign, destroying a gundeck.

Damage so far:- Anglo-Dutch = 6 Franco-Spanish = 17
Afer Ventus continues to blow from the south west, still at the same moderate strength.
HMS Prince George senses her moment and decides to commit the vanguard to double round the French and cross their T. Sérieux is now crossed by fire from both the leading English ships, but their gunnery is less than their resolve, so all they bring down is the main mast. Fortuna Belli now frowns on the Englis, as broadsides ripple down the fleet as far as HMS Monmouth, causing no damage to the French. Meanwhile the Dutch rear guard, headed by Graaf van Albemarle has now arrived.

Sérieux swings round to starboard to follow the English vanguard, and she brings down the fore-mast on HMS Prince George. Fortuna Belli smiles on the broadside reply from the French, as ships fromTonnant to La Sirene fire and their shots slam into the English fleet. Admiral Sir George Rooke on HMS Royal Katherine watches helplessly as she loses all gundecks on her starboard side, and, woe to thee, O ship! – catches fire. Will she go the same way as Le Fier?

Damage so far:- Anglo-Dutch = 14 Franco-Spanish = 18
Afer Ventus continues to blow from the south west, still at the same moderate strength and so the weather gauge remains the same for the next move.
HMS Prince George, HMS Norfolk and HMS Barfleur now ring Sérieux and rake her with broadsides, destroying her remaining gundecks on the port side. She now cannot return fire back on the English. O happy ship! O happy Admiral! HMS Royal Katherine manages to put out the fires and she resumes her position as flagship to the red Squadron, the English Centre. HMS Monmouth and HMS Kent fire broadsides against their opposite numbers in the French line of battle, and Esperance and La Sirene are damaged. The Dutch Rear now appears in strength, with Graaf van Albemarle leading, Gelderland next in line. They will soon be in battle.

Sérieux begins her retreat, but must be careful in not blocking the fire of the fast approaching French line of battle led by Sage, which is just out of range of the English. The French red squadron’s Sirene and Solide fire on the English, damaging HMS Monmouth and HMS Kent.

Damage so far:- Anglo-Dutch = 16 Franco-Spanish = 21.
The Venti Afer Ventus runs out of breath, and his companion, Auster, takes over as the wind swings to the south, still at the same moderate strength. The weather gauge is now neutral, favouring neither fleet.

Alas, unhappy ship! Sérieux is now reduced to a prize waiting to be captured, as further broadsides from HMS Norfolk and HMS Barfleur bring down the last of her rigging and rake her stern, destroying much of her starboard guns. HMS Prince George fails to hit Sage. HMS Kent and HMS Essex fire broadsides, damaging both the Sirene and Solide.

Sage fires a broadside beloved by Fortuna Belli and brings down the rigging on HMS Prince George, which will hamper the English vanguard. Solide and El Torro fire their broadsides. The Spanish shot is especially effective; in their delight, they see HMS Essex catch fire. Will she escape like HMS Royal Katherine did, or go the way of Fier, whose survivors are being rescued by Foudroyant?

Damage so far:- Anglo-Dutch = 20 Franco-Spanish = 26.
Auster continues to blow from the south, but at increased strength.

Broadsides from HMS Prince George and HMS Norfolk bring down the mizzen mast of Sage. HMS Essex manages to get her fires under control and then puts them out, thanks to the crew, Captain Hubbard and Fortuna Belli. Broadsides from HMS Kent to Graaf van Albemarle inflict further damage on their opposite numbers in the line of battle, with El Torro receiving a hit. Lieutenant-Admiral Gerard Callenburgh, in command of the rear on Graaf van Albemarle is delighted at the progress of the Dutch ships for they are ready to join battle.

Broadsides from Sage and Tonnant bring down the two leadings masts of HMS Norfolk, and for once the French fleet edges ahead of the Anglo-Dutch line of battle. Solide and El Torro fire in reply which hits Graaf van Albemarle.

Damage so far:- Anglo-Dutch = 23 Franco-Spanish = 29.
Auster now gives way to Subsolanus, blowing from the south-east, at increased strength. The weather gauge has now swung round in favour of the Franco-Spanish fleet. At this wind strength, seamanship will be sorely tested.

HMS Prince George manages to rig up a temporary sail and gets underway in strong seas. HMS Norfolk fires into Sage, damaging her. A broadside from HMS Swiftsure damages Tonnant. The Dutch now fire a broadside from Graaf van Albemarle to Dordrecht, against the Spanish, causing damage down their line of battle from El Torro to Santo Domingo.

Sage closes down onto HMS Norfolk and boards her. Despite gallant resistance from her depleted crew, HMS Norfolk conceeds and strikes her colours. The French have a new ship for their fleet if they can extract her from the mêlée and their tales will be retold many times! A small crew from the Sage transfers to Le Norfolk to begin the task. The French red squadron, Tonnant, Esperance and Sirene all fire broadsides as the ships pass the duel at the head of the line. The damage inflicted is light, as is that from El Toro, Santo Domingo and Sacra Familia against the Dutch.

Damage so far:- Anglo-Dutch = 32 Franco-Spanish = 35.
Subsolanus, blowing from the south-east, now blows at maximum strength. The Fates have turned the battle into one against the wind and waves, as much as ship against ship and so firing efficiency falls together with an inability to board another ship until the wind drops. The weather gauge still remains in favour of the Franco-Spanish fleet. Can they exploit it?

With the wind still at maximum strength, the Anglo-Dutch fleet moves to head off the Franco-Spanish fleet, preventing them in their primary task of sailing off the combat area to the west, which would allow the recapture of Gilbraltar. As the English ships of the blue squadron sail on, they fire broadsides towards Tonnant. However, in the high seas these inflict only minor damage. The Dutch also have limited success against the Spanish ships further down the line of battle. Graaf van Albemarle to Nijmegen all fire and lightly damage the Santo Domingo. More success is gained against the badly damaged Sérieux. Shots from HMS Monmouth to HMS Kent damage her further, and in these high seas, she is on the point of sinking.

Alas, Amiral de France de Toulouse in Tonnant knows the battle cannot be won, and in high seas begins to break off the engagement and head for home. As he steers the French ships round, they fire on HMS Prince George, which catches fire. Further down the line, the Spanish reply against the Dutch, with broadsides from Santo Domingo to Jesus Maria Jose and Dordrecht receives some damage. Having captured her prize, Sage attempts to separate from the Norfolk, but the high seas prevent this, and so they remain lashed together.

Damage so far:- Anglo-Dutch = 36 Franco-Spanish = 41.
Subsolanus still blows from the south-east, at maximum strength.

HMS Swiftsure leads the Anglo-Dutch line of battle round, preparing to head back to Gibraltar. The other ships behind turn in response. Meanwhile, a combination of broadsides from Graaf van Albemarle and heavy seas claims Sérieux, which sinks, with the loss of all hands… The high winds and Fortuna Belli help extinguish the fires on HMS Prince George, and she escapes to fight another day.

The Sage and Norfolk manage to break free in the high seas, and both damaged ships begin turning for home, in the direction of the rest of the fleet. The Franco-Spanish ships are out of range of the Anglo-Dutch in the high seas, so the fight cannot continue. The task is now to get home safely in the ensuing storm.

Damage so far:- Anglo-Dutch = 36 Franco-Spanish = 42.
Subsolanus gives way to Vulturnus, blowing from the East, with slightly reduced force.

The turn to home by the Anglo-Dutch fleet continues, with each ship turning at the same point.

The Franco-Spanish fleet continue to slip away in the high seas.

Damage so far:- Anglo-Dutch = 36 Franco-Spanish = 42.
Vulturnus gives way to Caecius, the Venti of the freezing north east wind, at moderate strength. This direction plays havoc with the remaining lines of battle, which must tack to accomodate the weather.

Alas for Caecius! He scatters the line of battle of the Anglo-Dutch fleet waiting patiently for their appointed time to turn, forcing them towards the English red squadron, which will have to take avoiding action shortly.

The Spanish ships scatter too, off towards the south-east.

Damage so far:- Anglo-Dutch = 36 Franco-Spanish = 42.
Caecius, the Venti of the freezing north east wind, continues his mischief.

The English squadrons scatter to the north west to avoid the approaching English and Dutch ships. It will take a considerable time to regroup all the squadrons into something battle worthy.

The Franco-Spanish fleet have their own disorder to attend to and sail for home, as do the Anglo-Dutch fleet. Thus the Battle of Vélez-Málaga Redux comes to an end.
Victoria sends her blessing to Admiral Sir George Rooke, commander Anglo-Dutch Fleet, and strikes a medal celebrating his victory; Imperium Pelagi, dominion of the sea.

An animated gif of the battle is below.

The Admirals fighting this encounter were:-
Admiral Sir George Rooke, commander Anglo-Dutch Fleet.

Amiral de France de Toulouse, commander Franco-Spanish Fleet.


Finis
1708 The Battle of Oudenarde and War Spanish Succession Battles Battle of Oudenarde, duc de Bourgogne, Duke of Marlborough, George II, James III, John William Friso, Jonathan Swift, Louis de France, The Battle of Oudenarde, War of the Spanish Succession 7:58 am
![]()

![]()
This was the third major battle that the Duke of Marlborough fought against Bourbon France during the War of the Spanish Succession.
He led a confederate army comprised of troops from
Britain

The United Provinces

Hannover

Austrian Empire

and Prussia

against the Franco-Bavarian army, comprised of troops from
France

French mercenaries from
Switzerland

and Ireland

troops from the Spanish Netherlands

and finally
Bavaria

The battle is famous for a number of reasons
It was an encounter battle – very rare in the early to middle part of the 18th Century, albeit planned by the Duke of Marlborough.

It evolved into a full scale battle, with troops arriving to take up positions, with a message sent but never received , lost on the battlefield (the realm of chance) that turned the course of the battle and European history.
It had a famous Prussian cavalry charge with General Natzmer, at the head of the Prussian cuirassiers, charged the French horse guards in reserve, while infantry fire from the hedgerows mowed down his cuirassiers. So dreadful was the fire that half the Prussian cavalry were slain, and the rest escaped with difficulty, hotly pursued by the French household troops.
Marlborough developed his line of battle into an envelopment of the French position – again very rare at this point in military history. Only nightfall prevented a significant number of the French troops from being captured.

It involved 4 potential rulers in Europe; heirs to the King of England, a possible Stadholder of the United Provinces and a King of France fighting on opposing sides. Only one would eventually rule, although all would survive the battle.
George II (serving in the Hanoverian cavalry, who charged and had his horse shot from beneath him). He succeeded to the throne of Great Britain and Elector of Hanover in 1727


James III (the Old Pretender) who never succeeded to the throne, served with the French as the Chevalier de St George.

Louis de France, duc de Bourgogne served disastrously as joint leader of the French forces. He died in 1712, and his son, Louis XV, succeeded to the throne of France, on the death of his Great Grandfather, le Roi Soleil.

And finally, John William Friso, Prince of Orange, who led the Dutch troops enveloping the French position. He died by accidental drowning in 1711, but his descendants are on the hereditary thrones of Europe, including The Netherlands and the United Kingdom.

It was the third of Marlborough’s famous four battles in the War of the Spanish Succession and led to the retreat of the French from the Spanish Netherlands and the eventual capture of the fortress of Lille.

My description of the causes of the War of the Spanish Succession and the Battle of Oudenarde can be found here, in Baroque style.
It includes stills from Kubrick’s Barry Lyndon (Seven Years War, but they give the feel of 18th Century warfare). The maps describing the battle are from Churchill’s Marlborough, his life and times Part 2 (1936) and from Chandler’s Marlborough as a Military Commander (1973).
A poem written by Jonathan Swift, celebrating the victory, can be found here. Notice the vitriolic reserved for the Chevalier de St George (which he styled the Popish pretender), compared to the lavish praise for Young Hanover Brave (the future George II), marking the poets political allegiance at the time of writing.
The city of Oudenarde is celebrating the battle this year. Links can be found here.
Current maps of the area, in detail and relief are shown below.

Present day Oudenarde has expanded out to encompass Eyne, and some of the rivers have been drained, but largely the topography remains the same. Notice that the Flemish spelling of the places names is somewhat different than those used in military accounts (e.g. Ouwegem = Royegem, River Wallebeck = River Norken).
A new book has just been published reviewing the battle by Partizan Press
A full wargames re-enactment of the battle can be found here, using these rules.
1708 The Battle of Oudenarde and War Spanish Succession Battles and Wargames Battle of Oudenarde, Fortuna Belli, Victoria, War of the Spanish Succession, Wargames 7:07 am
![]()

![]()
On the 300th anniversary of the battle, a wargame re-enactment was staged at the University of Leeds. The rules used for the re-enactment are found here.
One figure represents 60 men, with units arriving on the battlefield broadly as they did on the day in 1708. In total about 27,000 troops per side (about 30 battalions and 60 squadrons of cavalry) would eventually be deployed at this scale, as the engagement battle proceeded; which is about a 1/3 of those involved on the day. The individual regiments in the armies can be found here.
Kubrick’s film, Barry Lyndon, gives the feel of 18th Century warfare from the soldiers point of view. Bear this in mind as the sequence unfolds!
The battlefield was rescaled so that the action covered approximately 3 x 1.8 km, at a level of 1mm = 2m, so the battlefield spread over boards of length 1.5m by 0.9m. The layout is shown below, with each village represented by a house.

In the description of the re-enactment below, the terms left, centre and right describe the battlefield from the French view, looking towards Oudenarde. Broadly the left covers the ground between the river Scheldt and the village of Herlegem, the centre between Herlegem and the windmill at Royegem, and the right between Royegem and the river Norken.
The Grand Alliance must push the French back as far as they can towards the river Norken, the French to trap the Grand Alliance against their bridgeheads, across the river Scheldt around Oudenarde.
The full battle sequence follows, with each move representing 5 minutes. Each picture has short action comments for aficionados, and a running commentary on overall progress is provided throughout the sequence.
![]()


Move 1 3:30 pm (time of the start of the battle on 11th July 1708 )
As per the original battle, the Prussians rout the Swiss troops before the village of Eyne.

Move 2
The French troops crossing the river Norken begin to deploy into line, ready to advance. Vive le Roi! Avant mars!

Move 3 = 3:45 pm (+15 minutes).
A major change to the original battle as the Grand Alliance commander decides to send his Hanoverian cavalry around the battlefield to flank the French by the windmill at Royegem. This will take time and is a gamble, but we’ll see eventually how things work out.

Move 4
“Mitt Gott für König und Vaterland. Schwenk Marsch, Trab!” The Prussian infantry pass through Eyne village.

Move 5.
The Prussians begin marching onto the next village, Heurne, protected by another Swiss battalion. Meanwhile to their rear, the French have deployed a brigade, ready to advance, led by Maréchal Vendôme.
C’est lui, dont les dieux ont fait choix
Pour combler le bonheur de l’Empire Français

Move 6 = 4pm (+30 minutes)
The French begin their advance in an attempt to put a defensive line across from the villages of Herlegem to Heurne, sealing off their left flank. Will they get there before the Prussians? Will the Swiss be able to withstand the storm if relief does not arrive?

Move 7
French cavalry cross the river Norken by the village of Mullem.

Move 8.
The Hanoverian cavalry reach the top of the Boser Couter, and are ready to begin sweeping down onto the windmill at Royegem. The move has been spotted by the French, who have cavalry regiments in waiting for them just before the windmill. Maréchal Vendôme leads the French infantry through the villages of Herlegem and Groenewalde as the Prussians continue their advance. Meanwhile the Swabian troops of the Grand Alliance, led by The Duke of Marlborough begin their sweep around Dienpenbecke.

Move 9 = 4.15pm (+45 minutes)
Swiss troops are finally rallied by Maréchal Vendôme. It looks as if the French will arrive before the Prussians to form their defensive line across their left flank. Expect a fire fight soon to see who controls these villages.

Move 10

Move 11
Swiss and French battalions move forward to engage the Prussians. Fortuna Belli smiles on the army of le Roi Soleil as the Prussians are disrupted by the exchange of fire from the Swiss, and the French hold their own despite being outnumbered 2:1.

Move 12 = 4.30pm (+1 hour)
The Prussians before the Swiss troops break under fire as the odds swing rapidly against them and they run back towards the safety of the village of Eyne. The Prussian battalion on the left of their line become disrupted under artillery & musket fire.

Move 13
The Prussians disintegrate under fire and the troops start fleeing towards Schaerken. The French cavalry in reserve sense their moment and advance, “En avant, mes enfants! En avant, à la gloire!” The French have secured the left flank of the battlefield. Can they push on, take Eyne and threaten to trap the Grand Alliance bridgehead across the river Scheldt?

Move 14
One of the Prussian battalions is caught in the open by the pursuing French cavalry. The rest of the army looks on horrified, Fortuna Belli in her worst aspect. Meanwhile one of the other Prussian battalions has rallied to form a disordered square, which might hold against the second encroaching French cavalry regiment. The Hanoverian cavalry begin their advance off the heights of the Boser Couter towards Royegem.

Move 15 = 4.45pm (1hr 15 minutes)
The French engage the shaken Prussian square with artillery and musketry. Meanwhile the pursuit of the fleeing Prussians continues, with no quarter given. The advancing Austrian infantry forms square in defence against the oncoming wave. Meanwhile around Herlegem, Prussian and French infantry begin a fire exchange. Will the Prussians luck improve?

Move 16
Fortuna Belli frowns as the shaken Prussian square breaks. The French attack them again with cavalry; the Prussians flee as fast as they can towards safety in the form of the boggy ground around the River Diepenebeck, where horses cannot pass. At Herlegem, the Prussians break under fire. Thus their entire advance across the battlefield has failed.

Move 17
‘Es-tu prête à tout sacrifier?’ ‘Nous battra jusqu’au bout.’
Driven by their successes, the headstrong French cavalry charge a formed square in the belief they can break them. Under artillery and musket fire, the square beats them off and the cavalry rout. The Swiss and Austrian troops exchange fire. Meanwhile the first British line is deployed around Schaerken. About the mill by Royegem, the Hanoverian and French cavalry start their long anticipated duel, with the French becoming disrupted.

Move 18 = 5:00pm (+1hr 30 minutes)
Under fire, the Austrians rout towards Eyne. On the right flank about the mill at Royegem, the cavalry duel continues, with both front lines disrupted. Who will break first?

Move 19
About Royegem the French cavalry breaks first, and the disorganized second line moves up to continue the fight. Before Eyne, the remaining French cavalry also try their luck on a fully formed square.


Move 20
The French cavalry is easily beaten off by the square with supporting artillery and the troopers rout. The Bavarians have made steady progress across the battlefield and are soon to occupy the the villages of Herlegem and Groenewalde. A new brigade of French troops has formed behind the River Norken and will shortly set off. About the Mill at Royegem the cavalry duel continues, with odds slightly in favour of the Hanoverians and the fast approaching Swabians. Meanwhile, the Austrians are receiving the worst of a fire fight with the Swiss by the banks of the Scheldt.
So far Fortuna Belli has smiled more on the French. The Grand Alliance bridgehead has held with more troops pouring onto the battlefield each move , but their progress has been less than desired. They must break out if they are to succeed.
This is the last move at Leeds University on the day of the anniversary of the battle. Now the action switches to another location with the board and troops being set up again.

Move 21 = 5:15pm (1hr 45 minutes)
The French have now formed a line midway between the villages across the battlefield from the Scheldt to the edge of the marshy ground, covering their left and centre. Austrians rout under fire by the Scheldt, but British battalions move into the centre, whilst at the left of their line Swabians deploy into line of battle. At the cavalry duel by Royegem, French cavalry flee the battlefield. To their rear, the Maison du Roi begin their advance to the front line.

Move 22
The Austrian and Prussian troops continue routing down by the Scheldt, but in the centre of the French defensive line, a battalion becomes disrupted from artillery fire. The Swabians swing into line, ready to press their attack. French cavalry continue fleeing from Royegem as the crack Maison du Roi regiments move forward to fill the gap they have left.

Move 23
The French and Swabian infantry begin their fire fight, along the line before Diepenbeck, with both becoming disrupted in the process. Fortuna Belli frowns and the French battalion under artillery fire routs, leaving a gap in the French line. Can the Grand Alliance exploit this and regain the initiative before the Bavarian second line at Herlegem seals the gap?

Move 24 = 5:30pm (+2 hours)
At the extreme of their central line, a French battalion routs, with the rest still engaged in a fire fight with the Swabians. The British join the end of the line formed by the Austrians and the remnants of the initial Prussian attack.
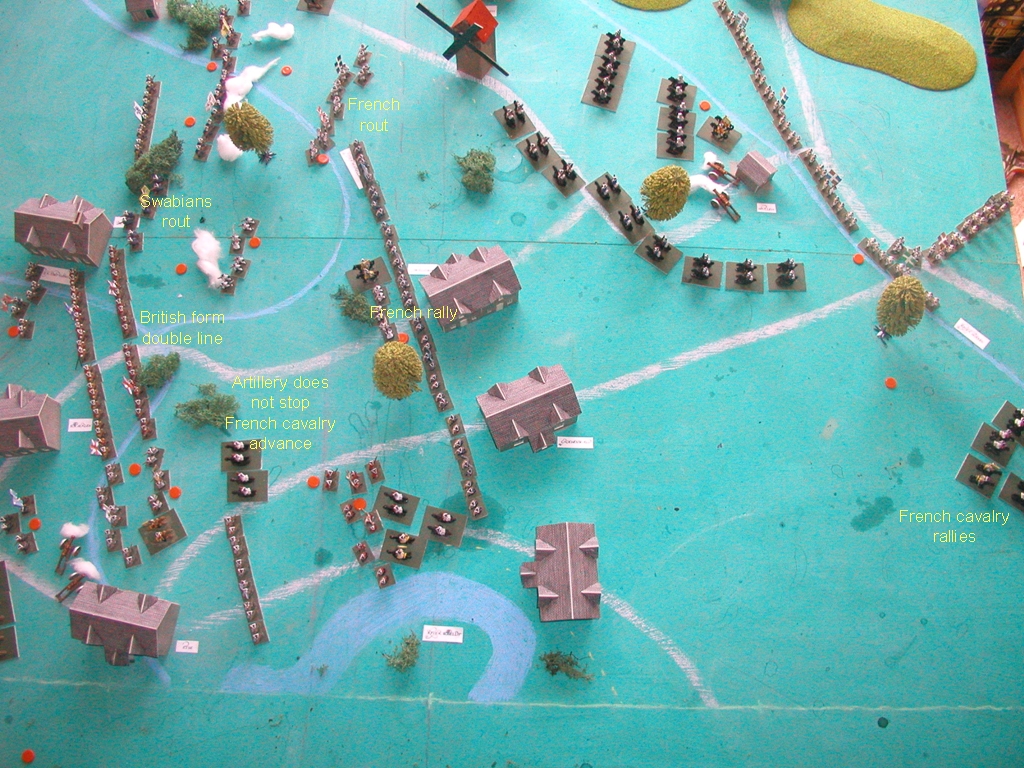
Move 25
The French line still continues to crumble into rout, leaving one of their battalions before Diepenbeck victorious, but isolated. French cavalry begin to challenge the Austrians and British, who must from square for protection. Their artillery fail to stop the French advance.

Move 26
The French cavalry break the shaken Austrian square, forcing the British infantry into squares for self defence. About Royegem a regiment of French Dragoons dismount and deploy, ready to cover the flank of the routing French infantry.

Move 27 = 5:45pm (+2 hours 15 minutes)
British cavalry advance before Schaerken and attack their French counterparts who fight bravely on after having broken the Austrian square. The Swabians begin to advance after winning their first fire fight with the French. Maréchal Vendôme orders a battalion of Bavarians into square to allow the fleeing French troops through their line before Herlegem.

Move 28
Fortuna Belli smiles on the French cavalry, who against the odds manage to fight on and hold off the British cavalry. British infantry begin to advance to the centre of the French position. By Royegem, the Hanoverian cavalry rout. French dragoons deployed to the rear of the line at Royegem are ordered to cross the field to the village of Groenenwalde.

Move 29
Still the French cavalry fight on against the odds. Hanoverian infantry begin to advance into the battlefield. A fierce firefight erupts across the centre, between the Swabians, and the French and their Bavarian allies. To the rear of this line, another line of French infantry advances. This gives them three lines in depth, surely enough troops to continue to advance?

Move 30 = 6:00pm (+2 hours 30 minutes)
The odds finally swing against the French cavalry before Schaerken and they break, having held off superior numbers for 15 minutes. In the centre, the Grand Alliance hold a shaken line that still advances against an even more ragged French line. About Royegem, the Maison du Roi advance into combat.

Move 31
The French centre breaks in confusion as the cry ‘Sauve qui peut’ goes up. The British cavalry reorganises after winning their fight. A shaken French cavalry regiment moves forward to meet them.


Move 32
The French cavalry regiment breaks under artillery fire, leaving the British to advance across the left flank, forcing the Bavarians before the villages of Herlegem and Gronenewalde into square. Meanwhile the Royal Regiment of Orkney Highlanders try to storm the village of Herlegem, held by the Swiss. About the centre, the fleeing French troops throw their second line into chaos, threatening their ability to maintain a fighting force. Maréchal Vendôme tries his best to rescue the situation.

Move 33 = 6:15pm (+2 hours 45 minutes)
Fortuna Belli now smiles on the Grand Alliance. One of the Bavarian squares is broken, with the troops fleeing for their lives into the village of Groenewalde. The rout in the centre becomes more confused as some units rally but others continue to flee. The only setback for the Grand Alliance befalls the Highlanders, who are repulsed from Herlegem by the Swiss troops ensconced there.

Move 34
The Royal Regiment of Orkneys rallies before Herlegem before trying their luck again. The Swabians try to push forward to exploit the turmoil in the French centre, but are broken by French artillery. Maréchal Vendôme is slowly stabilising his troops in the centre, but he cannot prevent a regiment from crossing the river Norken, and so going out of the battle.

Move 35
A Bavarian square manages to hold off a cavalry charge, which swirls around it in frustration, getting more disorganised. About Eyne, the Dutch cavalry arrive before the infantry columns, which are close behind. Meanwhile the Hanoverian and British infantry press on forwards.

Move 36 = 6:30 (+3 hours)
The Bavarian cavalry have successfully beaten off their attacking cavalry, which routs in confusion. At last, the Dutch infantry columns make their entrance onto the battlefield after crossing the river Scheldt by Oudenarde. Austrian troops try to take the village of Heurne from the Swiss, but become disorganised. Maréchal Vendôme has stopped his troops in the centre from routing, and they slowly get back into order. About Royegem, the first line of the Maison du Roi rout, but the second line in turn rout the Swabian cavalry in a great counter charge.

Move 37
The British cavalry win their duel with the French down by the village of Heurne. Meanwhile a fierce struggle erupts for control of the village of Herlegem, with the Swiss hanging on. The Bavarian square still hold out against cavalry attack, as infantry move up in close support.

Move 38
The Bavarian square breaks, and the survivors run for cover in the village of Groenewalde. The struggle for Herlegem continues with the Swiss still hanging on against odds of 2:1. The successful British cavalry wheel leftwards to attack the French Dragoons. Meanwhile by Royegem, Bavarian cuirassiers about turn and begin moving towards the left. If the Maison du Roi fail to hold the line, the French will not have a reserve for their right flank, but the Dutch advance threatens the centre and left.

Move 39 6:45 (+3 hours 15 minutes)
The French face simultaneous reverses across the battlefield as Fortuna Belli smiles on the Grand Alliance. By Royegem, the Maison du Roi finally crack from fatigue and begin routing. Thus the gambit the Grand Alliance made at the beginning of the battle by trying to flank the French by Royegem has finally paid off. The struggle for Herlegem is lost as British troops storm the village, ejecting the Swiss. On the left flank, the French Dragoons flee as the British cavalry are victorious again. This forces substantial numbers of French and Bavarian infantry into square, immobilising them.

Move 40
The fight for the villages swings to Groenewalde and Heurne. Bavarian cuirassiers sweep past their infantry, temporarily allowing them to form back into line of battle. The Grand Alliance start to move their artillery forward to help deliver the coup de grâce.

Move 41
Having successfully rallied his men earlier, Maréchal Vendôme is loath to order a general retreat. And yet he sees more Dutch cavalry pouring towards his block from the Bavarian cuirassiers, so he knows it’s only a matter of time. With a heavy heart he orders retreat which swiftly turns to cries of ‘Sauve qui peut’. Fortuna Belli has frowned on him today. And yet he was close; an hour and a half earlier, he was pressing Malbrough back against Dienpenbeck and Eyne. Another day, another place, he swears avant les dieux, he shall be the Tapissier de Notre Dame…

Move 42 7:00 (+3 hours 30 minutes)
Only 1 hour 30 minutes of daylight left. The Grand Alliance have won this battle, with the full weight of their reserves not committed yet. The French have given way on the left, centre and right flanks, as the villages of Groenewalde and Heurne falling. The cry ‘Sauve qui peut’ echoes down the French line. Maréchal Vendôme senses his best course is to extract what he can of his army for another day, with those able crossing the River Norken for safety. Some of the remaining French infantry is locked into squares as Grand Alliance cavalry encircles them. If the Grand Alliance cavalry can capture the French artillery, then a fine victory will ensue.

Move 43
The Bavarian cuirassiers rout before the Dutch cavalry. Meanwhile as many of the French infantry struggle over the river Norken as they can.

Move 44
The Grand Alliance cavalry sweep towards the French artillery which must surely succumb to weight of numbers and the speed of their advance. A ragged line of French infantry in defence forms behind the river Norken, but with night beginning to fall, the Grand Alliance advance will soon halt for the night.

Move 45 7:15 (+3 hours 45 minutes)
In possession of the field of battle, the Grand Alliance have a fine victory. The bulk of the French army has been pushed across the river Norken and the remaining French battalions encircled, with all their artillery captured. With only over 1 hours daylight left, His Grace The Duke of Marlborough, will offer terms to those battalions of French squares remaining once he can reign in the cavalry from further attacks.
In terms of victory points, the margin (30+) suggests a decisive victory to the Grand Alliance, and once again Fortuna Belli has smiled on the Duke of Marlborough; Victoria sends her blessings in the form of captured standards to bedeck Westminster Hall.
Swift writes his paean to another famous victory:-
”Ye Commons and Peers,
Pray lend me your ears,
I’ll sing you a song, (if I can,)
How Lewis le Grand
Was put to a stand,
By the arms of our gracious Queen Anne.
How his army so great,
Had a total defeat,
And close by the river Dender:
Where his grandchildren twain,
For fear of being slain,
Gallop’d off with the Popish Pretender.’
Though Bruges and Ghent
To Monsieur we lent,
With interest they shall repay ’em;
While Paris may sing,
With her sorrowful king,
Nunc dimittis instead of Te Deum.
O Lewis perplex’d,
What general next!
Thou hast hitherto changed in vain;
He has beat ’em all round,
If no new one’s found,
He shall beat ’em over again.”
An animated gif of the battle sequence is below.

The Generals involved in the real battle and their counterparts in the re-enactment were


The Generals involved in the 21st century were John, Mark, Ian and Ben.


Rules used for fighting this and other Marlburian battles can be found here.
Thanks to Dixon’s Miniatures for the figures, and to warflag.com for the flags

Finis
Age of Gloire and Dutch War Battles and Nine Years War Battles and War Spanish Succession Battles and Wargame Rules War of the Spanish Succession, Wargames 11:09 am
1 Introduction
These rules give a simplified version of combat during the French Wars (1667-1714), especially for the Nine Years War (1688-1697) and the War of the Spanish Succession (1701 – 1714). The game works at the level of operational units, such as infantry battalions, cavalry regiments or artillery batteries, each with their own characteristics. These three types of units form a balance of forces, which are opposed. Combat is resolved by calculating the quality and quantity of troops involved, modified by probability to yield the result, hence winning an individual action on the battlefield. The sum of these small encounters mounts up towards an overall victory. Thus, battles of the time can be simulated, with odds on victory weighted towards those with larger numbers of better quality troops and their tactical deployment. Using these rules, large actions at divisional level per side can be managed within a reasonable time and playing space. Full scale battle reenactments can be managed by ‘scaling down’ the troops deployed each side, to keep the proportions the same on the chosen playing surface.
Text below in italics and bold font link to tables which are used in the game. Click on the text, and it should take you directly to the relevant table, and click again to enlarge if necessary. Use your browsers back button to return to the rules.
2 Equipment
2.1 Playing surface
Hardboard of various sizes joined together can quickly make a suitable surface. A total area of 1.5 m by 1.2m (5’ by 4’) suffices for most games.
2.1.1 Game scale
1 mm on the board = 2 m on the battlefield. Thus a 1.5 m by 1.2 m board scales to 3 km by 2.4 km.
2.2 Tape measure
A retractable metric tape measure that spans the playing area is needed.
2.3 Random Number generator
The game uses a random number generator found on scientific calculators, online websites or by an excel spreadsheet to add the necessary element of chance in conflict.
2.4 Infantry, cavalry and artillery and command units
There are 4 types of units in the battle based of the three main arms; infantry, cavalry and artillery. In addition there are command units. The number of figures required depend upon the scale used. 15mm scale figures require 2 figures per base unit. 25 mm scale figures require 1 figure per base unit.
2.4.1 Infantry (battalion)
An infantry battalion is initially comprised of 5 base units. Each base unit is 20 mm by 15 mm, and has 2 figures mounted (if 15mm scale figures) or 1 figure mounted (if 25 mm scale figures). Thus in line formation, the frontage is 100 mm wide, equal to 200 m on the battlefield. Each base unit represents 100-125 men, so a battalion would have a field strength of 500-625 men.
Infantry battalions are grouped together into regiments, in turn grouped into brigades or divisions as required.
Infantry comes in various levels of quality. These typically include:-
Guards
Line
Dismounted Dragoons
The details of these troops for each of the main armies are given in the National Army tables.
2.4.2 Cavalry (regiment)
A cavalry squadron comprises of 1 base unit, 30 mm by 40 mm, and has 2 figures mounted (if 15mm scale figures) or 1 figure mounted (if 25mm scale figures). 3 or 4 squadrons of similar types of cavalry form a cavalry regiment. Thus in line formation with 4 base units, the frontage is 120 mm, equal to 240 m on the battlefield. Each base unit represents 100-125 men, so a cavalry regiment would have a field strength of 300-500 men.
Cavalry regiments are grouped either into the larger infantry divisions, or as separate cavalry divisions.
There are 3 main types of cavalry; heavy, medium and dragoons.
Heavy cavalry includes Cuirassiers and Regulars. These have the greatest shock value, but move at the slowest rate. They typically charged home with the sword only, hence their greater shock value.
Medium cavalry was armed using carbines, and attempted to engage using this weapon in preference to the sword via a modified form of caracole.
Dragoons have intermediate shock value, and move at a slower rate than heavy cavalry. They can act as cavalry, or can dismount and act as infantry. To dismount or mount up between the two states takes a move.
The details of these troops for each of the main armies are given in the National Army tables.
2.4.3 Artillery (battery)
One cannon occupies a front of 20mm, represents a single battery of 8-10 guns, with an attendant horse figurine, which is placed on the board showing the direction of travel if the piece is being moved.
2.4.4 Command units
Generals and attendant staff comprise 1 base units, 30 mm by 40 mm, and has 2 figures mounted (if 15mm scale figures) or 1 figure mounted (if 25mm scale figures).
Messengers sent by the General to communicate his wishes to the troops under his command comprise 1 base unit, 20 mm by 40 mm, with 1 figure mounted, regardless of the scale of the figures used.
Generals and messengers move at the fastest rate of all the types of troops above, but they have no fighting potential of their own, they act to modify the potential of troops around them.
2.5 Disorganised counters
As troops become disorganised, they are disrupted in formation. A small orange counter is placed by the unit for as long as it remains disrupted.
2.6 Time counter
Either mark the time in the battle off the victory table (see section 9.6), or use a specially created clock dial, which moves with each game turn. Each turn, comprising of a first and second player phase, represents 5 minutes on the battlefield.
3 Game setup
3.1 Battlefield scenery
3.1.1 Playing surface
Covering the area with PVA glue and using green railway scatter foam makes an attractive looking surface.
3.1.2 Hills
Polystyrene foam tiles can be cut to shape and added as required, with each layer representing 100m. Layers of the foam tiles can be placed on top of each other to create higher hills and mountains. Covering the surface with PVA glue and using green railway scatter foam makes it look attractive.
3.1.3 Rivers and lakes
Blue felt strips 20mm by 60mm can be added together to make rivers or lakes.
3.1.4 Villages and towns
N gauge railway houses can be added to represent villages (a single house) or towns (as many houses as required). Each house can shelter one infantry battalion or cavalry regiment.
3.1.5 Roads
Brown felt strips 20mm by 60mm can be added together to make roads.
3.1.6 Rough ground
Grey railway scatter foam denotes areas of rough ground.
3.1.7 Woodland
N gauge railway trees can be added to the battlefield, together with green railway scatter foam to create woodland areas. Glueing each tree to a solid base (2p coins) help keep the trees from toppling over.
3.2 Troop deployment
Troop deployment is relatively straightforward if recreating a historical battle. Simply follow the known pattern, keeping the troop density scaled to the size of the playing area. If creating an imaginary battle, keep in mind the numbers and type of deployments typical of the age.
If fighting an encounter battle, when not all the troops are on the battlefield at the start, deploy the troops at the designated time.
Before the battle starts, calculate the total number of troops on the battlefield and determine how many base units this comes to, then determine how many of base units are needed to reach 15% of the total and at 5% intervals thereafter, and mark these values off in the victory table. If additional reinforcements arrive during the battle, add these extra troops to the initial value and keep a further tally of the new total number of troops. Recalculate the number of base units needed to reach 15% of the total and at 5% intervals thereafter, and mark these values off in the victory table. This becomes important when determining any crisis of morale as the game progresses and casualty levels rise.
4 Playing sequence
The game proceeds in turn sequences, with the first army taking the attacking stage, and the second army in the defensive stage, regarding any combat.
The sequence is:-
(a) Disruption and rout removal phase – section 5
(b) Artillery fire phase – section 6
(c) Orders and movement phase – section 7
(d) Combat phase – section 8
(e) Crisis of morale phase – section 9
This completes the first part of the turn.
The game now proceeds to the next turn sequence (steps a-e), with the second army taking the attacking stage, and the first army in the defensive stage, regarding and combat. This completes the second part of the turn.
The game has now finished one turn, and the time counter progresses by 5 minutes in the victory table, before beginning the next turn.
Each stage in the turn is explained in more detail in sections 5-9.
5 Disruption and rout removal phase
Only the army in the active, attacking stage of each turn can rally troops.
5.1 Disrupted troops
Disrupted units may be rallied by generating a random number and comparing the result in the National Army tables for the unit’s morale. If the random number matches or exceeds the value in the table, the unit becomes organised again, otherwise the unit remains disorganised for the turn.
Disrupted units behave in terms of movement as normal units. Their combat potential is reduced, according to the National Army tables.
5.2 Routing troops
Routing units need a random number ≥ 0.800 to stop routing, becoming disrupted for the turn, and until being rallied by the process described above in 5.1. If they fail to rally, they continue to rout at charge speed in the most obvious direction for their safety. If they should pass through friendly units during their rout, they disorganise these units.
5.3 Generals and their effect on morale
If the troops are under fire from artillery or in combat, the General must see if he survives for each turn he wishes to modify the morale. Generate a random number and compare the result to the following table for Generals under fire. Apply the results immediately.
If the Generals survive the outcome above, their presence results in +0.100 being added (Marlborough adds +0.200) to any random number generated for disrupted or routing troops, thus improving their odds.
6 Artillery firing phase
The army taking the attacking stage fires as many of their artillery batteries in the organised state as they wish. Those in the disrupted state may not fire that turn. Each artillery battery fires once per turn, on one unit at a time (such as an infantry battalion, cavalry regiment or another artillery battery).
The effectiveness of artillery changes with range. To see if the target is affected, measure the distance between the artillery unit and the target. Generate a random number and consult the artillery table to see what damage on the enemy unit they inflict. Note that foot batteries are more effective than horse batteries, which is reflected in the artillery tables.
Artillery can only fire on visible units by direct line of sight (i.e. they can’t fire on units hidden behind hills, villages, or hidden behind other units etc). Take account of the reduction of visibility that occurs with dusk if the battle is being fought one hour or less before nightfall.
Artillery batteries are captured if enemy units pass through cannons, becoming eventually their active units. It takes one full move for a captured battery to become active again. The capturing unit must remove one base unit from play, as these now become the new artillerymen manning the artillery battery.
Artillery batteries which fire may not limber up to move in the turn that they fire. To limber or unlimber a battery takes a full move, with the artillery unit capable of moving or firing in the next move respectively.
7 Orders and movement phase
7.1 Orders phase
Armies during the French wars of the latter 17th Century and early 18th Century were controlled by a hierarchy of command, which was strictly observed with the exception of the French, where a degree of initiative was encouraged. It is not the intention of the game to proceed as chess, where any piece can be moved at whim, so the rules try to reflect the decision making process and the vagaries that often happened on the battlefield. The Generals fighting the wargame use suspension of disbelief. If enemy troops are bearing down unseen upon another army because of restrictions in visibility, no reaction to this threat can occur until it becomes visibly obvious, as often happened during battles of the period.
7.1.1 Initial orders
At the beginning of the battle, each division or brigade would have initial orders from the commander in chief of the army. This would explain initial objectives (e.g. III Brigade should advance, seize the village before it, and await new orders). These orders should be performed at the beginning of the battle.
7.1.2 Change to orders
As the battle progresses, the initial orders can be superseded by new orders, conveyed either in person by the commander in chief, or by the nearest General, or from messengers from the above leaders.
If the orders are conveyed in person by the commander in chief or General, the orders are accepted without question or loss of clarity. If the orders are given by a messenger, generate a random number. If the result is ≥ 0.150, the order was understood. Once all units have received their orders, the staff officer must ride back to the General who issued the orders to report for further orders. If the result was ≤ 0.149, the order was not understood and the units will continue their existing state of action.
Messengers figures are added and removed from the board as required, and they have no combat effectiveness. They may be captured if an enemy unit passes through them, and the order should then be passed back to the nearest opposing army General.
7.2 Movement phase
The phasing player may move any or all units may be moved, up to their maximum allowance, with each unit. Consult the National Army tables for details.
7.2.1 Changing formation
Units may change formation (e.g. line to column or vice versa etc), which takes time. Infantry under cavalry attack or threat of cavalry attack must form a defensive square, bearing in mind the time constraints in moves spent in changing formation. Consequently they cannot move but may fire whilst in this formation. They can subsequently be attacked by cavalry, as described in section 8.3.
Changing formation takes time and reduces the ability to move, but not the ability to fight.
7.2.2 Organised or disrupted units moving through each other
Units in the organised state or disorganised may move through each other, but disrupt each other during the process.
7.2.3 Withdrawing units
Units may withdraw at half speed by facing the enemy (and still engage in combat) or retreat at full speed with their backs turned to the enemy, but cannot engage in combat. The enemy can engage them in combat however, and treat the troops as disrupted.
7.2.4 Routing units
Routing units continue to move directly to the rear of their army at charge speed, with their backs turned to the enemy. They will pass through any units they encounter, disrupting them as they go. If they rout off the board, they are permanently removed from the battle.
7.2.5 Effects of terrain
Terrain affects movement. Difficult terrain (e.g. hills / woods / crossing streams etc) reduce speed, roads enhance speed. Consult the National Army tables for details.
7.2.6 Charging units
Charging enemy units adds speed. Consult the National Army tables for details. Units can only charge once per six turns (i.e. once per ½ hr in real time).
7.2.7 Generals and messengers
These have a maximum speed of 200 mm per turn in any direction, regardless of terrain.
8 Combat phase
8.1 Mandatory Combat
Combat is mandatory between visible units in range, as defined below in sections 8.1.1 to 8.1.3, and 8.3.
8.1.1 Infantry vs infantry combat
Infantry must be within 0-50 mm of their enemy to attack (0 – 100 m). Count the total number of base units in a column when using this formation, even if the rear base units are greater than 50 mm away from their opponent. See 8.2 -8.4 for the odds and effect of combat.
8.1.2 Cavalry vs cavalry combat
Cavalry must be in physical contact with their opponent to attack. Count the total number of base units in a column when using this formation, even if the rear base units are not in combat with their opponent. See 8.2 -8.4 for the odds and effect of combat.
8.1.3 Cavalry or infantry vs artillery combat
Infantry must be within 0-50 mm of their enemy to attack (0 – 100 m), Cavalry must be in physical contact with their opponent to attack. Count the total number of base units in a column when using this formation, even if the rear base units are not in combat with their opponent. The artillery battery will have a combat strength of 1, regardless of whether the battery is organised or disorganised, or whether the battery has just fired on the opposing unit.
8.2 Calculating the odds of combat
To initiate a combat, first identify the combat potential of each of the opponents by counting the total number of base units and multiplying this by the attack / defence strength points (consulting the appropriate National Army tables), taking into account whether the troops are in the ordered or disordered state. Calculate the combats at battalion vs opposing battalion (for example) if an entire frontage of troops became engaged. That way the effect of the battle proceeds by the small local combats.
Now compare the attacker’s strength to the defenders strength by using the odds table. These form the basic odds which can be modified by the following.
8.3 Modifiers to combat odds and the combat results table
The result of combat now proceeds by generating a random number for each of the combats to be considered.
The following modifications are made.
8.3.1 Terrain
The phasing player with advantageous terrain either adds 0.100 to the random number (if attacking) or subtracts 0.100 (if defending).
8.3.2 Generals and their effect on combat
If the troops are under fire from artillery or in combat, the General must see if he survives for each turn he wishes to modify the morale as per section 5.3. Generate a random number and compare the result to the following table for Generals under fire. Apply the results immediately.
If the Generals survive the outcome above, their presence results in +0.100 being added (Marlborough adds +0.200) to any random number generated for combat, thus improving their odds.
8.3.3 Charging
If the troops attacking are charging, add +0.100 to any random number generated for combat.
8.3.4 Infantry attacking infantry in square
Infantry attacking opposing infantry in square add 0.100 to the random number, to account for extra ranks being hit in the densely packed formation. Infantry in square use their disrupted factor to account for reduced firepower, regardless of their state of organisation.
8.4 Combat results table
After these modifications to the random number look up the result of combat in the combat results table at the odds level decided above with the following modifications.
If an attacker uses combined forces of two types on one unit, e.g. Infantry &
Cavalry, increase the odds by 1 column e.g. 1:1 becomes 2:1.
If an attacker uses all three combined forces on one unit, e.g. Infantry, Cavalry & Artillery, increase the odds by 2 columns e.g. 1:1 becomes 3:1.
If an attacker strikes from either flank, increase the odds by 1 column e.g. 1:1
becomes 2:1.
If an attacker strikes from the rear, increase the odds by 2 columns e.g. 1:1
becomes 3:1.
Consult the combat results table, cross index the random number with the appropriate odds column to yield the result and apply the effect of combat immediately to the combat troops affected, as described in the next section.
8.5 Effects of Combat
The effects of combat are immediately applied to the troops concerned. The movements indicated also are immediately applied, even if the troops have already moved that turn. Any base units removed from play represent troops that have been either killed, wounded or captured, and the steady accumulation of such losses affect the army and its willingness to fight on.
8.5.1 Attacker routed, Ar
Ar = Attacker routed. Remove one base unit from the combat group, and mark off one victory point in the victory table. The remainder will rout from the board at charge speed until a random number ≥0.800 is thrown to rally them to the disrupted state.
8.5.2 Attacker retires, Aw
Aw = Attacker retires. Previously undisrupted units combat units are disrupted to value of opponents combat strength and withdraw facing enemy at full speed. Units must use disrupted value for all further combat and continue to retire until rallied. Attackers already disrupted remove one base unit from the game, and mark off one victory point in the victory table. The remainder will rout from the board at charge speed until a random number ≥0.800 is thrown to rally them to the disrupted state.
8.5.3 Attacker disrupted, Ar
Ad = Attacker disrupted. Previously undisrupted combat units are disrupted to the strength of their opponent and withdraw at full speed facing their opponent. Attackers already disrupted remove one base unit from the game, and mark off one victory point in the victory table. The remainder will rout from the board at charge speed until a random number ≥0.800 is thrown to rally them to the disrupted state.
8.5.4 Disruption exchanged, Dx
Dx = Disruption exchange. Previously undisrupted combat units are disrupted. Attackers already disrupted remove one base unit from the game. The remainder hold their ground for this move. Defenders already disrupted remove one base unit from the game and mark off one victory point in the victory table. The remainder will rout from the board at charge until a random number ≥0.800 is thrown to rally them to the disrupted state.
8.5.5 Defender disrupted, Dd
Dd = Defender disrupted. Previously undisrupted combat units become disrupted. Defenders already disrupted remove one base unit from the game, and mark off one victory point in the victory table. The remainder will rout from the board at charge speed until a random number ≥0.800 is thrown to rally them to the disrupted state.
8.5.6 Defender retires, Dw
Dw = Defender retires. Previously undisrupted units combat units are disrupted to value of opponents combat strength and withdraw facing enemy at full speed. Units must use disrupted value for all further combat and continue to retire until rallied. Attackers already disrupted remove one base unit from the game, and mark off one victory point in the victory table. The remainder will rout from the board at charge speed until a random number ≥0.800 is thrown to rally them to the disrupted state.
8.5.7 Defender routed, Dr
Dr = Defender routed. Remove one base unit from the combat group, and mark off one victory point in the victory table. The remainder will rout from the board at charge speed until a random number ≥0.800 is thrown to rally them to the disrupted state.
8.6 Cavalry vs infantry combat (square attack)
Infantry under threat of cavalry attack would automatically attempt to form into a square. The initial state of the infantry (i.e. normal or disrupted) is key to the effectiveness of the square as a defensive measure. It is assumed that cavalry will attempt to make physical contact with the square, regardless of its state of effectiveness and infantry will attempt to repel this by firing if within 0-50 mm of their enemy. For cavalry attacking squares, follow the table to see what happens, using the descriptions in sections 8.4.1 & 8.4.3 (cavalry) and 8.4.5 & 8.4.7 (infantry) as guidance .
Should cavalry attacking a square suffer disruption after already being disrupted, remove one base unit from the game, and mark off one victory point in the victory table. The remainder will rout from board at charge speed until a random number ≥0.800 is thrown to rally them to the disrupted state.
Should the infantry square be broken by the cavalry, then treat as though they were routed, i.e. remove one base unit from the game, and mark off one victory point in the victory table. The remainder will rout from board at charge speed until a random number ≥0.800 is thrown to rally them to the disrupted state.
Note routing infantry troops cannot reform into a square, and would be at the mercy of any pursuing cavalry, who remove a base unit from play for every move the cavalry comes into contact with the routing unit. As this happens, mark off one victory point in the victory table for every base unit removed from the game.
8.7 Control tests after routing opponent
Control tests are needed for troops in close combat that rout their opponent. Troops come under control generating a random number and comparing the result to the morale test values in the National Army tables. If the random number matches or exceeds the value in the table, the unit responds to command and may do as the player wishes; otherwise the unit will automatically pursue the fleeing troops, until rallied. Note that generals can affect the random number as described in section 5.3.
9 Crisis of morale test
9.1 Victory table
The victory table tracks both the time and the level of casualties incurred in the battle as the game progresses. For each base unit removed from the play, mark off one victory point in the victory table. Before the battle starts, calculate the total number of troops on the battlefield and determine how many base units this comes to, then determine how many of base units are needed to reach 15% of the total and at 5% intervals thereafter, and mark these values off in the victory table as per section 3.2
9.2 Crisis of morale
At the end of each move a test must be performed to see if the whole army suffers a collapse of morale (sauve qui peut). If the % level of casualties suffered exceeds for the first time the levels indicated by the crisis of morale table, a random number must be rolled for all troops in the army. The result indicates whether a crisis of morale has happened for that unit.
If the random number exceeds the level indicated for the level of casualties suffered, then the unit fights on until the next level is reached, when an assessment is made again. If the random number generated indicates a crisis of morale has occurred, then follow the guidance in the table and apply it immediately to the troops concerned. In the subsequent move, all affected units can be rallied in the normal way. Note for a % casualty level above 40%, an immediate crisis is likely to occur for a majority of troops.
Should reinforcements arrive each move onto the battlefield, then the % casualties should reflect the new combined level of troops. In this way, continuous reinforcements ‘lift’ morale, or in this game, reduce the likelihood of suffering a widespread collapse of morale.
10 Winning the battle
Possession of the battlefield normally defined the victor in this age of warfare, even if more % casualties were lost in winning the battle. The game is
constructed in such a way that this will occur eventually, with one side suffering a dramatic loss of combat effectiveness, as described in section 9 . Should the battle have to end before this point is reached (i.e. by dusk falling etc), the following is offered as guidance regarding the extent of victory.
Determine the % casualties for each army. If the difference in the % casualties between the two armies is
0 – 5%, the result is a draw.
5 -10%, the result is a marginal victory.
10-25%, the result is a major victory.
> 25%, the result is a decisive victory.
![]()
Contact the author using the comments page below if you would like further details on how to use these rules.


